Paper chromatography is a technique for separating out components in a mixture, such as for testing the purity of compounds. It has largely been replaced by more advanced analytical tools, so today it is mostly used as a teaching tool. Paper chromatography is a useful Science Club activity because it is relatively quick, requires only small quantities of inexpensive materials, and can be safely done by the youngest students. In this module, Kidizen scientists will study the composition and separation behaviors of a variety marker types and colors. They will then employ this knowledge and their chromatography skills to identify the various mystery markers from their inks alone!
Supplies
Reusable
- Dropper bottles or eye droppers
- Pencils
- Washable pens, assorted brands and colors
- Small (2-3 oz) cups
- Rulers (metric preferable; grades 4+)
- Calculators (optional; grades 4+)
- Cafeteria trays (optional)
Consumable
- Chromatography paper (preferred) or plain, smooth white paper towels
- Water
- Scratch paper (Methods 1 & 3) or Waxed paper (Method 2)
- Construction paper, 3 colors (grades 1-3)
Printable
- 1x Worksheet (age-appropriate) per student
Chromatography paper is available from many sources online for a reasonable cost, and is preferable to using paper towel. If you do use paper towels, choose white, smooth towel, the kind often used in school dispensers. Avoid any towels with embossing or printing which will interfere with the separation.
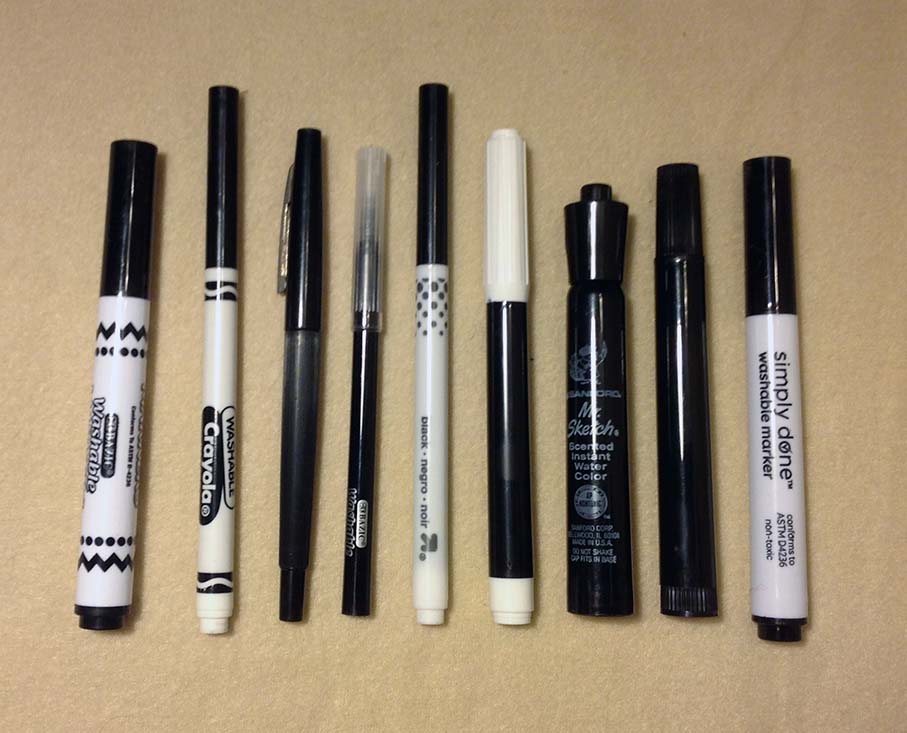
A variety of markers is best. For Part 1 of the activity, involving different solvents, a mix of washable and non-washable black markers can be used. For Part 2, in which water is the only solvent, only washable (i.e., water soluble ink) markers — in various colors — should be used. Non-washable/permanent inks won’t be affected by water at all. This would be problematic for the experiment!
Non-Water Solvents: Unless you are working with older students (e.g., middle or high school) and with appropriate fume hoods (or doing the activity outdoors), your students should not be using anything other than water during the activity. In this case, make your own examples of separations with different solvents, and bring them in (see Preparations section). Other easily accessible solvents that will work for this activity are listed in the table below, along with where to find them. Because you need so little solvent for this activity, and safely storing large amounts of these can be expensive and space-intensive, your best option is probably to ask around to see if someone already has these solvents on hand and would be willing to give you a few tablespoons.
| Solvent | Where to find it |
|---|---|
| Isopropyl alcohol 70%+ (a.k.a. rubbing alcohol, isopropanol) | Drugstore, grocery store, superstore |
| Ethyl alcohol 90%+ (a.k.a. ethanol) | Drugstore, grocery store, superstore, …or even the liquor store (Ever Clear is almost pure ethanol) |
| Acetone | Some nail polish removers; drugstore, superstore |
| Methyl ethyl ketone (MEK) | Some nail polish remover (Checks ones labeled “non-acetone”; drug store, superstore |
| Toluene | Hardware store |
| Methanol | Hardware store |
| Mixed hydrocarbons (a.k.a. “mineral spirits”) | Hardware store |
Printables
Printable worksheets, and a short presentation for calculating retention factor, can be downloaded using the following button:
Preparation
Choose one of the following methods for doing the activity:
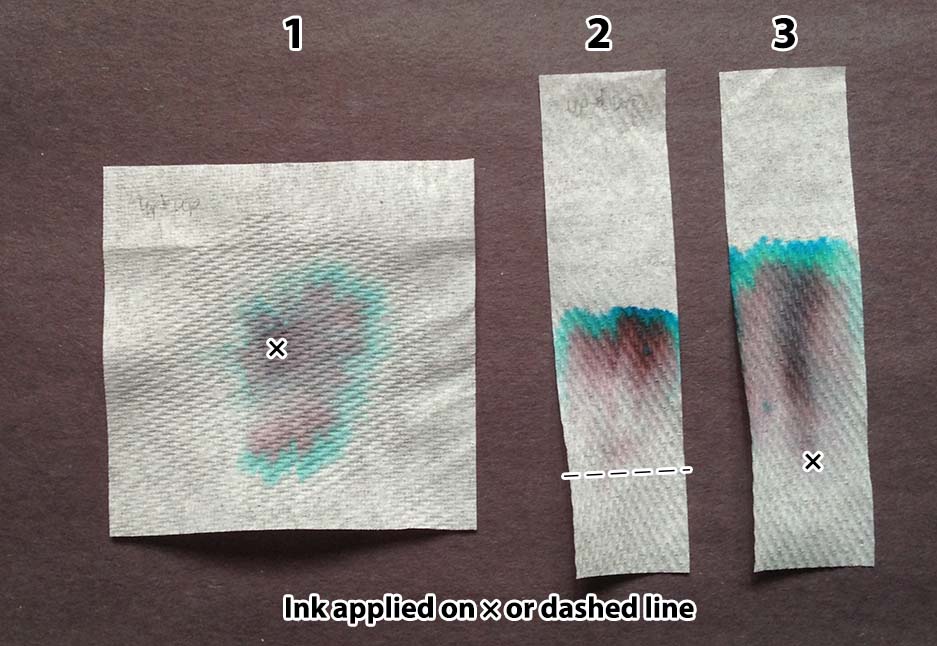
- Put a spot of ink in the center of a 3″ × 3″ piece of paper. Lay the paper over a small cup. Place three drops of water slowly one at a time onto the spot of ink, waiting for each to be absorbed before adding the next. Wait about five minutes, then place the paper onto a piece of scratch paper to dry.
- Draw a line of ink across a strip of 1″ × 4″ paper, one inch from one end. Hold that edge of the paper in about ¼ inch of water for five minutes. Remove the strip from the water and lay it on a piece of scratch paper to dry.
- Place a spot of ink about an inch above one end of a 1″ × 4″ strip of paper. Lay the strip on a piece of waxed paper. Add five drops of water slowly on the edge closest to the spot, waiting for each to be absorbed before adding the next. (This can also be done holding the bottom edge in liquid, as in Method 2.)
Depending on what method you choose, cut the paper into 1″ × 4″ strips or 3″ × 3″ squares.
If the kids are in grades 1-3 cut pieces of construction paper to fit inside name tags, three colors divided evenly among the students.
Materials for Part 1
Print the six black inks with six solvents sheets in color. Print one age-appropriate worksheet for each student. If you have the resources you may choose to create your own samples, using an assortment of washable and “permanent” black inks and a range of polar and non-polar solvents. Use the provided template to create corresponding worksheets. On the meeting day, place each sample on a separate table, with two rulers and two calculators if your students are grade 4 and older. Photos of our sheets, on chromatography paper, are shown below (click to enlarge):
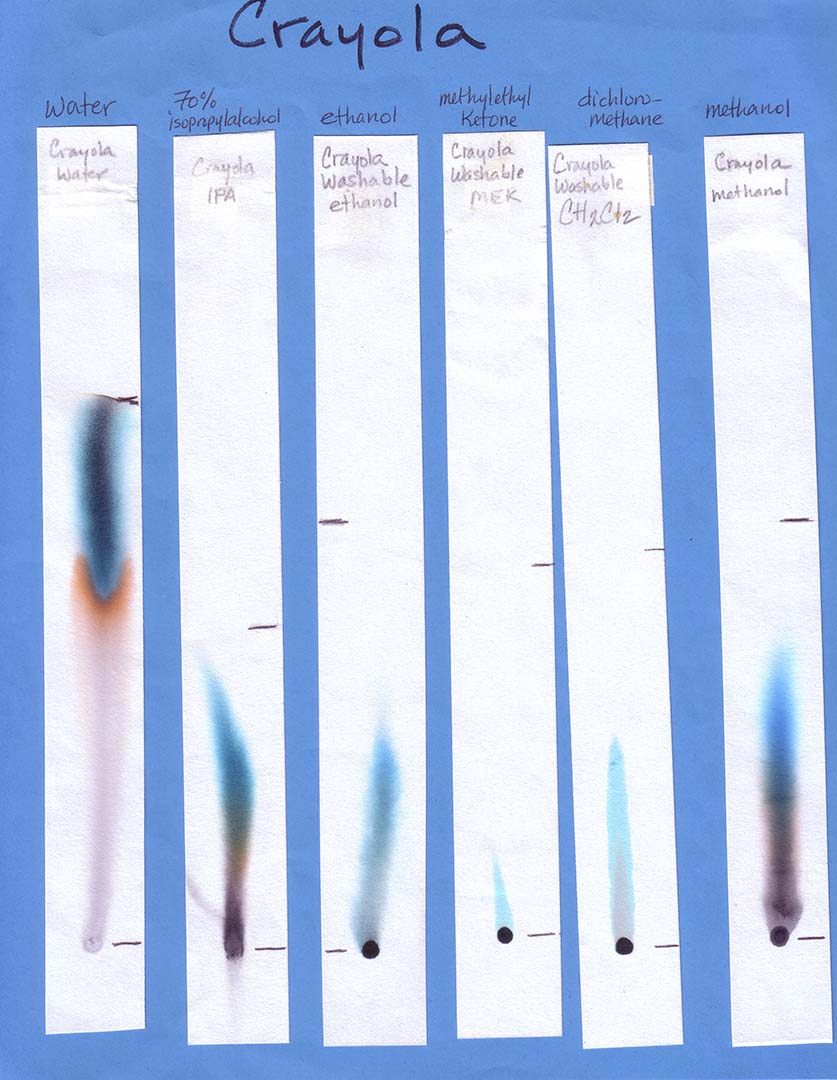
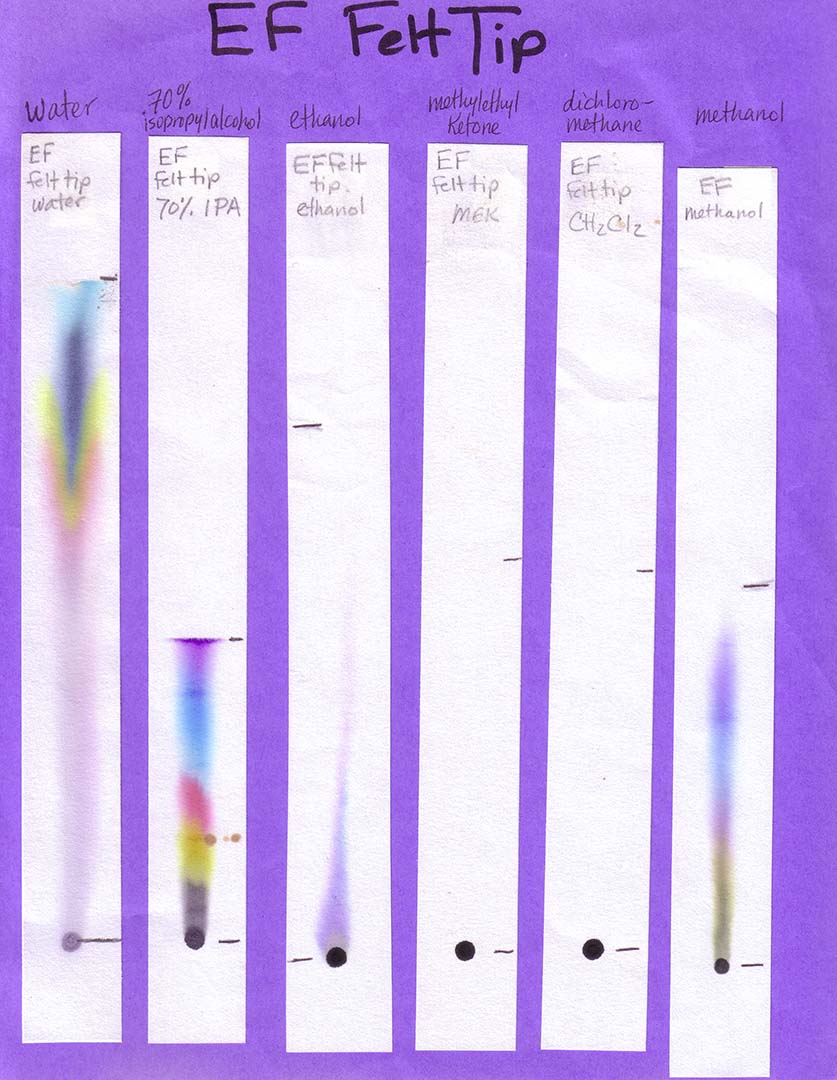
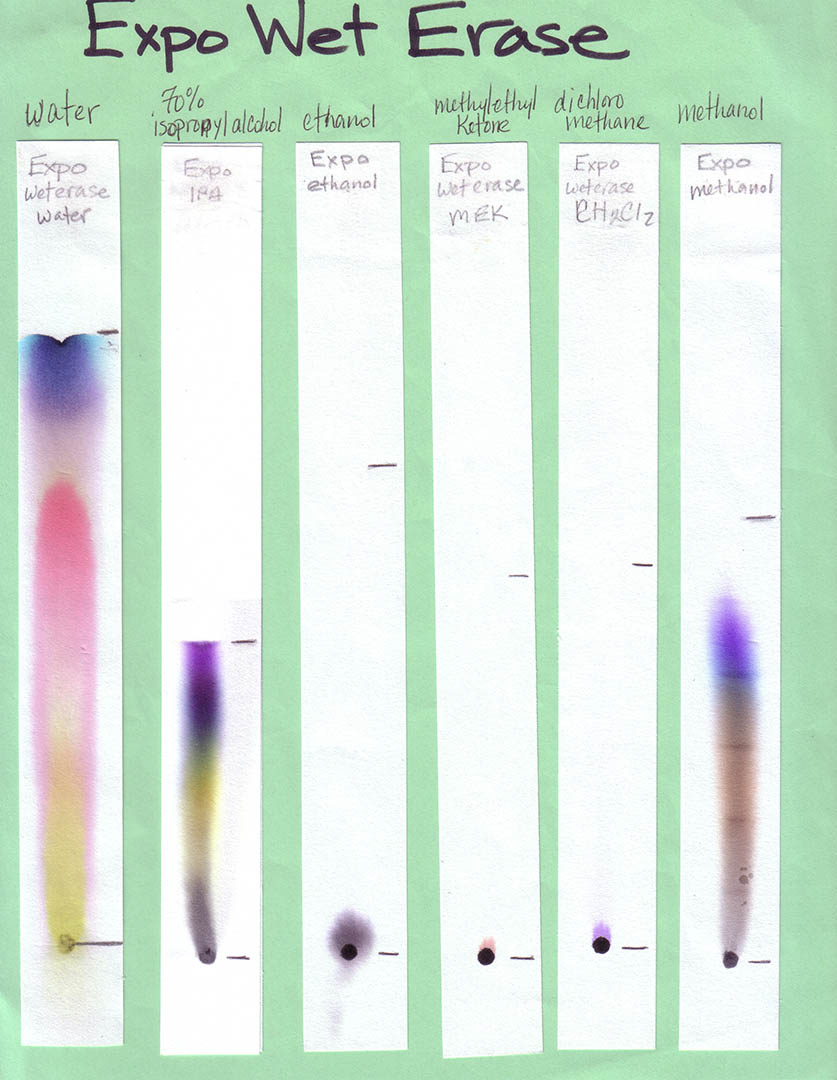
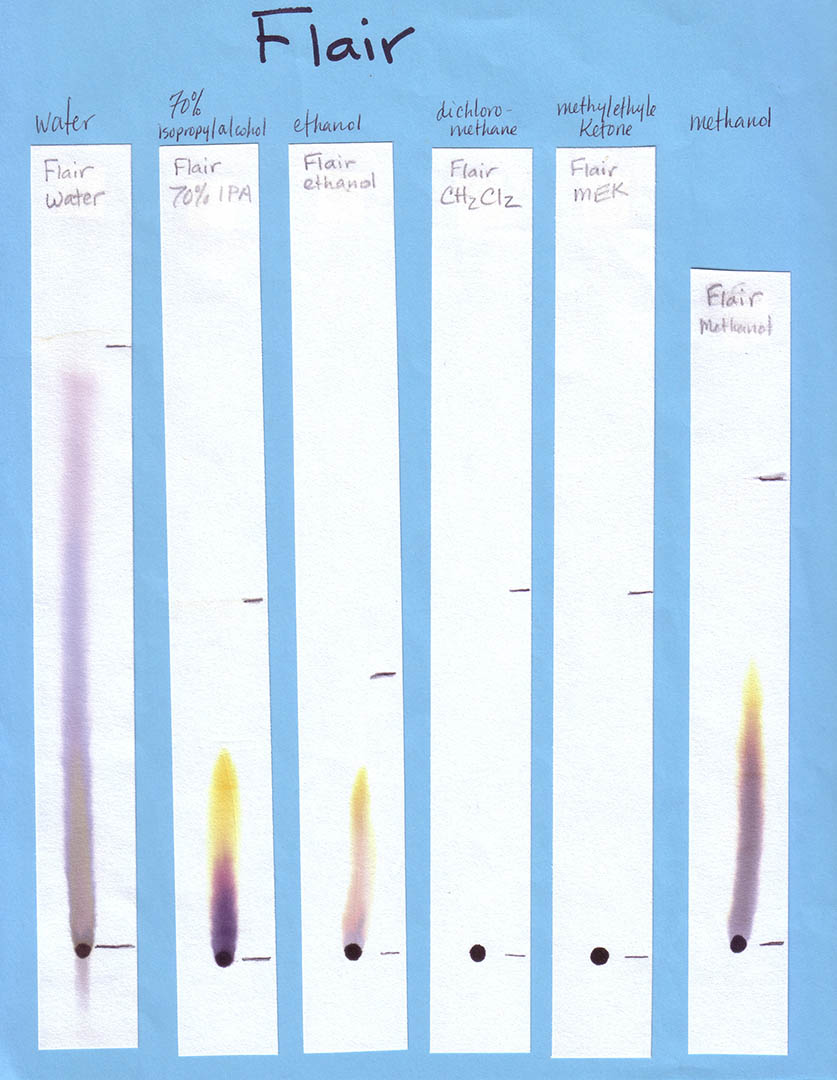
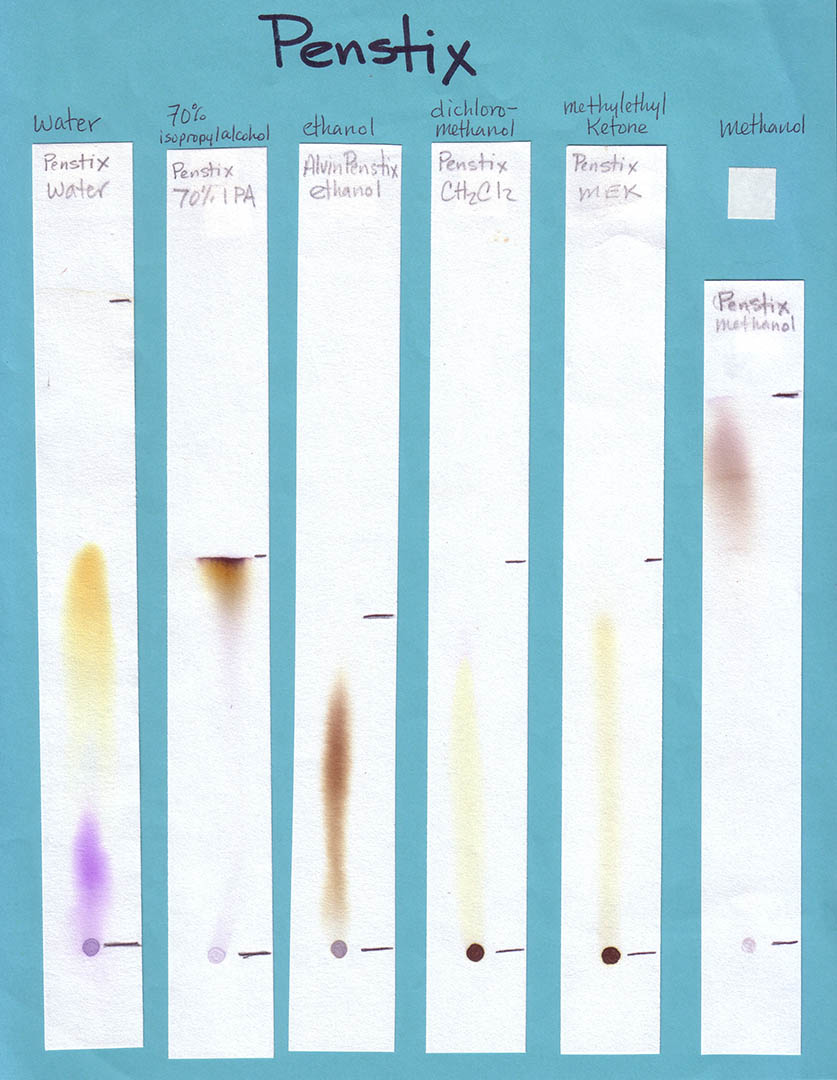
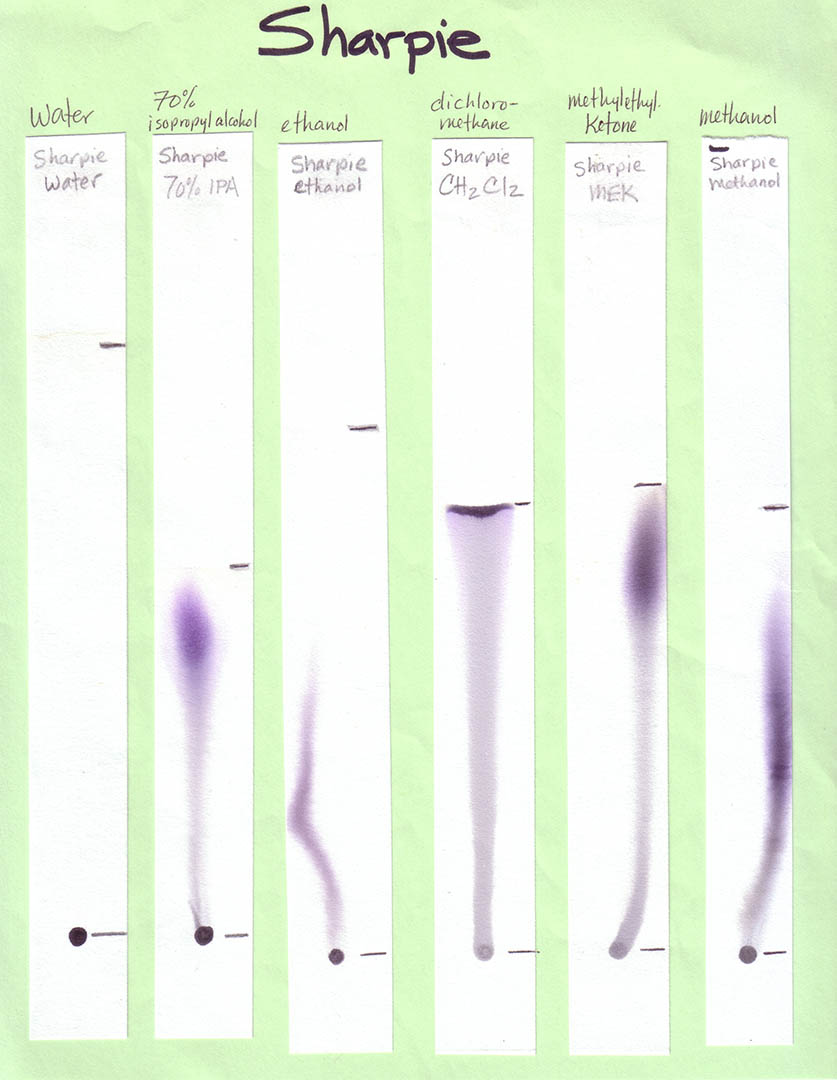
When developing your paper chromatography strips using these volatile solvents choose a glass (not metal or plastic) jar with a lid. The jar is preferably tall and thin, such as a jar for olives. Put a small amount of solvent — a quarter inch or so should do it — into the jar, suspend the paper strip so the end just touches the bottom of the jar, and cover with the lid or foil. Remove the strip before the solvent front reaches the top of the strip.
Materials for Part 2
Experiment with the washable inks you’ve collected to determine which will be interesting mixtures to separate. Blues, reds, and yellows tend to be single dyes (and thus don’t separate), but the only way to know for sure is to test it. There is no way of knowing for sure ahead of time.
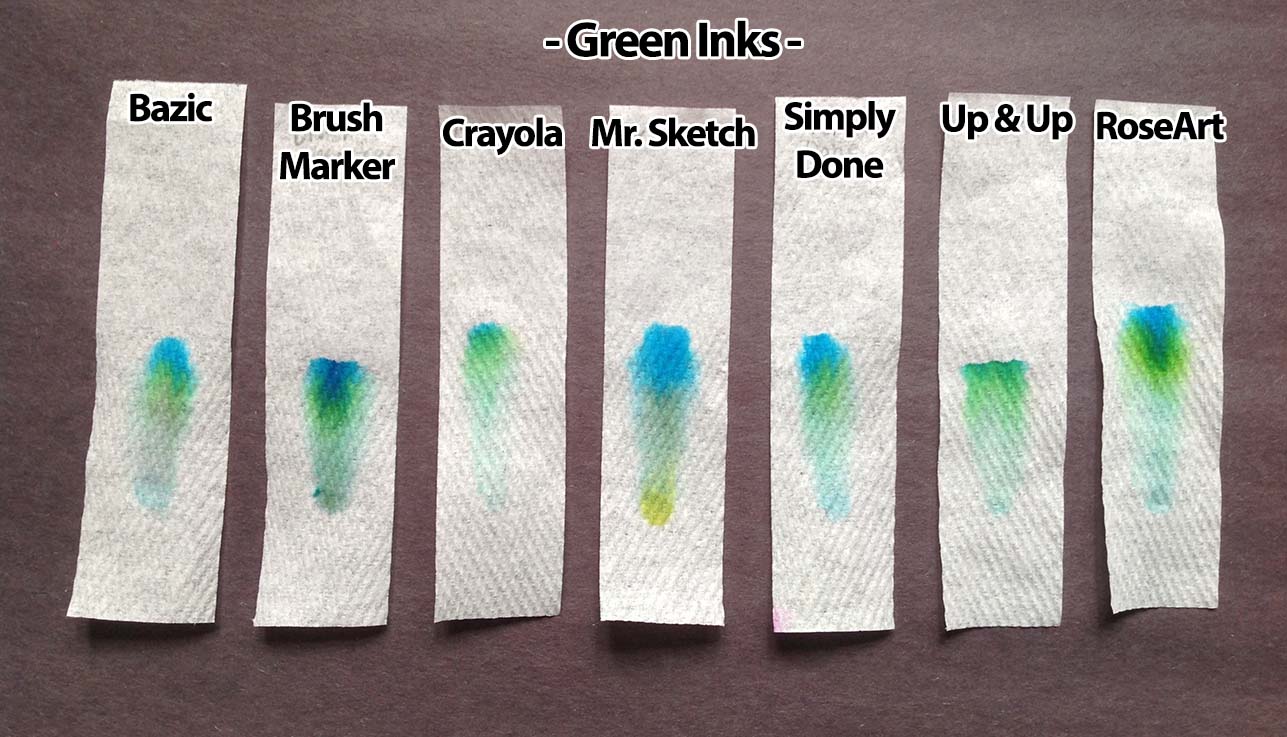
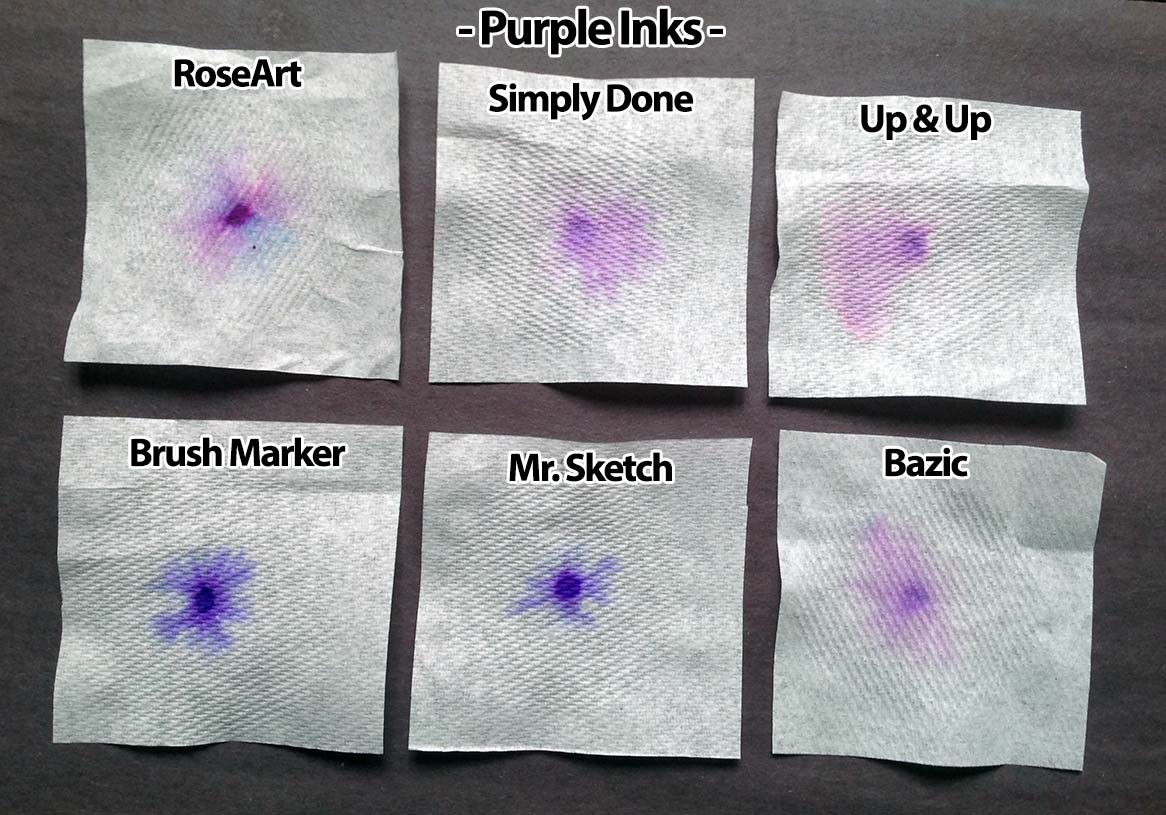
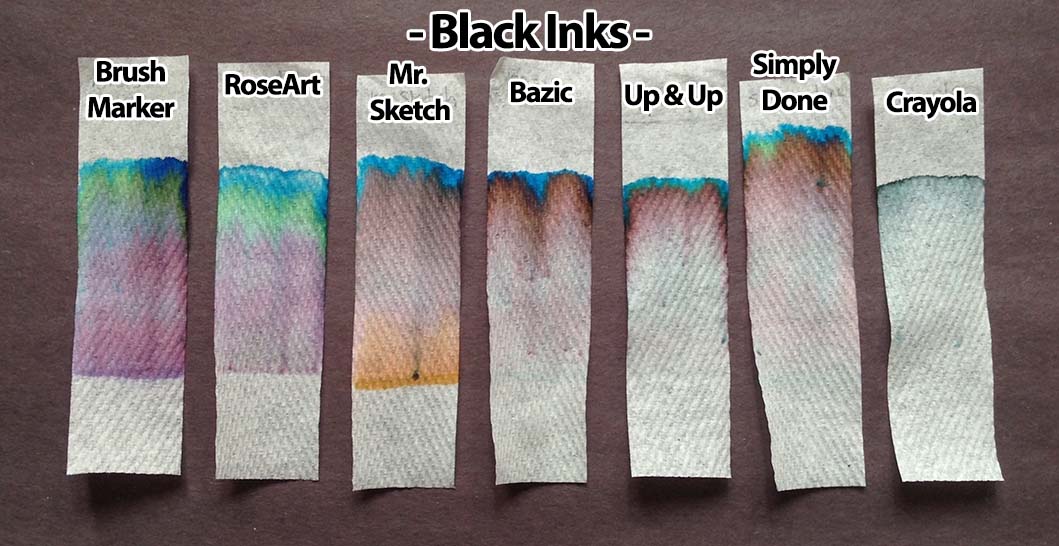
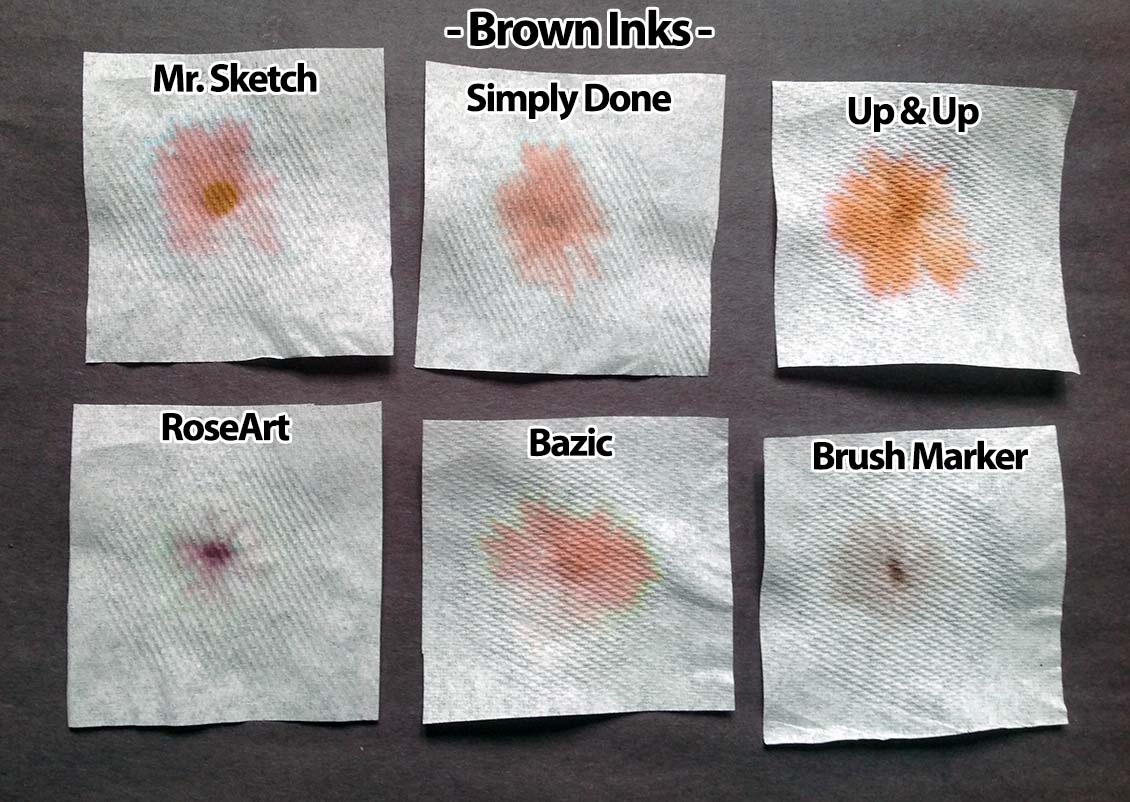
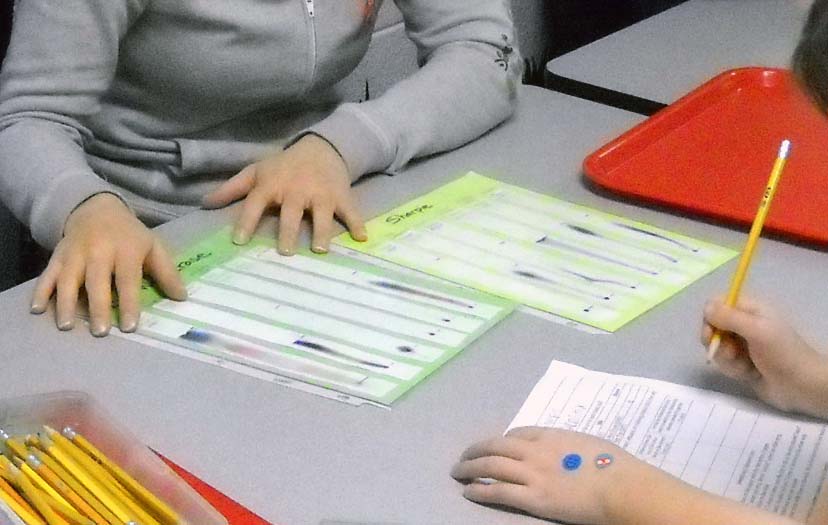
Select markers for the activity with a variety of separation behaviors, including at least two of any single color. Prepare one sample of each ink using the chosen technique, carefully labeling each sample in pencil with the brand of marker. Once dry, mount the papers on a chart with the brand names labeled in ink. Examples of washable markers tested this way are shown below below, using paper towels and Methods 1 & 2 (click to enlarge):
Assign a number to each marker. Prepare papers with spots of each ink, labeling each paper with the assigned number. Prepare enough samples so every pair of students will have several different inks to test, at least four. Keep track of the brand name that corresponds to each number.
If you chose method 3 cut 6″ × 6″ strips of waxed paper, one per each pair of students.
For each pair of students prepare a tray with a pencil, a small cup with a half inch of water, a dropper bottle of water or eye dropper, piece of waxed paper (Method 3), scratch paper (Methods 1 & 2) , ruler, and calculator (grades 4 and up).
Running the Module
Introduction (5 min)
Chromatography is a technique for separating mixtures. The mixture is dissolved in a fluid called the mobile phase, and can be gas or liquid. The mobile phase carries the mixture through a system such as a tube, plate, or sheet which contains a material called the stationary phase. The different constituents of the mixture interact differently with the stationary phase, some staying longer than others causing them to separate.
Paper is the system in paper chromatography. A mixture is placed near one end of a filter paper, and that end of the paper is placed in a liquid solvent. The solvent diffuses up the paper, dissolving the components in the sample. Since some of the components will dissolve more easily than others chances are high that each move at different rates up the paper. The more soluble a component is, the farther it will migrate up the paper. If a component does not dissolve at all it will stay at the starting point.
With students of 4th grade and above, retention factor should also be introduced. In paper chromatography, the retention factor (Rf) of a component is, in a sense, a measure of its affinity for the mobile phase (the solvent) vs the stationary phase (the marker’s ink). It is defined by the ratio of how far that component traveled along the paper versus how far the solvent traveled.
To calculate the retention factor (Rf) for a given component in the ink, divide the distance that component has traveled from the initial line or spot by the total distance the solvent has traveled. This is diagrammed below for an ink exhibiting yellow and blue constituents:

If your students are in grades 1-3 do the following activity. Have all the children line up at the end of a long hallway. Tell the students with color 1 (in their name tag lanyards) to move one step at the designated signal, those with color 2 to move two steps at the signal, and those with color 3 to move 3 steps at the designated signal. Tell the students that they represent three different dyes in an ink, and to pretend that they have been put onto a piece of paper, and that the paper is about to be placed in water. The water is slowly moving up the paper. Give the designated signal five times. The students will have separated into three groups, just like three dyes will have separated on the piece of paper.
If your students are in grades 4 and up explain retention factor and how to calculate it (such as with the presentation provided.)
Activity – Part 1 (25 min)
Divide the students into six groups, and assign each to one of the six black ink samples. Give each pair of students a worksheet and pencil. Give them three minutes to examine the samples, then instruct groups to move on to the next. Repeat until each group has visited all six samples. Give the teams five minutes to complete the worksheets using the last sample they visit.
Activity – Part 2 (25 min)
Give each pair of students a tray of supplies and one of the numbered samples. Demonstrate the chosen chromatography technique. Explain that their task is to figure out the brand of marker for each of the numbered ink samples. Allow students to work at their own pace, giving them new samples when they’ve matched their current sample to the displayed samples.
Discussion (5 min)
Gather the students. Reveal the brand name associated with the marker numbers. Were the teams successful identifying their samples?
How did your experiments go? Did you and your students find any particularly interesting combinations? Did you discover certain brands of markers that used the exact same inks? We’d love to hear from you! Drop us a note or leave a comment!


0 Comments