Challenge your students’ powers of deduction to determine which of four suspects committed several different burglaries. This can be an especially good module to do as the closing activity of Science Club sessions that included mystery powders or ink chromatography. However, those prior activities aren’t necessary for a satisfying experience.
This module is low cost and easy to run as long as you have a volunteer for each station. However, it does take some time to prepare all the samples the first time. The samples can last indefinitely if carefully stored so future Whodunit (“Who Done It”) activities will take very little time to set up. There are commercially prepared forensics/crime scene kits you can buy but these are typically very expensive considering what you get, and often less comprehensive than what you can easily assemble yourself.
Age Range
Elementary through middle school. Up to 24 students in teams of two.
Time Required
Variable (see below)
Helpers
One per clue station
This post considers five versions of this module:
- One day for 60 minutes, not including gathering time. Grades 1-3.
- One day for 60 minutes, not including gathering time. Grades 3-5.
- Two days for 60 minutes each, not including gathering time. Grades 3-8.
- Two days for 60 minutes each, not including gathering time. Grades 6-8.
- Three weeks integrated with extended discussions.
Disclaimer: We have no financial ties and receive no financial support or free/discounted supplies from any company mentioned in this post. All recommendations come from our personal experience. We make no money from any links we include.
Supplies
General Supplies
- Stapler
- 3×5 Note cards
- Sharp scissors
- Pencils — Two per team plus extras
- Hand lenses — Preferably one per student, or at least two per clue station requiring them
- Microscopes (optional)
- Paper cut into quarters (scrap is okay), or “coin envelopes” if you have them
- Larger envelopes — unused business return envelopes work well
- Masking tape
- Clear packing tape
Printables
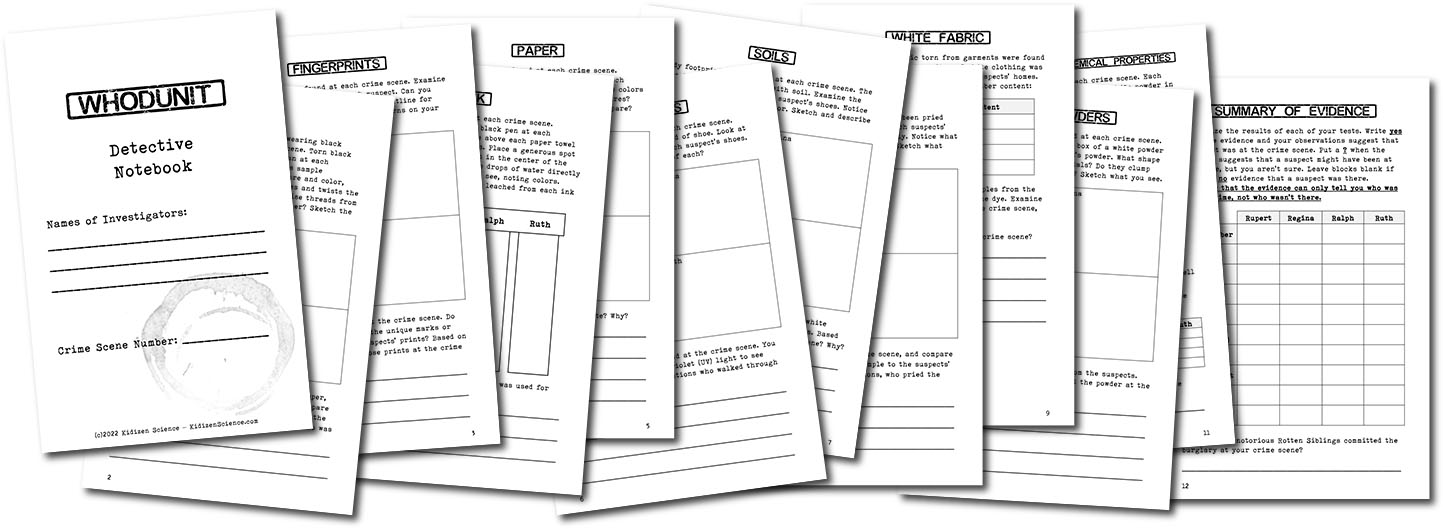
Printouts for the various activities in this module can be downloaded using the button below. This includes the “Detective Notebook”, in which each team of investigators will record their evidence and test results and deduce the perpetrators.
Preparation
Devise the back story for your crime scenes and suspects, or use this sample:
There has been a rash of burglaries in town, with thieves stealing ( ____________ ) . The four Rotten siblings, Rupert, Regina, Ralph, and Ruth are the prime suspects. The police have collected evidence from the crime scenes, and from the suspects. It’s up to you, the detectives, to study the evidence to figure out who is responsible for each break-in.
A note on names: be sure to choose names that are ethnically and culturally neutral, and not names of any of the students or their friends. You could also choose genderless nicknames like Swifty, Sticky Fingers, or Twinkle Toes, or cartoon characters like Elmer Fudd.
Choose your clue stations. We suggest four stations for Versions 1 and 2, and eight or nine stations for Versions 3 and 4, and all ten for Version 5. The supplies, preparations, and procedures for running the activity for each station are listed separately. Stations with a * are best for versions 1 and 2.
- Fibers*
- Fingerprint
- Shoe print*
- Ink*
- Paper
- Tools
- Soil
- White Powder Chemical Tests*
- White Powder Visual Tests
- White Fabrics (fiber identification dye)
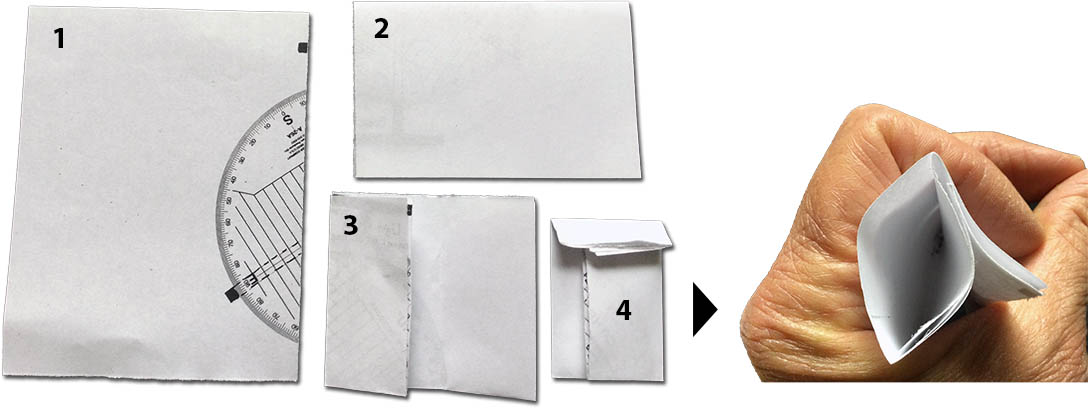
If you don’t have coin envelopes prepare paper packets according to the picture. Once filled with the crime scene samples, fold the top over and secure it with a piece of tape.
Prepare the supplies for each clue station you’ve chosen. Follow the clue chart to know which suspect(s) was (were) responsible for each crime scene.
Make any changes, if desired, to the Detectives Notebook. Print and assemble a copy for each student. The included file is designed such that, if printed using double-sided printing (and set to “short edge binding” or equivalent printer setting), the pages can be folded in half and stapled together to form a handy booklet. You can also add sheets of colored construction paper or card stock to the outside to provide some extra stiffness and color to the books.
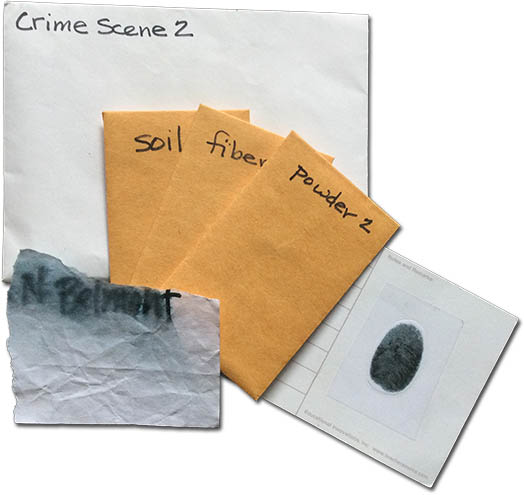
Assemble envelopes for each team, with evidence from their assigned crime scenes. Depending on which clue stations you chose, include packets of fibers, soil, white powder, half of a ransom note, and/or a fingerprint card. Tool and shoe print evidence will be found at the stations. You can also choose to keep all crime scene evidence at a central location for teams to check out and return as needed, or keep all samples at their respective stations.
Make sure that each volunteer understands how to run their station.
Running the Module
The time you spend with the whole group is brief, since discussions about and how to evaluate the various types of evidence take place at the stations.
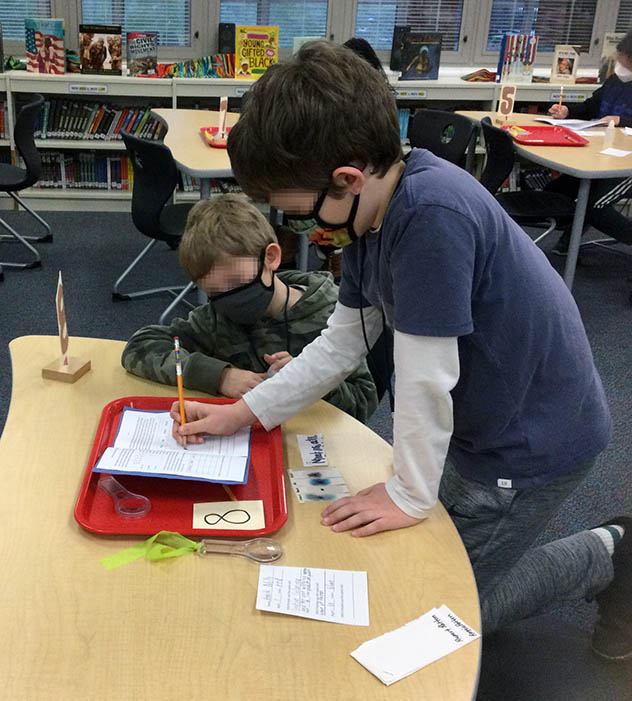
Relate your crime story and introduce the suspects. Students will work in pairs. Issue the Detective Notebooks and instruct the teams to write their names on the notebooks. Distribute hand lenses if you have one per student available. Make sure teams know the order they’re to visit the stations. Allow 12 minutes per station.
If you are running a one-day activity, collect the teams after they’ve visited all four stations. Give them a few minutes to review their notes to determine the suspect(s) they think is/are responsible for their assigned crime scene. Reveal the actual perpetrators.
If you are running a two-day activity, give the teams a few minutes to finalize the day’s notes, then collect the notebooks and hand lenses at the end of day one.
On day two, redistribute the notebooks and hand lenses. Allow 12 minutes at each of the four evidence stations. At the close let teams working on the same crime scene meet to compare notes. Give them a few minutes to agree on who is responsible for their crime. Finally, reveal the perpetrators.
Version 5
Consider using “Whodunit” as a theme for a three-week-long session. Introduce one technique each in weeks 1 and 2, applying that technique to analyze corresponding evidence from the crime scenes. The last week, have the teams analyze the remaining clues in stations. Briefly introduce the crime scenes and suspects at the beginning of the first week. After demonstrating and practicing the featured technique, introduce the related evidence. Collect the Detective Notebooks each week. Suitable techniques are:
Ink Chromatography: Introduce, then let the children investigate assorted water-soluble markers (see the Paper Chromatography module). Let the children examine the ransom note inks and papers during the last fifteen minutes. If you only have one or two of each suspect’s pen you may choose to label and add the inks to the test strips ahead of time.
You will also need several samples of each suspect’s paper for teams to share.
White Powders: Refer to the Mystery Powders module. Investigate citric acid, table salt, starch, and baking soda. Then, instead of testing mixtures, introduce the white powder from the crime scenes. Examine them either as outlined in the Detectives Notebook using spot plates or in test tubes as in the module. In the latter case you, will need to use the “alternate powder version” Detective Notebook file. Include visual analysis of the powders.
White Fabric: The Fabric Identification Dye from Educational Innovations (www.teachersource.com) will allow the children to dye the white fabric from the crime scenes themselves under close supervision. While the white fabric samples are in the dye baths introduce the black fiber evidence from the crime scenes. Children can investigate these until the dyed fabrics are ready to rinse.
Stations
Click a station’s name to show its details.
Materials
- 4 scraps of black fabric of different weaves and composition
- 4 note cards
- 3 sheets of paper, cut into quarters
- A piece of smooth, white paper
Black fabric is suggested because it’s easier to find a variety of fabrics in black. You should be able to purchase 4″ widths of fabric at any fabric store. Four fabrics we’ve used are wool flannel, cotton twill, polyester gaberdine, and a polyester jersey knit.
Preparation
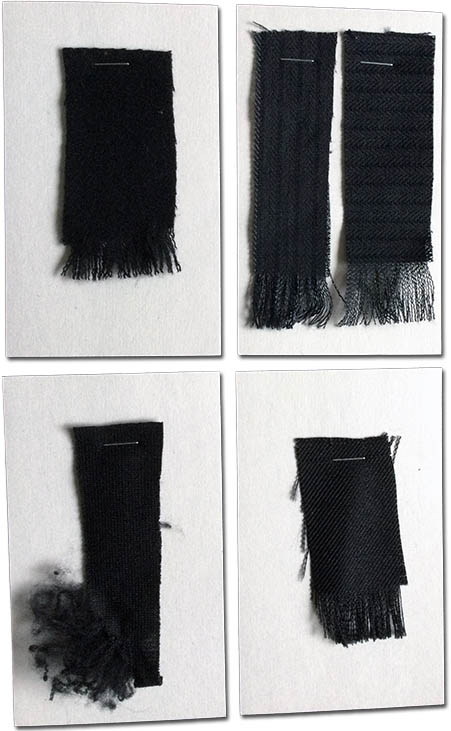
Label four cards with a suspect’s name. Assign a fabric to each suspect. Cut the fabric into one-inch-wide strips. You’ll need about twelve inches in total. Securely staple a four-inch-long segment of fabric onto the suspect’s note card, and fray one end of each. If, for a given fabric, the warp and weft (a.k.a. woof) yarns are not the same prepare lengthwise and crosswise strips for that fabric and staple both to the suspect’s card. Cut the remaining strips into one-inch squares, then unravel them into individual threads, being careful not to mix suspect’s fibers.
Running the Station
At the station, provide the four suspects’ samples on the note cards, a piece of white paper for contrast, and hand lenses.
Introduction
Eye-witnesses saw people wearing black clothing running away from each crime scene. Torn black clothing was found in the garbage can at each suspect’s home. Examine each suspect’s sample carefully. Notice differences in texture and color, and how the method of weaving crinkles and twists the threads. Do the crosswise and lengthwise threads from a sample look different from one another? Sketch the threads from each suspect’s sample.
After the students have examined the suspects’ samples, describing and sketching them in their Detective Notebook, they empty the threads from their crime scene evidence packet onto the white paper, sort the different threads, and try to match them to the suspects’ samples. The students enter their conclusions in their notebooks. Students should return the crime scene threads to their evidence packet.
Materials
- White note cards
- Chart of fingerprint patterns
Preparation
Find images of thumbprints online. Choose four prints that have unique features so the children have a good chance of telling them apart. Attach a full print on a note card and label each card with a suspect’s name. Cover the prints with clear packing tape.
Label note cards with crime scene numbers. Put a partial thumbprint, cut from photocopies of the entire prints, on each card according to the chart. Make sure all suspects from each crime scene are represented.
Running the Station
At the station provide the suspects’ cards, the fingerprint patterns chart, and hand lenses.
Introduction
Thumb prints were found at each crime scene. Show the “detectives” the chart of common patterns found in fingerprints. Each person’s fingerprint has its own unique combination of patterns. Examine the thumb prints taken from each suspect. Can you find patterns unique to each?
Help students identify specific patterns if they’re finding it difficult to do so. Students should sketch the suspects’ thumbprints with any distinctive patterns in their Detective Notebook. They shouldn’t try to draw every ridge, just the location and shape of patterns unique to each thumbprint. They then examine the thumbprints on the note cards from their crime scene, looking for the same patterns they discovered on the suspects’ thumbprints.
Materials (Ink)
- Four different water-based black pens (Make sure they produce different colors and patterns when water is dripped onto spots of the ink.)
- Waxed paper
- White paper towels
- Dropper bottle of water
- Masking tape
Materials (Paper)
- Four different types of white paper, of various thicknesses and textures
- Black construction paper
Preparation
Compose a ransom note based on the crime story you’ve created, or use this text for our sample story.
“If you want your (_____________ ) back, leave twenty dollars in the hollow tree next to the playground.”
Assign a brand of pen and a type of paper to each suspect. Cut the paper sheets into quarters. Label the quarter sheets twice in pencil on diagonal corners with a crime scene number according to the clue chart for your version. Copy the text using the pen assigned to that suspect. Use the pen from one suspect and the paper from the other for crime scenes with two perpetrators. With three perpetrators, use the paper from one, write the message with the pen of the second and sign it with the pen of the third. Lay the ransom notes on waxed paper, then drop several drops of water onto each from the dropper bottle, enough so that some of the ink dissolves and wicks into the paper. When the notes have dried, relabel each with a permanent marker, then tear each in half making sure each half is labeled. You will need to make two copies of each note so each team will have half a note in their evidence envelopes.
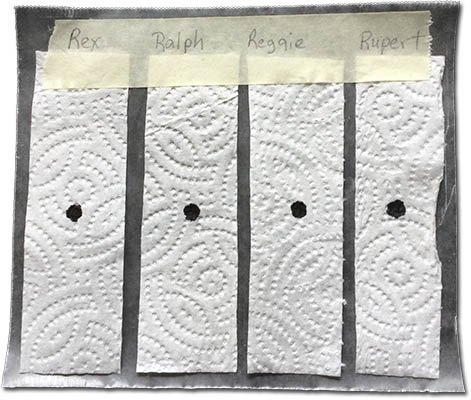
Prepare ink testing strips. Cut the white paper towel into strips one inch wide, then cut those strips into four-inch lengths. Cut waxed paper into pieces about five inches by six inches. Using masking tape, tape four strips onto each piece of waxed paper taking care that the strips do not touch. Prepare a test set for each team, plus an extra or two.
Running the Stations
At the Ink station place the four black pens labeled with the corresponding suspects name, a dropper bottle with water, pencils, ink test strips, and half of each ransom note.
At the Paper station place samples of paper “found” at each suspect’s home, a piece of black paper for contrast, and hand lenses. Tear a corner off of each suspect’s piece of paper.
Introduction (Ink)
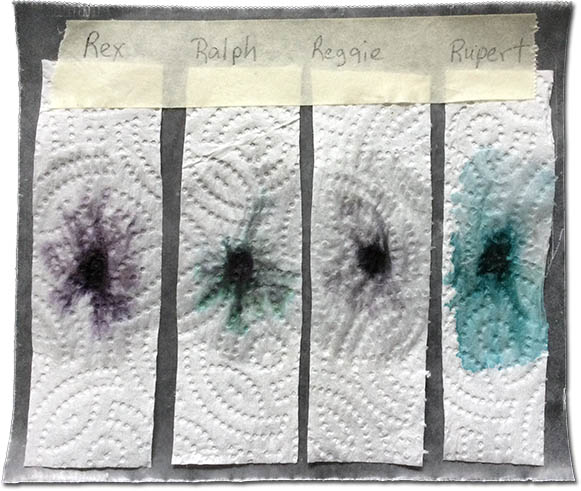
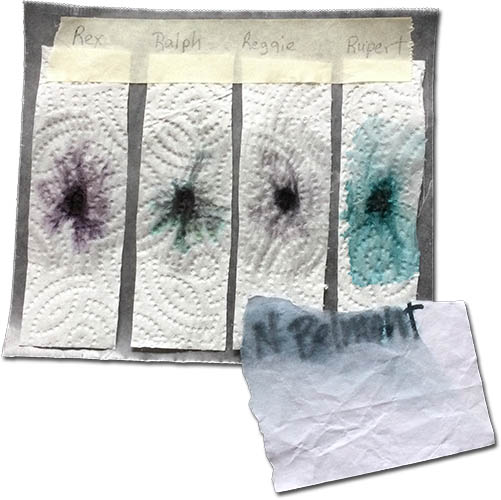
A torn, wet ransom note was found at each crime scene. Detectives found a different black pen at each suspect’s home. Black inks are usually mixtures of several dyes. Each dye behaves differently when exposed to water. When messages written with black ink get wet the various dyes often separate.
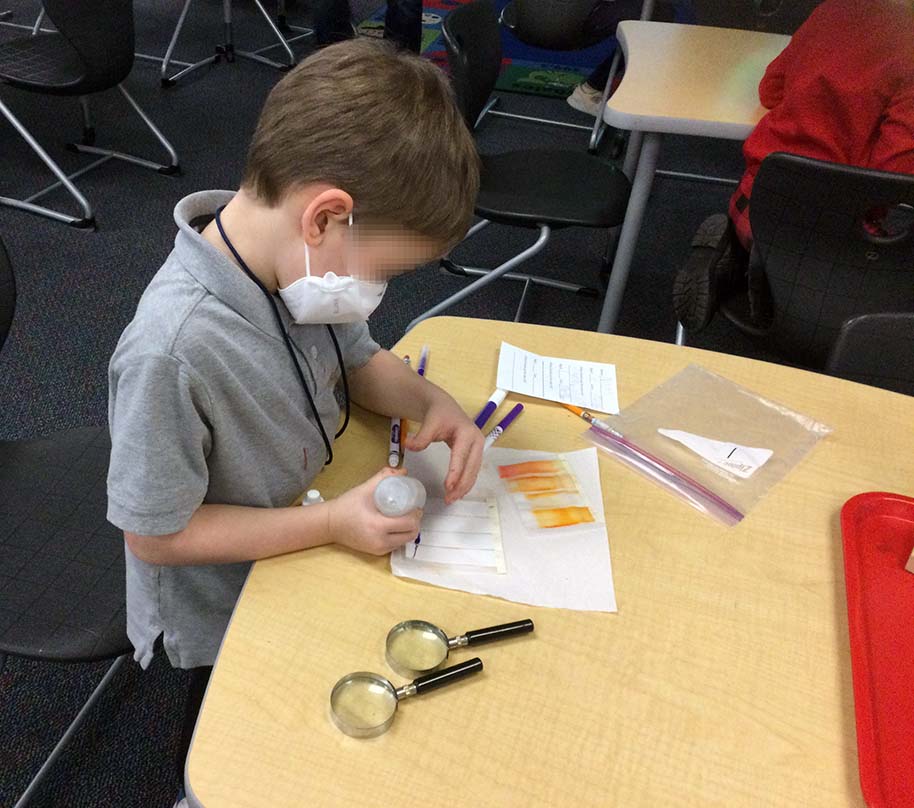
Students label the tape above each paper towel strip with a suspect’s name, then place a generous spot of ink from each suspect’s pen in the center of the corresponding strip. They put three drops of water directly onto each dot, then wait a few minutes as the water wicks through the paper. Students sketch what they see, noting colors. They compare the colors of ink that leached from each ink with the colors on the ransom note in their evidence envelopes, and record their conclusions in their Detective Notebook.
Introduction (Paper)
A torn, wet ransom note was found at each crime scene. Detectives found a different white paper at each suspect’s home. Examine each paper. How do the colors compare? Are they different weights and textures? Look at the torn edge; how do the fibers compare? Describe the samples below.
After the students examine the suspects’ papers, noting characteristics in their Detective Notebooks, they compare the piece of ransom note in their evidence envelopes with the suspects’ papers, entering their conclusions into the notebooks.
Materials
- Water-based acrylic paint — Preferably black or dark brown
or, for more drama
- Water-based paint that glows in ultraviolet light or Glow Germ Lotion (available from https://www.glogerm.com or https://www.teachersource.com)
- Four shoes with very different sole patterns
- Heavy weight white paper — at least 8.5″x11″, larger is better
- Ultraviolet (UV) light source if using UV-reactive paint — UV LED “flashlights” are best
Preparation
Make sure the shoes’ soles are clean and dry. Take a picture of each sole and label each picture with a suspect’s name.
Label sheets of paper with crime scene numbers according to the version you’ve chosen.
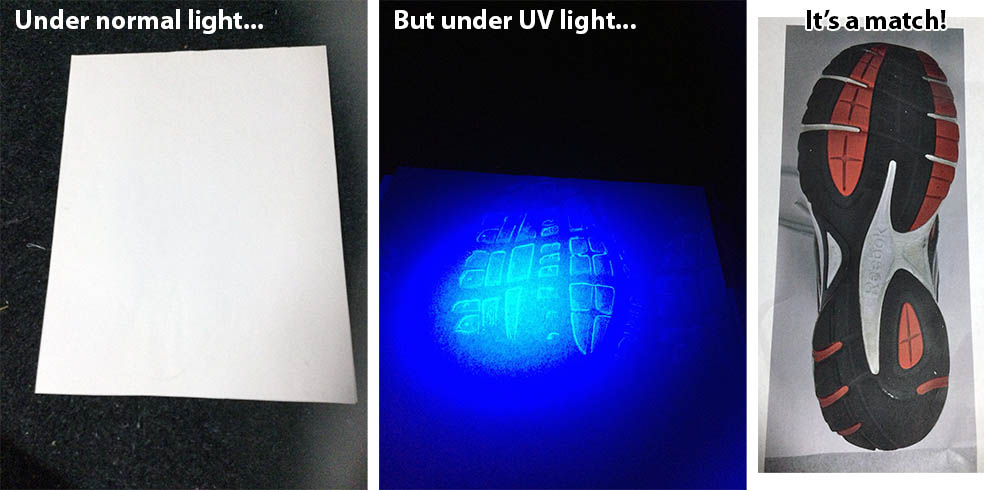
Dab the chosen paint or Glow Germ to form a thin, uniform layer on one shoe. Carefully press the shoe onto a piece of paper, then remove it being very careful not to smear the pattern. You do not want the entire sole printed, but you want enough so that the shoe can be identified. Place four sheets of paper together to easily produce partial prints on the individual sheets. Allow each sheet to dry thoroughly before “printing” additional shoes. Each sheet should have four partial prints, at least one from each suspect at the crime scene.
Running the Station
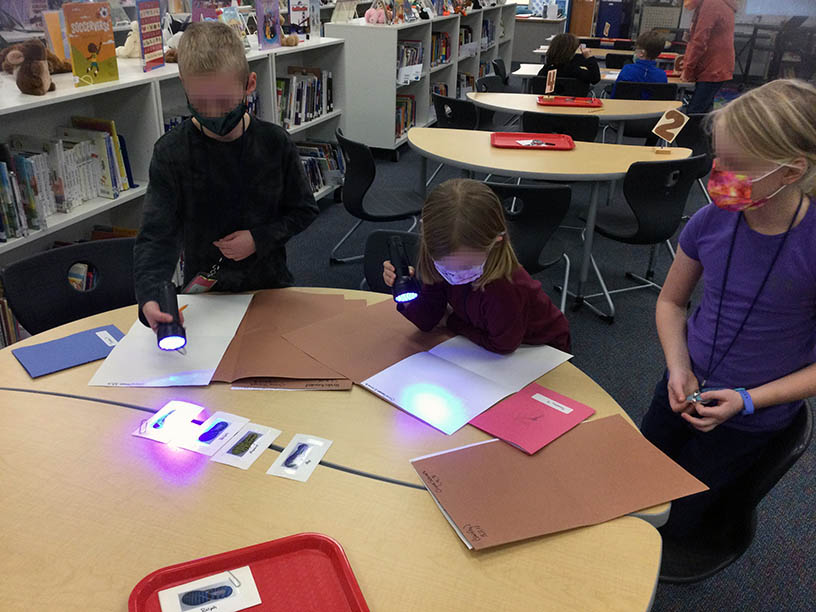
Locate this station in a less well-lit location if you need to view the papers under ultraviolet light. This could include a deep cardboard box turned on its side, a small table with a blanket thrown over it, turning the light off over the station, or using an adjoining darkened room.
Provide the crime scene sheets, pictures of the suspects’ shoes’ soles, and the UV flashlight if needed.
Introduction
Clear shoe prints were found at each crime scene. (If using UV light explain that detectives use ultraviolet light to reveal clues at crime scenes not visible under normal light. If the criminal stepped in substances that glow under UV light his footprints might show up. For example, if the criminal tried to clean up the crime scene floor using certain brands of cleaning liquids.) Police officers found that each suspect wore a different brand of shoe.
The students look at the photographs of the soles of each suspect’s shoes and sketch features unique to each in their Detectives Notebooks. Then give them the sheet of shoe prints from their assigned crime scene to examine. They note their conclusions in the Detective Notebook.
Materials
- 3x Sheets of paper, cut into quarters
- Smooth white paper
- 4x Dry soil samples
- Clear packing tape
- 4x “Snack-sized” ziplock bags or sealable, transparent tubes or bottles.
- 4x Petri dishes (optional)
Collect samples of four soils that look significantly different from each other. This could include sand, heavy clay subsoil, commercial top soil, commercial potting soil, or topsoil from your yard. Make sure you don’t collect decomposing mulch instead of topsoil, although that topsoil could contain fine particles of decomposing mulch.
Preparation
Thoroughly dry the samples. Break up the dried soils if they’ve formed clumps; there should be no pieces larger than grains of rice. Assign a suspect to each soil, and prepare a labeled bag or sealed tube of each.
Label and fill twelve paper packets according to the clue chart for your version. Crime scene samples with more than one suspect should include equal volumes from each.
Running the Station
At the station label four pieces of white paper, about 6″ x 6″ in size. Place a small sample of the corresponding soils on the squares. Spread out the particles so individual grains can be observed, and cover with a clear piece of packing tape. If you have petri dishes, put the suspects’ soils in them, placing the white paper underneath. Provide white paper, cut into corners, for the students to use with their crime scene samples.
Introduction
Muddy footprints were found at each crime scene. The suspects’ shoes were covered with soil. Examine the soil samples scraped off each suspect’s shoes. Notice differences in texture and color. Sketch and describe each soil.
After the students have examined the suspects’ samples, describing and sketching them in their Detective Notebooks, they empty the soil from their crime scene evidence packet onto the white paper, spreading it out so they can see individual particles, and try to match them to the suspects’ samples. The students enter their conclusions in their notebooks. Students should return the crime scene soil to their evidence packet, and discard the white paper.
Materials
- Four tools chosen from: chisel, pocket knife, rasp, coping saw, cross-cut saw, claw hammer
- 7x (version 4), 8x (v1), or 10x (v2 and 3) pieces of scrap lumber of the same type — for example: 3-inch segments of economy-grade 1×2 furring strips
Preparation
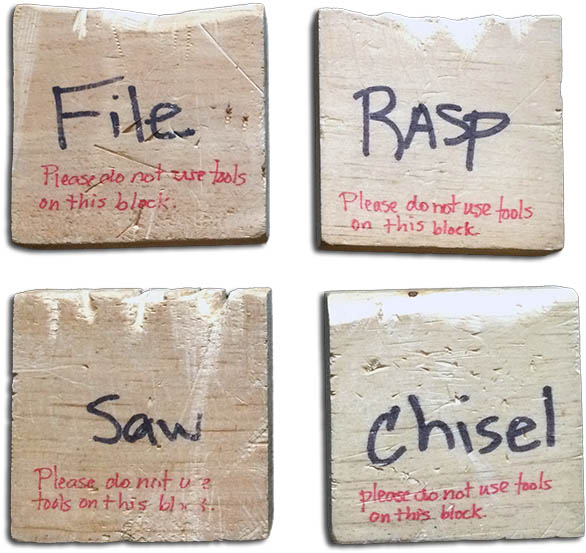
Assign a tool to each suspect. Label a block of wood for each suspect. Use the assigned tool to pound, gouge, cut, or carve the corresponding block.
Number the remaining blocks according to the clue chart for your version. Using the assigned tools for each suspect to pound, gouge, cut, and carve the corresponding crime scene blocks according to the clue chart.
Running the Station
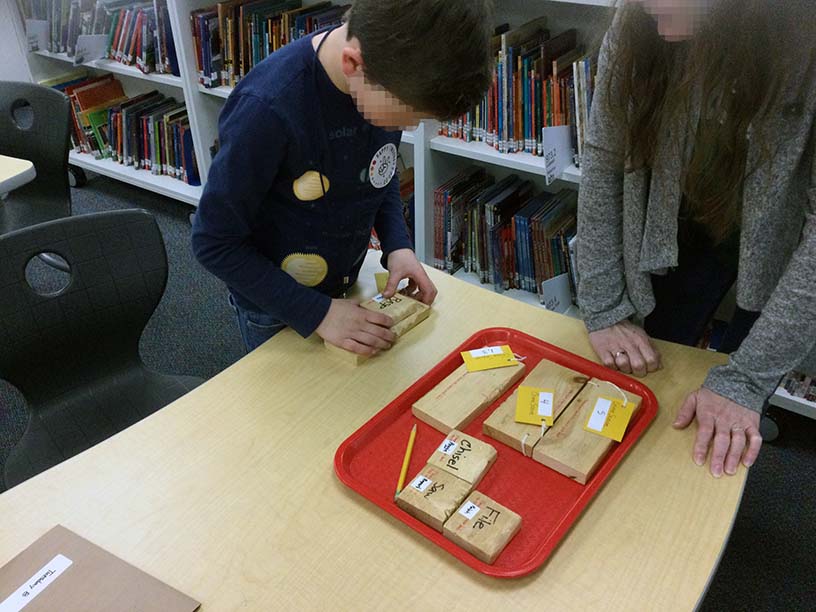
At the station place the tools labeled with the suspects’ names for the students to look at, not handle, the sample blocks for each suspect, the crime scene blocks, and hand lenses. If there won’t be an adult actively supervising the station don’t provide the tools.
Introduction
The door frames at each crime scene had been pried open using tools. Tools were found in each suspect’s car. Examine each suspect’s tool carefully. Notice what sort of marks each tool makes in wood. Sketch what you see.
After students have examined the suspects’ blocks, and noted their observations in the Detectives Notebook, give them their assigned crime scene block. Their conclusions about who pried open the door are entered into the notebook.
Materials
- Four pieces of fabric of four different fibers, including bleached cotton muslin — if purchasing, buy strips ~4 inches wide
- Needle and thread
- Pieces of chip board or cereal box cut to ~1″x2″
- Permanent marker
and
- A package of dark colored dye — for example, “RIT”
-or-
- A packet of dark colored, unsweetened drink mix
-or-
- Fabric identification dye available from Educational Innovations
Preparation
Assign each fabric type to a suspect.
Dye the four fabric samples. If using commercial dye or fabric identification dye follow package instructions.
If using unsweetened drink mix powder soak fabric in hot water for at least a half hour. Bring ¼ cup of vinegar, a quart of water, and the powder to a boil. Squeeze excess water out of the fabric strips, then add them to the boiling dye and simmer for 45 minutes. Cool to lukewarm then remove the fabric from the dye. Rinse in warm water until the water runs clear, and hang to dye.
Cut a 4″ x 4″ piece of each fabric and label with the corresponding suspect’s name.
Label pieces of chipboard/cereal box with crime scene numbers using a permanent marker. Punch or poke a hole into one end of each.
Cut 1″ x 1″ pieces of each fabric and attach to corresponding crime scene number tags using the needle and thread.
Running the Station
At the station display the 4″ x 4″ samples identified by suspect, and the smaller samples labeled by crime scene number.
Introduction
Scraps of white fabric torn from garments were found at the crime scene. A torn item of white clothing was found in a trash can at each of the suspects’ homes. Tags on the garments identified the fiber content.
Samples from the suspects and the samples from the crime scenes were treated with the same dye. Examine the suspects’ fabric and those from the crime scene, noting similarities and differences in your Detective Notebooks.
Materials
- Baking soda
- Salt
- Citric acid
- Corn starch
- Small spoon
- Several 15-well spot plates — ideally one per team
- Five tiny scoops, tiny spoons, or paint can openers
- Dropper bottles, one each of water, vinegar, iodine solution, and phenolphthalein or bromothymol blue
Baking soda, corn starch, and table salt are found in the baking aisle of any grocery store. Citric acid (“sour salt”) can be found in grocery stores featuring middle eastern cuisine.
Well spot plates can be found at many online vendors. A good source for these is from Flinn Scientific. These plates come with a detachable 1 gram scoop, particularly useful for dispensing right-sized samples of powder into the wells. As of April 2022, a set of ten polystyrene plates cost $17.50. Ours are over ten years old, and have been washed and reused many dozens of times.
Preparation
Assign a white powder to each suspect. The assignments must be the same as for the white powder visual properties test.
Label and fill twelve paper packets according to the clue chart for your version. Samples with more than one suspect should include equal amounts from each.
Running the Station
Print the key, and place the spot plates as indicated. Consider pre-loading the suspect’s samples onto the spot plates. The students will add the powder from the crime scene.
Introduction
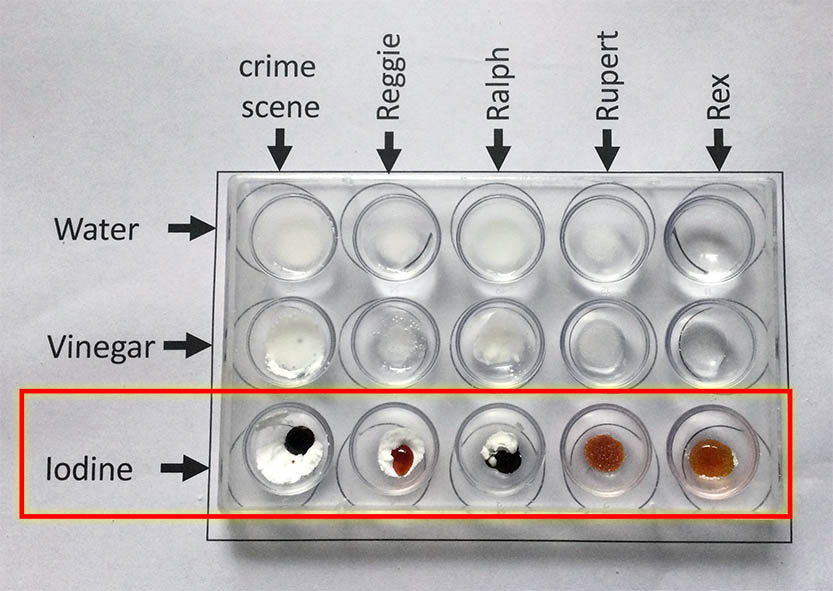
White powder was found at each crime scene. Each suspect had an open bag or box of a white powder in his car. Chemical tests can help identify these powders. Any substance that is a carbonate (like baking soda) produces carbon dioxide gas in acid (like vinegar). Starch turns black when exposed to iodine. Some powders dissolve in water, others sink, or form milky suspensions. Color-changing pH indicators show whether a solution is acidic or basic.
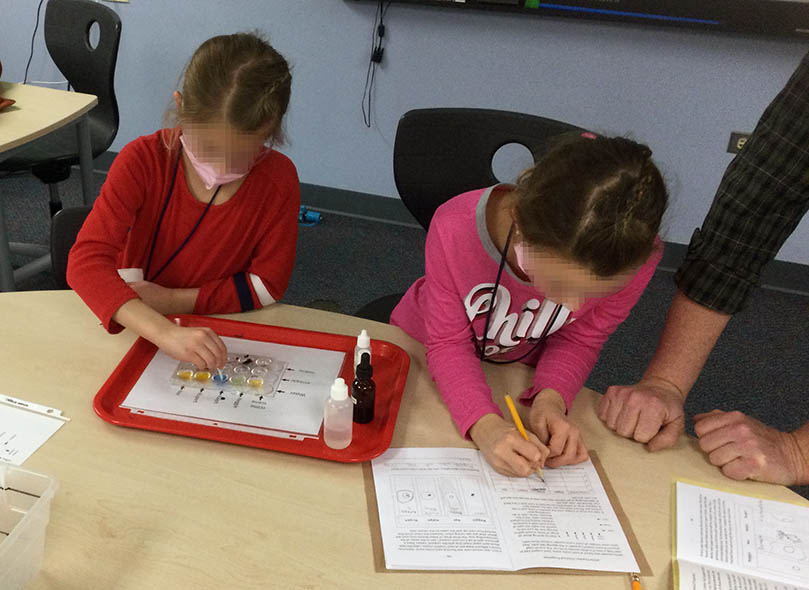
Help guide the students through the steps in their Detective Notebook:
- Put a lentil-sized amount of each suspect’s powder in the appropriate wells. In the interest of time, and to avoid cross-contamination, we suggest preloading the spot plates with the suspects’ powders.
- Students then place lentil-sized samples of crime scene powder in those three wells.
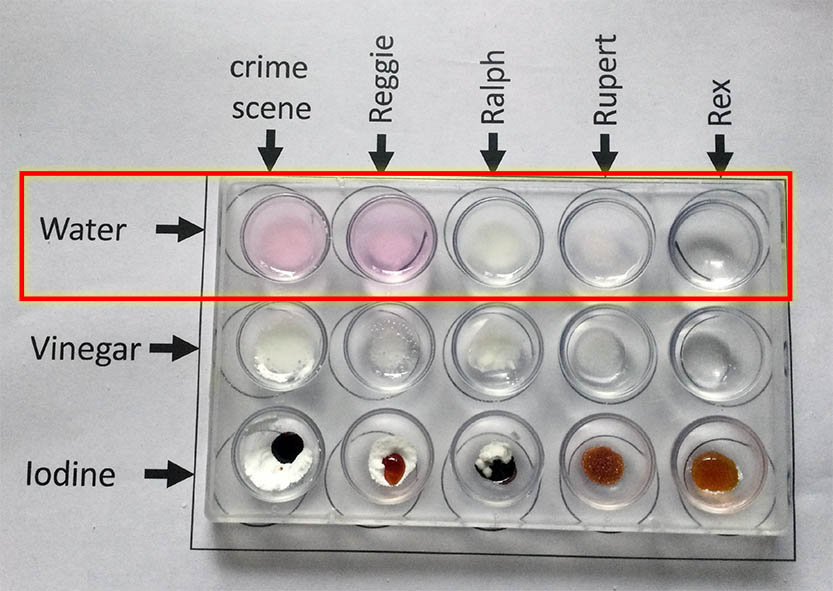
- Start by putting about 20 drops of water in each well in the top row. Be sure not to overfill the wells! Stir each of these wells with a toothpick, carefully wiping the toothpick between wells. Did it fizz, dissolve, clump, sink, or do something else?
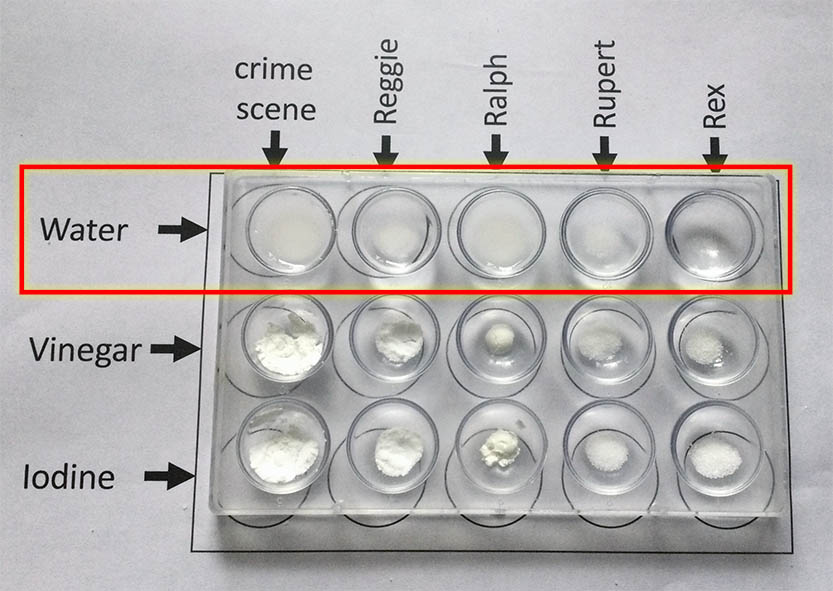
- Add one drop of vinegar onto the powder in each well in the second row. Record what you see. Did the sample fizz?
(Note the bubbling in the crime scene’s and Reggie’s powders.)
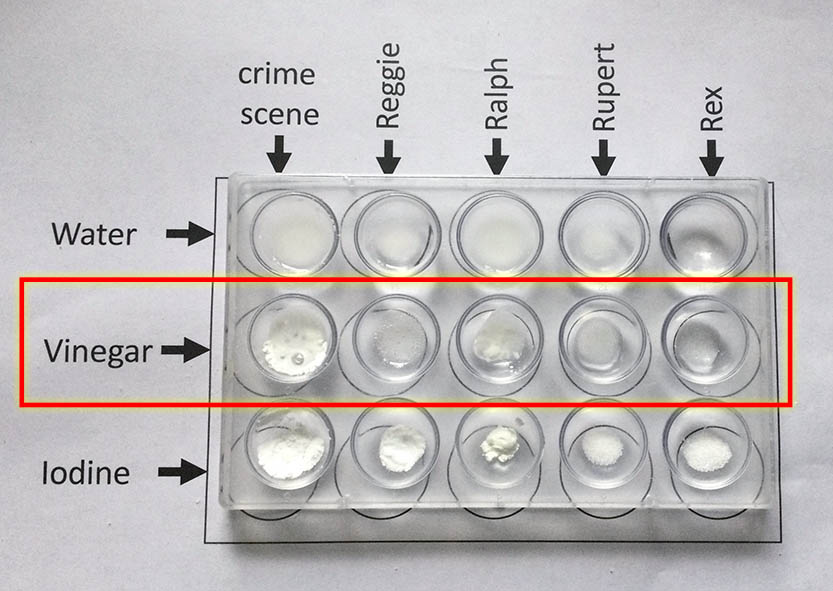
- Add one drop of iodine onto the powder in each well in the third row. Record the color you see.
(Ah ha, the crime scene’s powder turned black. It must be starch!)
- Add one drop of pH indicator into each well of the top row. Record any color you see.
(The indicator used in the photo was phenolphthalein.)
If you don’t have enough spot plates to have one per team, be prepared with a container to dump used samples into, and a handy sink or bucket of clean water, and towels to quickly wash and dry plates.
Materials
- Baking soda
- Salt
- Citric acid
- Corn starch
- Small spoon
- Four sheets of black construction paper, cut into quarters
- Clear packing tape
Baking soda, corn starch, and table salt are found in the baking aisle of any grocery store. Citric acid (“sour salt”) can be found in grocery stores featuring middle eastern cuisine.
Preparation
Assign a white powder to each suspect. The assignments must be the same as for the white powder chemical properties test.
Label and fill twelve paper packets according to the clue chart for your version. Samples with more than one suspect should include equal amounts from each.
Running the Station
At the station label four pieces of black paper with the suspects’ names. Place a small sample of the corresponding powders on the squares. Spread out the particles so individual grains can be observed and cover with a piece of clear packing tape. Provide black paper for the detectives to use with their crime scene samples, and hand lenses.
Introduction
White powder was found scattered at each crime scene. Each suspect had an open bag or box of a white powder in his car. Examine each suspect’s powder. What shape are the particles? Are they crystals? Do they clump together? Are they dull or shiny? Sketch what you see.
After the students examine the suspects’ samples, describing and sketching them in their Detectives Notebook, they empty the soil from their crime scene evidence packet onto the black paper, spreading it out so they can see individual grains, and try to match them to the suspects’ samples. The students enter their conclusions in their notebooks. Students should return the crime scene powder to their evidence packet, and discard the black paper.
How did your young investigators do? Did you make any changes or additions to the activity that works well? We’d love to hear about it. Leave a comment or send us an email!


0 Comments