Many balances familiar to students, such as bathroom scales, fish or luggage scales, and the scales for pre-weighing produce in grocery stores are examples of spring balances.
Unlike balances based on levers, spring balances can only measure the weight, not the mass of an object. It does so by opposing the force of gravity acting with the force of an extended or a compressed spring. Spring balances can be calibrated to indicate mass, but only in a particular location. They are not as accurate as lever-based balances, and are typically used when some accuracy can be sacrificed for simplicity, speed, and sturdiness. Spring scales are employed to weigh very heavy things like trucks, materials on conveyor belts, and storage silos.
Hooke’s Law defines the relationship between the force applied to a spring or other elastic material to the distance it stretches or compresses. In this module, students set up and conduct experiments to test the validity of the relationship.
Supplies
Weights (10 per workstation)
Choose weights such that each one added will stretch the spring or rubber band to produce a measurable movement, but that ten together won’t overextend it. For many springs and rubber bands each unit should weight ~10-12 grams. These include but aren’t limited to:
- Washers — 1.25 to 1.5 OD (outer diameter) galvanized washers work well
- Ball bearings ~1/2 inch (~1.3 cm) in diameter
- Hexagram weights (10 gram)
- Nickels taped together in bundles of 4
Support (1 per workstation)
- A clamp large enough to accommodate a table top or chair seat
- A pencil


-or-
- Piece of 1×2 or 2×2 wood about 2 to 4 inches (5-10 cm) long and a clamp large enough to accommodate the table top or chair seat and wood

-or- (if you don’t have clamps)
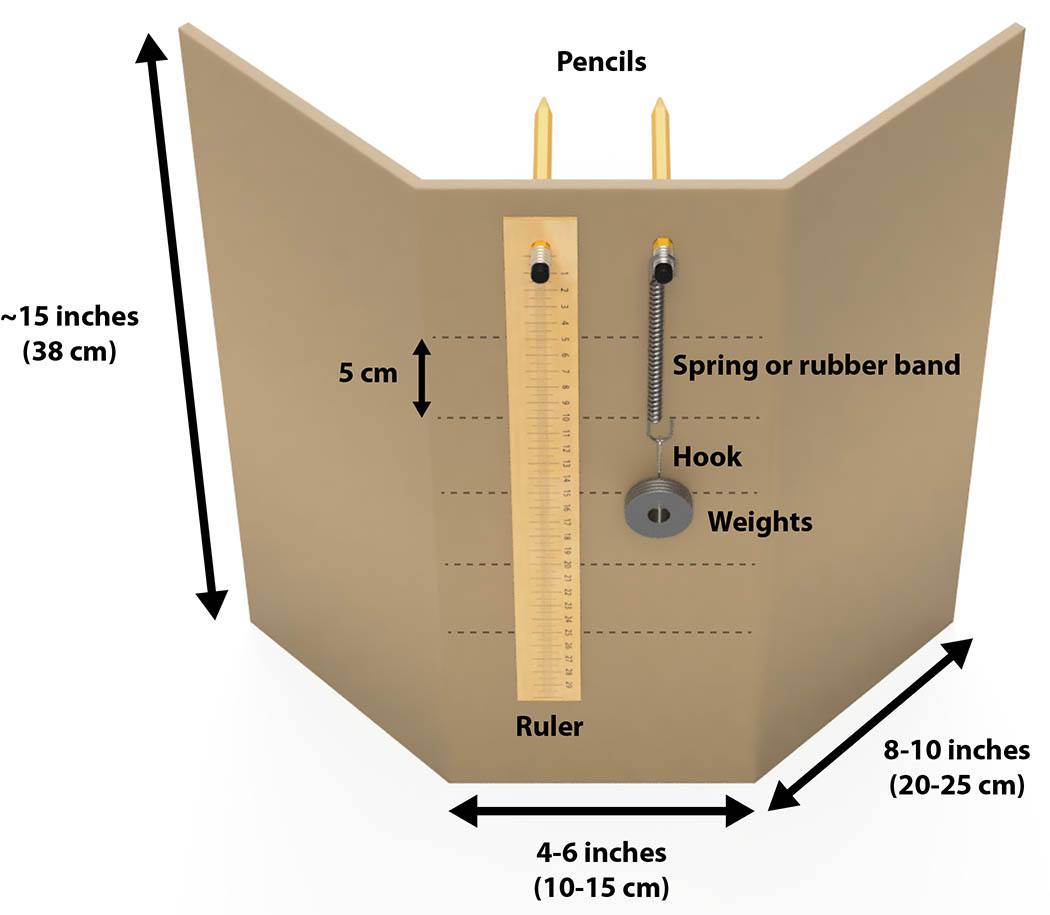
- Corrugated cardboard 13-15 inches (33-38 cm) tall and 18-24 inches (46-61 cm) wide or cardboard box at least 13 inches long in one dimension.

Other Supplies
- Pencils with metal ferrules — Two per workstation + extras
- Items to test — Fine, lightweight extension springs or rubber bands. One per workstation + a few extras.
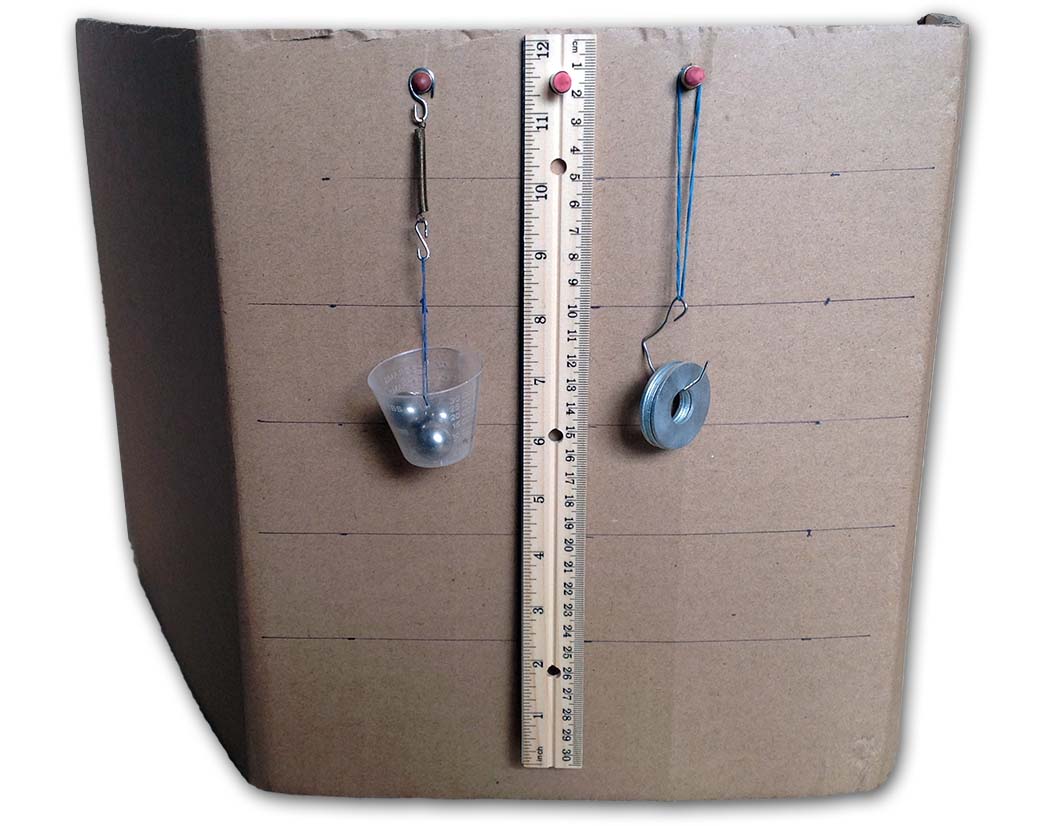
- One small cup (2-3 oz) and six inches of light string per workstation, if not using washers
- Stiff wire or small paper clips
- Foot long rulers with metric scale — One per workstation
- (Optional) Commercial non-digital spring balances, such as fish scales, bathroom scales, kitchen scales, postal scales, luggage scales, etc.
For Optional Pre-Activity Demonstration
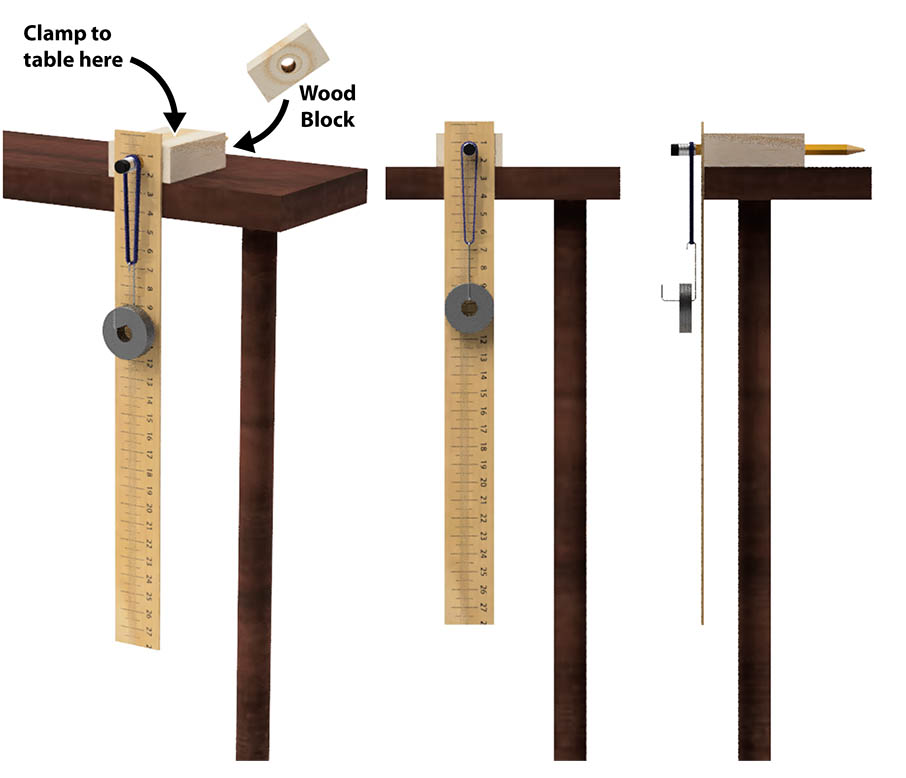
If you have a heavier-weight spring or large, heavy duty rubber band consider using this to demonstrate the technique for the students. The distances moved are greater, and easier for the children to see and understand. Suspend the spring or rubber band from a table top using a clamp with or without a block of wood. Use a meter stick for your scale. If there is no hole in the meter stick simply stand it upright against the table next to the spring or rubber band. You will need heavier weights such as larger washers, 20 gram hexagram weights or even sand bags, and a larger hook or bucket.
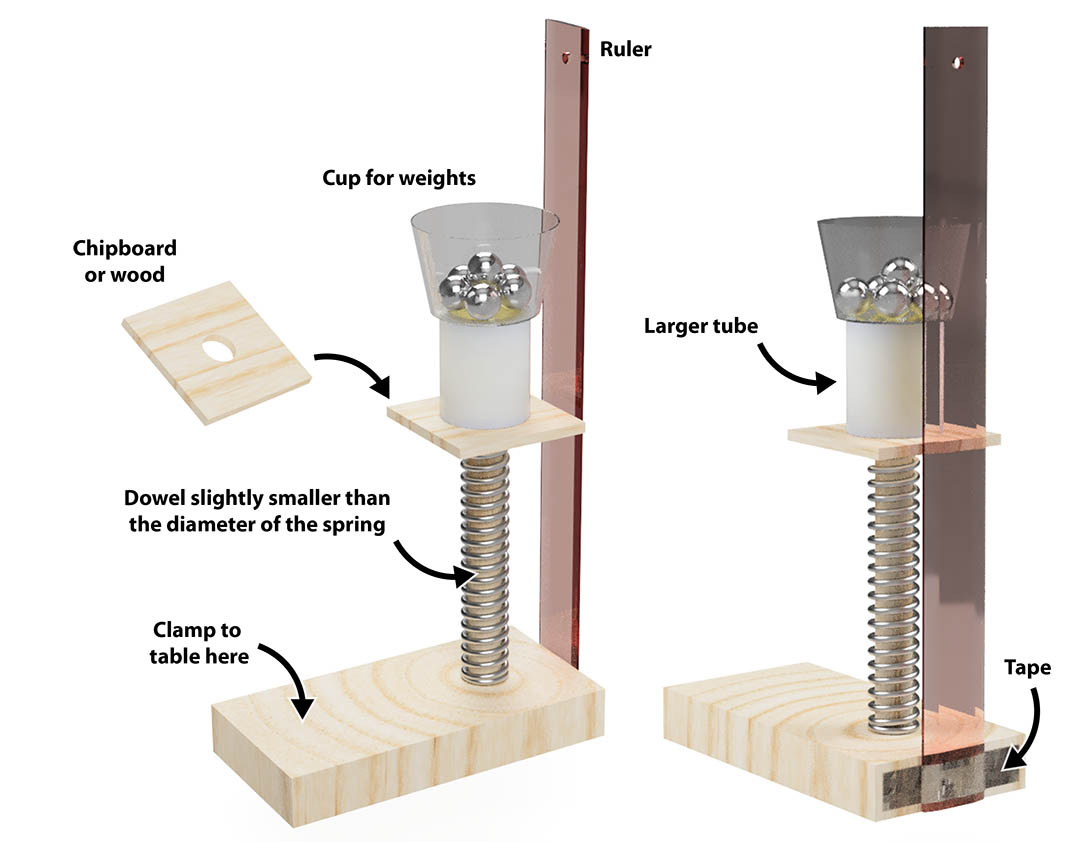
Compression Spring Option
Compression springs, while the basis for most commercial spring balances, are harder to use than extension springs or rubber bands for this activity. Most compression springs you’ll find are too stiff and/or too short. However, if you can twist out the spring from a very thick spiral bound notebook see the plans for a compression spring experiment. Two such setups are shown below — one using washers for weights and one with a cup for “loose weights” like ball bearings.


Printables
Worksheets and other printouts for the module can be downloaded using the button below.
Preparation
Acquiring the right springs and rubber bands is critical to the success of the project. You need springs that are weak enough to stretch with weights you have chosen. You may have to go to a hardware or home center store to test available springs. Choose extension springs with a loop or hook on each end. Ideally, springs should be at least an two inches (~5 cm) but less than four inches (~10 cm) long if using a twelve-inch scale. Rubber bands should be new, with no signs of stress such as discoloration or visible cracks, between two and five inches long. Each team will need a spring or rubber band. Have a few extras on hand.
Set up each work station before the activity begins, one per pair of students.
- Each workstation will need a rubber band or spring, a pencil, washers or weights, a ruler, a support, and one or two S hooks and a cup as needed.
- If you are using weights, punch two holes in the plastic cups, not too close to the rim. Use the string to make a handle on each cup. It should be just long enough to allow you to add or take away weights easily. (See examples in photos above.)
- Use wire cutters and needle nosed or small pliers to form small S-hooks from wire or paper clips to connect the rubber band or spring to the cup handles.
- If you have scraps of lumber available use a 5/16 inch (8 mm) bit to drill a hole in each. It is easier to securely clamp the pencil if it’s been inserted through a block of wood clamped to the table.
- If you don’t have clamps, assemble the cardboard supports. The actual dimensions aren’t important as long as the ruler doesn’t touch the table and the apparatus doesn’t tip over when the weights are added. A standard handheld ¼ inch hole punch produces a perfect sized hole for the pencil. Adjust the pencil so only the metal ferrule extends past the cardboard.
- Use wire cutters and needle nosed or small pliers to form small S-hooks to suspend the springs from the pencil. One end of the hook should fit loosely around the metal ferrule of the pencil. The grooved metal ferrule helps keep the hook from slipping off. Rubber bands can be directly suspended from the pencil.
- If using washers, create S hooks, one end small to attach the spring or rubber band, the other end deep and wide enough to hold all ten washers at the same time.
Print the drawing explaining Hooke’s Law (or show on a TV or projector).
Print record sheets, two per pair of students plus a few extras. Provide a work sheet and pencils for recording and plotting the data at each workstation. Reserve the extra sheets for students who have time to repeat the experiment.
Running the Module
Introduction (~10 min)
Mankind has used scales based on levers for thousands of years. We still use them when accurate measurement of mass is required. In Britain around 1770 Richard Salter invented a new kind of balance that used a spring rather than a lever. Unlike balances based on levers, spring balances can only measure the weight, not the mass of an object. It does so by opposing the force of gravity acting on the item to be weighed with the force of an extended or a compressed spring. Spring balances can be calibrated to indicate mass, but must be recalibrated frequently and for each particular location. They are not as accurate as lever-based balances, and are typically used when some accuracy can be sacrificed for simplicity, speed, and sturdiness. Spring scales are employed to weigh very heavy things like trucks, materials on conveyor belts, and storage silos. Most bathroom scales and the scales for pre-weighing produce at the grocery store are spring balances. (Show examples if you have them.)
Hooke’s Law explains how a spring or rubber band behaves when it is stretched or compressed:
F = k*x (extension) or F = -k*x (for compression)
where k is a number often called the spring constant, a characteristic of the spring or rubber band. F is the force applied to the spring, and x is the displacement, how much the spring is stretched or compressed when the force (weight) is applied. This is shown below:
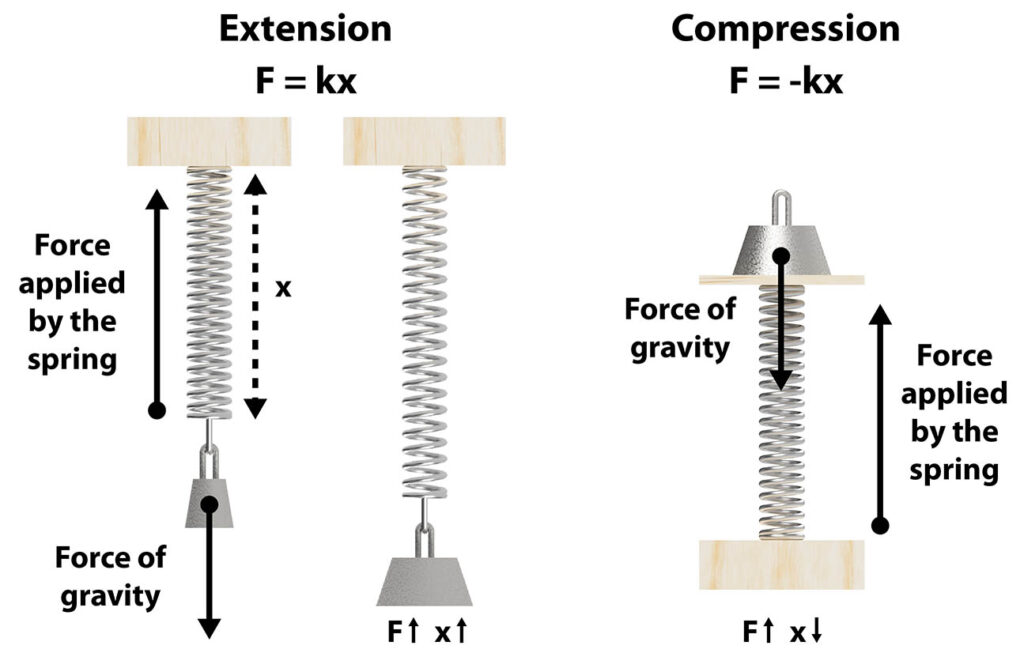
According to this formula, the plot of force F versus displacement x will be a straight line. In this activity you will test this formula using springs or rubber bands. Will you get a straight line?
Demonstrate the procedure using an actual work station, or a larger version if you have one.
- Choose an appropriate point to follow, like the top of the hook holding washers or cup handle, or the bottom of the cup holding weight.
- Explain that the same point must be used every time a weight is added or removed.
- Explain the importance of reading the ruler with eyes level with the point chosen. Avoiding parallax error is key to obtaining accurate data.
- Add the first weight, then read the location of the chosen point on the ruler. Use the centimeter scale, and record the reading in centimeters, not millimeters.
- Make sure the hook doesn’t slide off the pencil
- Add the second weight, then read and record the location.
- Repeat until all ten weights have been added.
- Remove one weight, then read and record the location.
- Repeat until only one weight remains.
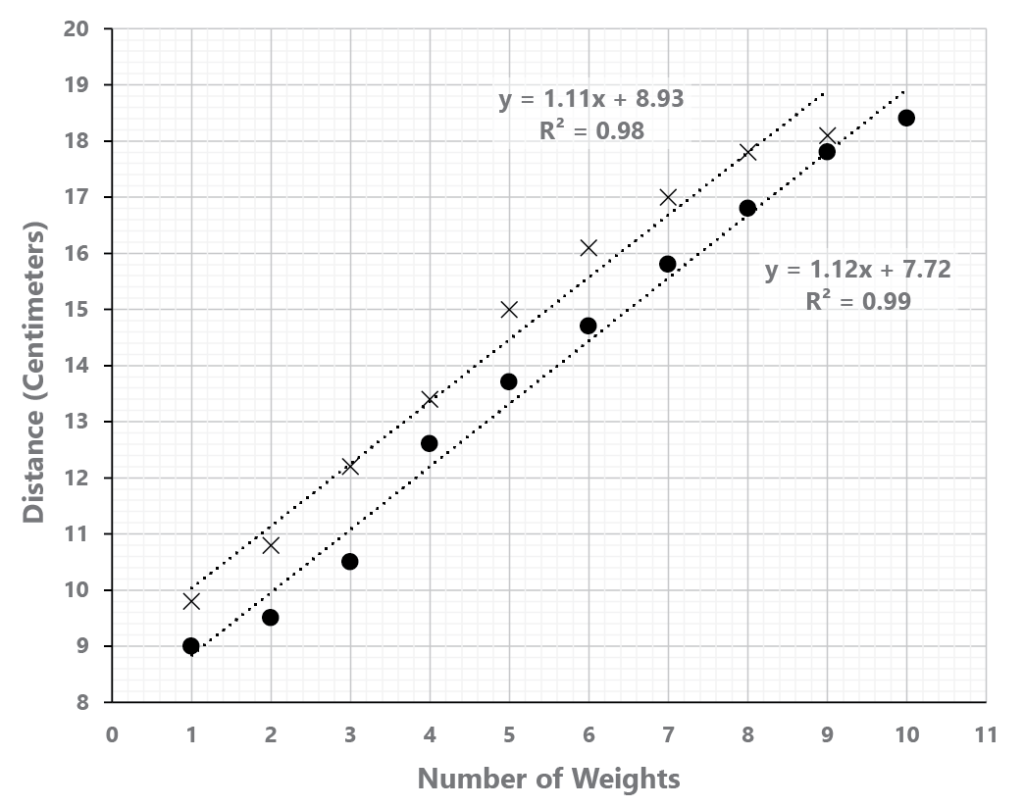
- Based on your data, label the Y-axis on the graph.
- Plot the data for adding weights on the graph. Connect those points.
- Plot the data for removing weights on the same graph. Connect those points.
Activity
Assign pairs of students to work stations. Allow the students to work at their own pace, but monitor them to make sure they understand how to obtain accurate readings. Younger students may need help plotting their data. If teams finish with enough time left give them new record sheets to evaluate a different rubber band or spring. One option is to have teams do the data plotting away from the workstations so those will be available to other teams more quickly.
Conclusion (~5 min)
Gather the teams with their record sheets. Ask the following questions:
- Did you get straight lines? If not, what might be the reason?
Did parallax error skew the readings of the ruler? Did you use the same point to measure each time? Is the rubber band old, and not perfectly elastic anymore?
- Are the lines straight in the middle, but not at one or both ends?
With the least weight the rubber band or spring may be somewhat limp, and might not be hanging straight down. With greater weights the rubber band or spring might have stretched beyond its elastic limit
- Are the lines plotted when you removed the weights exactly the same as the line you plotted when you added weights?
Rubber bands lose some of their elasticity every time they are stretched, eventually wearing out and breaking. That’s why they often don’t return to their original lengths. If springs are stretched beyond their elastic limit they won’t return to their original length.
Were your kids hooked on springs? Did you make any tweaks to the activity that worked well for you? Good sources of springs? We’d love to hear from you! Drop us a note or leave a comment!
Header image made using images from Wikimedia Commons: “Feet on Scale“, “Fruit Scales“, and “Salter Housewares Scale Duwisib Castle“.


0 Comments