Most children have heard about DNA, whether in terms of police detective work, discovering one’s ancestry, fighting cancer and other diseases, or most recently in the new highly effective mRNA vaccines. This module provides even young students the information to better understand what DNA is, and how it is essential to all life.
The process of actually extracting the DNA takes a little time, so in between the steps, students will participate in a variety of games and activities that teach about various aspects of DNA function and construction.
Supplies
Refer to the DNA extraction instructions for ingredients and tools. Ideally you will want one 15 mL test tube and a stirring stick or wire per child and test tube racks. However, sizes are flexible, and a pair of students could share one tube without taking too much away from the experience.
Syringes and/or pipettes for ease in transferring ingredients (optional)
Insulated container with ice (if a freezer won’t be handy)
Pencils, at least one per student plus extras
Printables
All the necessary worksheets, game components, instructions, and Translation and Transcription presentation can be downloaded in printable form using the button below:
Preparation
Assemble the ingredients and supplies for the DNA extraction according to the instructions. Test the extraction process at least a day ahead of time to ensure it works for you, making modifications as necessary.
Print and cut the materials for the games. Have volunteers lay out the codons for the mRNA coding game during the gathering time.
Print the Translation and Transcription presentation if you won’t be able to project it. If you use the suggested online activity, go through it at least once yourself so that you are familiar with how the activity works.
DNA Extraction
There are many recipes for extracting DNA available online, but they all have these features in common.
DNA Source
You can use saliva or foods with particularly large amounts of DNA, such as strawberries and split peas. Strawberries are octoploid, having eight of each type of chromosome, so they yield a lot of DNA.
Buffer Solution
- Detergent breaks up cell and organelle membranes. DNA is located in the cell nucleus.
- Salt prevents the DNA strands from clumping together before they are separated from the proteins that bind them.
- Baking soda maintains a neutral pH of the solution. The DNA will be destroyed if the solution is too acidic or basic.
- Enzymes release the DNA strands from the proteins that bind them.
Alcohol
DNA is not soluble in cold alcohol. Use 91% Isopropyl alcohol (a.k.a. “rubbing alcohol”), available in the first aid section of any pharmacy or pharmacy department.
We’ve used this method when extracting DNA as one part of a sixty-minute activity for elementary school students with limited lab supplies. Since the ingredient amounts are approximate and detergents, meat tenderizers, and pineapple juice vary in composition and concentration, we strongly advise you to try the procedure as written before the day of the activity to make sure it works for you! If it doesn’t, check to make sure you followed all of the instructions. If so, try doubling the amount of detergent and enzyme (meat tenderizer or pineapple juice) in your buffer. If you are still unsuccessful, consider trying another recipe. Links to three alternatives are given at the end of these instructions.
Before the Activity
Thoroughly blend strawberries, fresh or frozen, with about 5 mL of distilled or bottled (not tap) water per strawberry. When you have a smooth, uniform mixture pour it into a strainer, collecting the slurry of strawberry cells. The slurry must be at room temperature, never chilled, at the time of extraction.
Prepare the buffer solution:
- 125 mL (1/2 cup) of distilled or bottled (not tap) water
- 1/4 teaspoon of salt
- 1 teaspoon of baking soda
Stir these ingredients until the solids are completely dissolved. Gently mix in:
- 1 teaspoon of dishwashing detergent
- A pinch of meat tenderizer powder or a drop of pineapple juice
Put your alcohol in the freezer. If using 15 mL test tubes you’ll want about 3 mL per tube. If you won’t have a freezer available during the activity pack and keep the bottle of alcohol packed in ice after you remove it from the freezer.
Day of the Activity
At the beginning of your activity show the children your containers of strawberry slurry and buffer. Briefly explain that the strawberry slurry contains separated cells, and the purpose of each ingredient in the buffer. Choose a student to add the buffer solution to the strawberry slurry and stir it gently to mix. Use a one-to-one (1:1) ratio of slurry to buffer.
While the students participate in another activity, prepare the test tubes of slurry, one per child if possible. Place about 3 mL of slurry/buffer mixture into each 15 mL test tube. If your test tubes are larger use more, up to one third of the tubes’ volume. Place the test tubes in racks or holders. About fifteen minutes after the buffer was added reassemble the students and assign each a test tube. Since the alcohol and strawberry layers must not be mixed, adults should slowly add the cold alcohol to each tube, letting it run gently down the side of the tube which is being held at an angle. Add about the same amount of alcohol as strawberry mixture. Return tubes in the upright position to the rack so the children can watch the DNA begin to precipitate out. It will look like wispy cobwebs extending upwards into the alcohol layer.
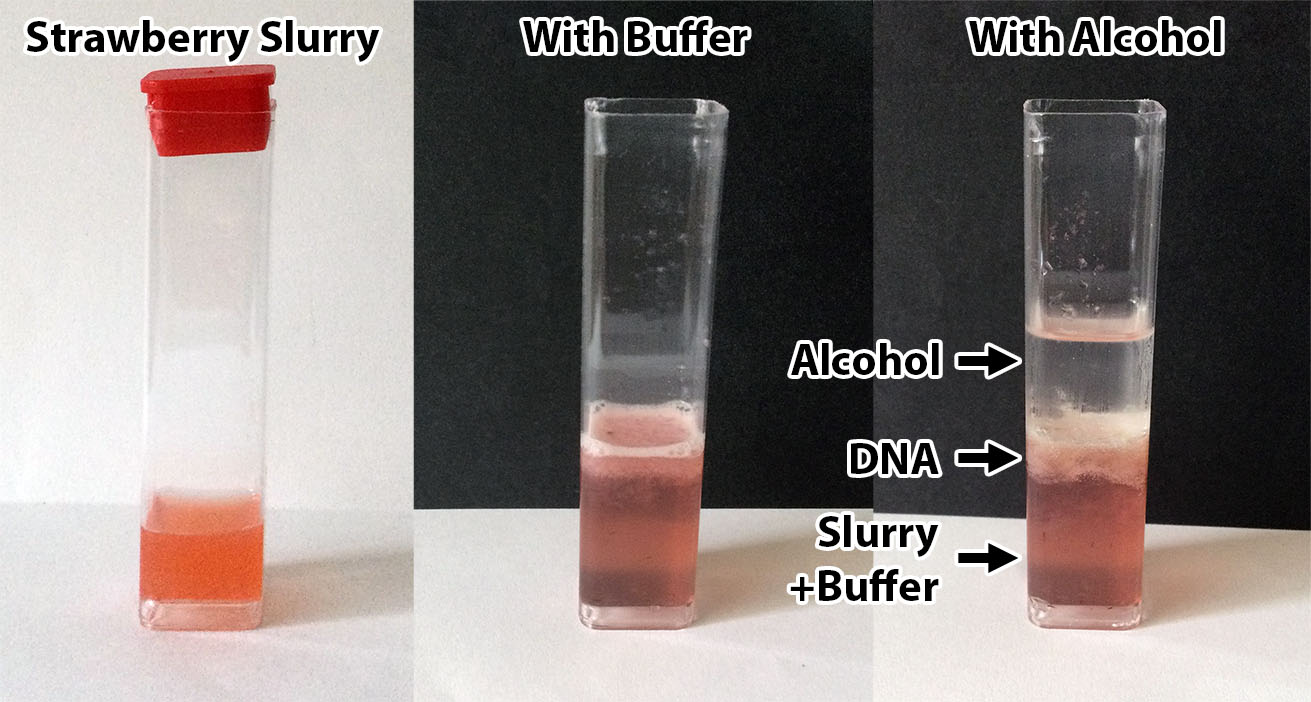
Engage the students in another activity so the tubes can stand undisturbed in the racks for about 15 minutes. Reassemble the students. Give each team a thin rod-like a coffee stirrer or a piece of wire with a little hook at one end. If the students carefully swirl the rod in the alcohol layer they should be able to capture and remove the DNA, which will look like a mass of translucent strands.
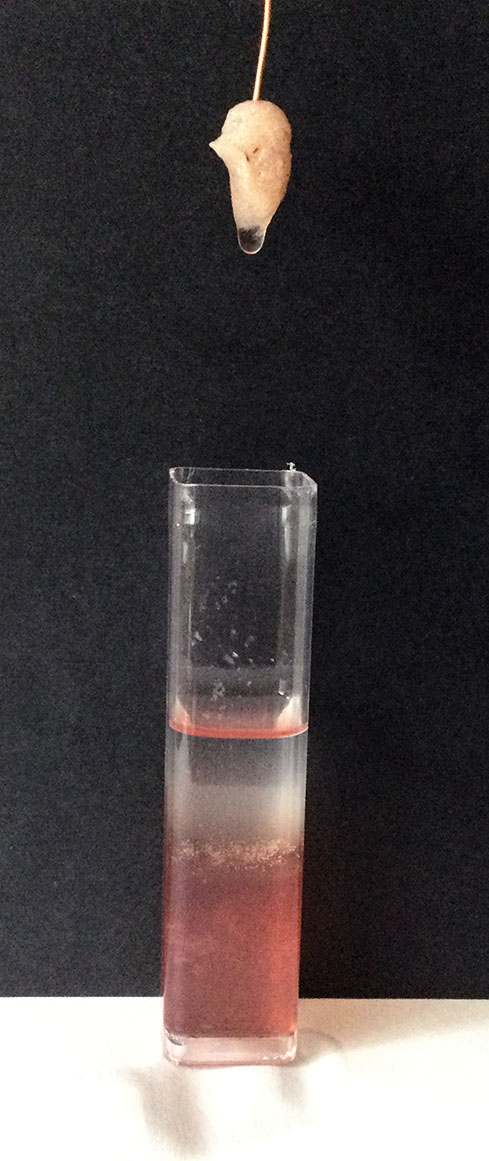

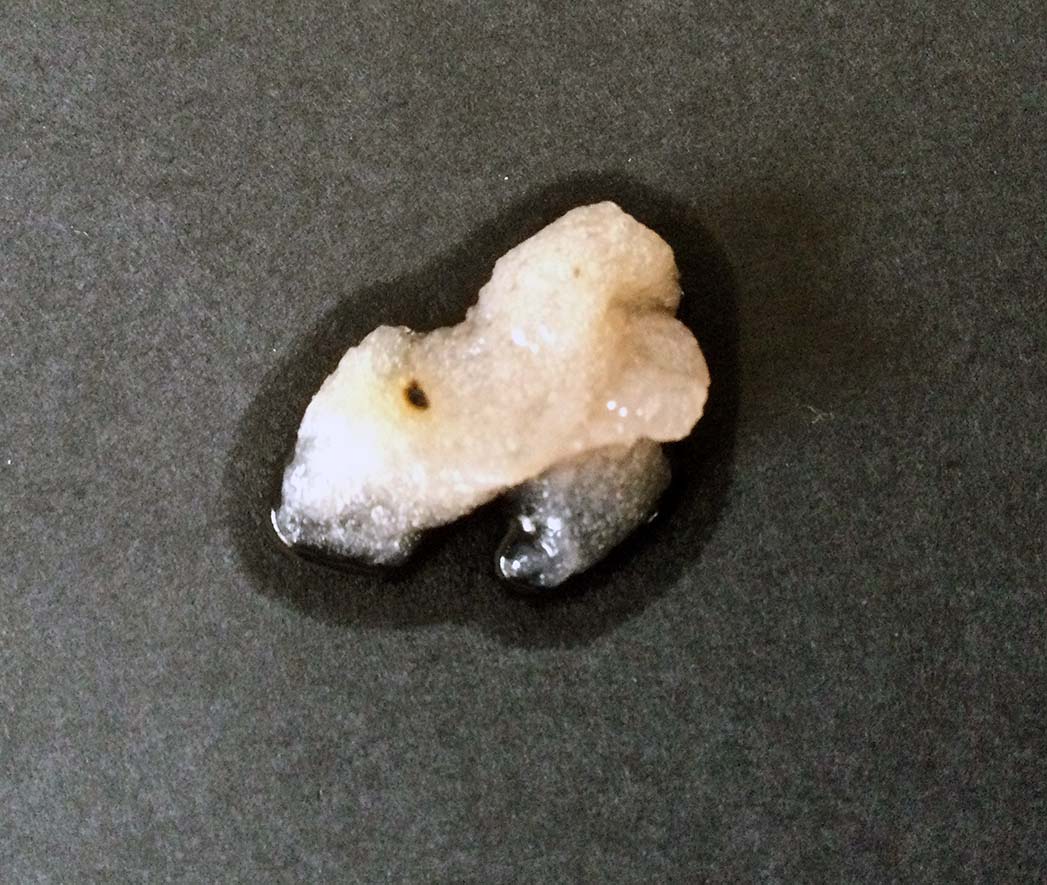
Ask the children why we are able to see this DNA with our naked eyes. If they need a clue have someone hold up a single long human hair or piece of sewing thread from across the room. Can the children see it? Can they see someone’s pony tail or a piece of knitting yarn? They can see the DNA because they are looking at a very large number of strands all bunched together.
Alternative Versions
A student-friendly procedure for extracting human DNA is available here from NOVA’s Science Now.
A version using split peas that is good for this age group is available here from the Genetic Science Learning Lab at the University of Utah.
Here is version from the University of California at Davis for older students, if the extraction process itself is the primary focus of your activity. It requires additional lab equipment per student.
Game Instructions
Translation
This game is designed for twenty-four students plus three adult or older student volunteers. You will need an unobstructed area like a hallway, gym, or outdoor space. Peptides are chains of two to fifty amino acids, and are the constituent parts of much larger proteins. Cut the mRNA strips apart. Give one strip and an amino acid/ RNA codon table to each “tRNA” volunteer. Cut the five amino acid strips out, giving one amino acid to each of the twenty-four students. Designate a starting point along a wall for each of the three peptide chains. Assemble the codon students a distance away from the starting points.
Before beginning the game, call the tRNA players’ attention to the many codon patterns that will help speed their searches. For example, any codon beginning with “CC” will be proline; any codon beginning with “GG” is glysine and so forth. The game starts when the tRNA players go in search of the first amino acid on their lists. When found, they take those students to their starting points where the students remain, touching the wall. The tRNA players find the second amino acid on their lists, and “attach” those children to the first. The peptide chains grow as amino acids are found and added in order. The winning team is the first to find reach the STOP codon of their mRNA.

The game can be adjusted for a larger group. In that case you will need to print additional amino acid sheets and adjust the length and composition of your mRNA strips. We suggest using more, shorter chains rather than fewer longer chains. For example, if you have 32 students make four peptides with eight codons each rather than two peptides of sixteen each.
mRNA Coding
One set of codons and one set of peptide chains provide enough materials for twelve students or teams of students, each making an eight-codon mRNA chain. There are five codons for each amino acid (six for serine) and 12 stop codons. There will be a number of unused codons if all students complete their mRNA chains correctly. Cut the codons apart and place them face up on a table or counter so that all are visible. Choose a location large enough so that 12 individuals can view the codons at the same time.
Cut the twelve peptide chain strip columns apart. Each will have seven amino acids, represented by their three letter designations, followed by a STOP. Provide each student or team with a peptide strip and a reference table of RNA codons. Their task is to retrieve a codon for each amino acid on their strips, the winner being the first to complete this correctly.
Explain that messenger ribonucleic acid, mRNA, provides the template on which amino acids are assembled to make peptides and proteins. Peptides are chains of two to fifty amino acids, and are the constituent parts of much larger proteins. Each student or team’s task is to find a codon for each of the amino acids in their respective peptide strips. Before beginning the game, call the students’ attention to the many codon patterns that will help speed their searches. For example, any codon beginning with “CC” will be proline; any codon beginning with “GG” is glycine and so forth.
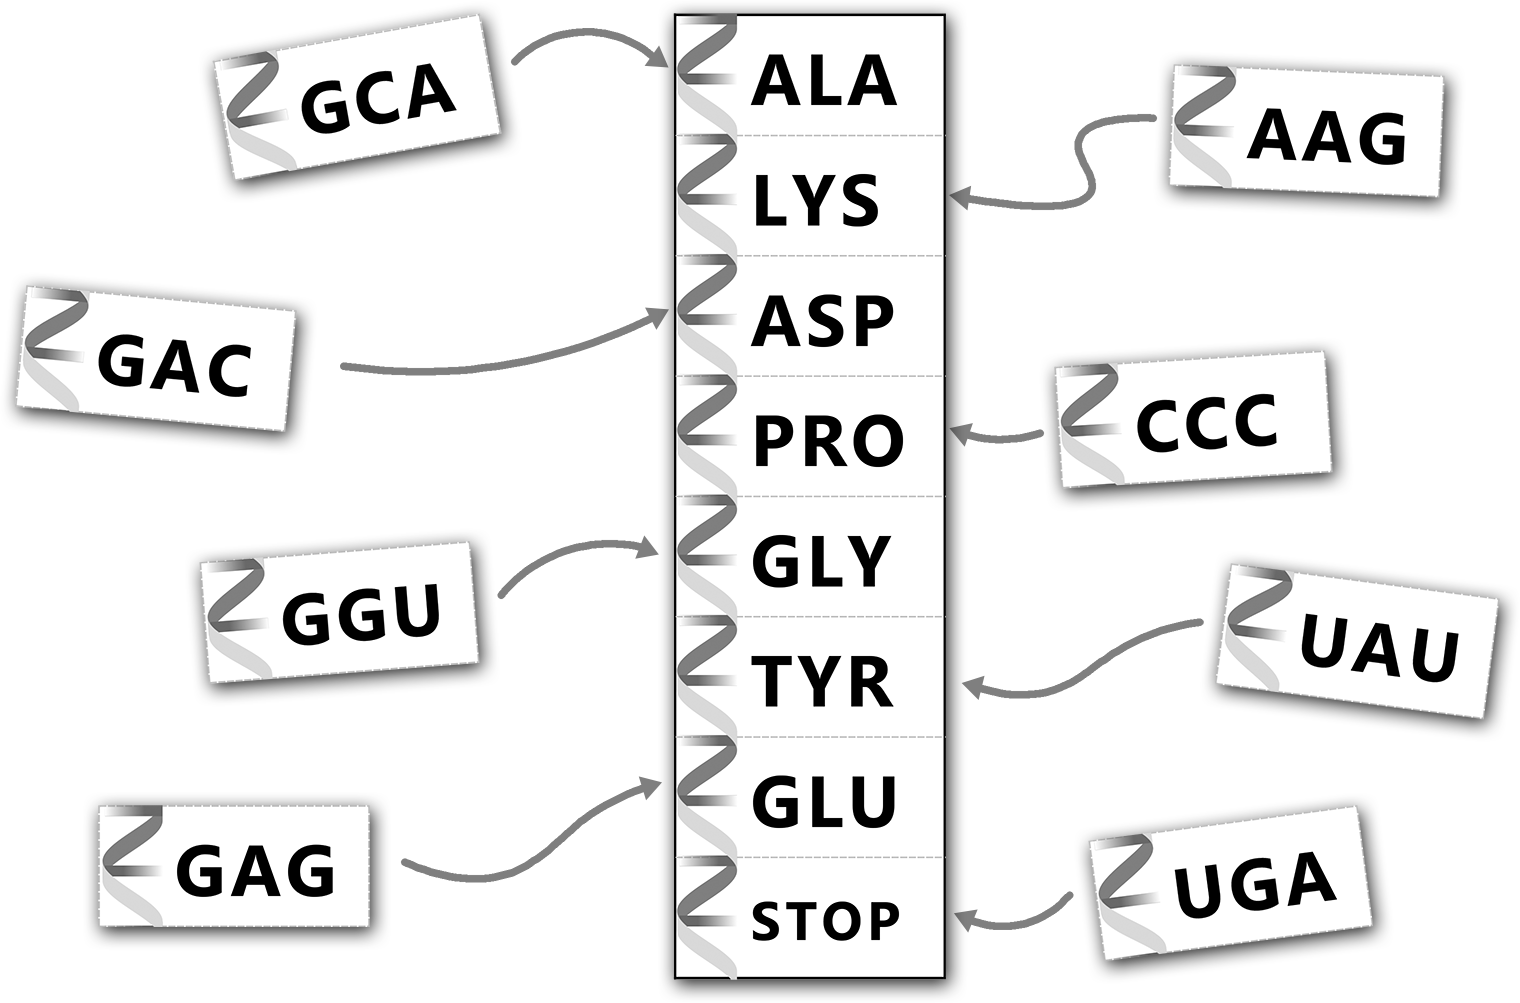
Assign each student or team to a location away from the codon table where they must leave their peptide strips. Only one person per team may view the codons at a time unless you are able to spread them out over a particularly larger area. After students retrieve a codon they place it on top of the corresponding amino acid on their strips. They do not have to find the codons in order. Check the completed mRNA for accuracy, returning any codons placed in error to the codon table. There are most likely other students searching for them!
Hidden Messages
Give each child a pencil. Each amino acid is associated with a three-letter abbreviation, a single letter, and one to six RNA codons. Each codon contains three nucleic acids represented by the letters A, G, C, or U.
To discover the hidden messages, students write the amino acid letter associated with each codon. Begin by having each student find and mark every “stop” codon. There is a stop codon at the end of each word. Note that there is a “start” codon at the beginning of each message.
There are a number of ways to organize this activity including but not limited to:
- If you have access to a white board or equivalent you can have students enter words as they find them.
- Divide the students into teams of four. The winning team is the one to discover the most words.
- Divide the group into six teams and assign one message to each. The winning team is the one to decode its message first.
- Students work individually or with a partner until time is called. Encourage them to bring the sheets home to complete.

Running the Module
Introduction (<15 min)
You will be presenting an extremely simplified overview of how RNA is transcribed from DNA, and is then translated into proteins, the process that makes life possible. If you use the online “Learn Genetics” activity referenced in the provided Translation and Transcription presentation do it as a group. Be prepared for some students to catch on quickly, and others to be utterly confused. However, they will have enough information so they can play the games. Hopefully all will have a better understanding at the end of the module.
Assemble the students. Begin by explaining the extraction process and adding the buffer solution to the strawberry slurry as described in the DNA extraction instructions. While you continue with the Presentation and/or “Learn Genetics” introduction have your volunteers divide the strawberry/buffer mixture into the test tubes, then distribute the test tubes in racks to tables.
Extract DNA – Part 1 (5 min)
Assign each student to a test tube. You and your volunteers will then add the very cold alcohol to each tube as described in the DNA Extraction instructions. With the students still sitting by their tubes, distribute the amino acid tags for the Translation Game. Before you leave for the game have the children look for the first wispy strands of DNA forming at the alcohol/slurry interface in their test tubes. Remind them not to touch or shake the tubes!

Translation Game (10 min)
Move into the unobstructed space chosen for the RNA translation game. After the game collect the amino acid tags, then return to the test tubes.
Extract DNA – Part 2 (5 min)
Have the students check their tubes for DNA, reminding them not to touch or shake the tubes. If sufficient DNA has precipitated out give each child a stick or hooked wire. (If not, proceed to the mRNA coding game, leaving the tubes to rest a bit longer.) Demonstrate how to place the tip of the stick or wire into the alcohol layer (not into the strawberry layer) and gently swirl it in the DNA. Hopefully each child will be able to remove the clumped DNA on the stick for closer examination.
Ask them why they are able to see the DNA with their naked eyes. If they need a clue have someone hold up a single long human hair or piece of sewing thread from across the room. Can the children see it? Can they see someone’s pony tail or a piece of knitting yarn? They can see the DNA because they are looking at a very large number of strands all bunched together.
Return the sticks or wires to the tubes, and set the tubes and racks aside for later cleanup.
mRNA Coding Game (10 min)
Divide the students into 12 teams and give each team a peptide strip and an amino acid codon chart. Explain the rules, then start the competition. Afterwards return to complete the DNA extraction if you haven’t already done so. Otherwise, assemble the children for the Hidden Messages game.
Hidden Messages Game (15 min)
Depending on the game format you chose, give each student or team of students a hidden messages sheet and pencils. Explain how to decode the messages. As a group find and mark all of the STOP codons, then allow the students to decode the words at their own pace.
How did your young biochemists do? Strawberries sure have a LOT of DNA, don’t they? Did you make any tweaks to the activity that worked well for you? We’d love to hear from you! Drop us a note or leave a comment!
Updated 31 October 2021 to fix the Amino Acid Tags printable.
Updated 10 November 2021 to fix a typo in the codon sheets and adding some notes about running certain activities with younger kids.


0 Comments