Archimedes’ principle states that the upward force (buoyancy) exerted on a body partially or fully immersed in a liquid is equal to the weight of the liquid that the body displaces. This law of physics is fundamental to the field of fluid mechanics. It was first described by Archimedes of Syracuse.
The net force on the object is the difference between the magnitudes of the buoyant force and the object’s weight. The object rises if the net balance is positive, sinks if it is negative, or remains in place, (floats) when it is zero.
In this module, students will learn about density and its measurement via water displacement. They will employ this knowledge to determine the identities of mystery metals, sleuth out whether the jewelry is real, and more!
Supplies
Supplies per Team
- 1x Plastic 100 mL graduated cylinder
- 1x Plastic test tube with cork stopper that fits inside the graduated cylinder (160 cm long, 1.5 cm outer diameter works well and is readily available online. For other options, see our boat building module.)
- 1x Wire lifter
- 1x Piece of scrap fabric ~2″x2″ (5×5 cm)
- 1x Piece of dark colored paper ~4″x4″ (10×10 cm)
- 1x Pencil
- 1x Calculator (Optional)
- 1x Cafeteria Tray (Optional)
Additional Supplies
- Food coloring (blue is best; no yellow)
- A Clean 2- to 4-Liter bottle
- A Black permanent marker (e.g., Sharpie), medium or wide-point
- Assorted metal items that fit inside the test tube (e.g., screws, nuts, bolts, fishing weights, ball bearings, tubing, rods, etc)
- Stiff wire, ~16 inches (41 cm) per team
- Stiff, flat plastic (e.g., from packaging)
- Needle-nosed pliers
- Sturdy scissors or tin snips
- Awl
- Hand-held hole punch
- Paper towels
Printables
The worksheets and diagrams for this module can be downloaded using the following button:
Preparation
Wad the fabric scraps and stuff one into each test tube (see photo). Tamp firmly to protect the bottom of the tube.

Prepare the wire lifters which protect the bottom of the cylinder. These also allow students to raise the samples and test tubes without pouring the water out of the cylinder. Cut circles from the flat plastic packaging material with scissors (or tin snips if the plastic is too thick for the scissors). The diameter should be about 4 mm less than the inner diameter of the graduated cylinder. Punch one hole using the hole punch about 1/8 inch (~1/3 cm) from the edge of the disk, then punch several smaller holes using the awl.
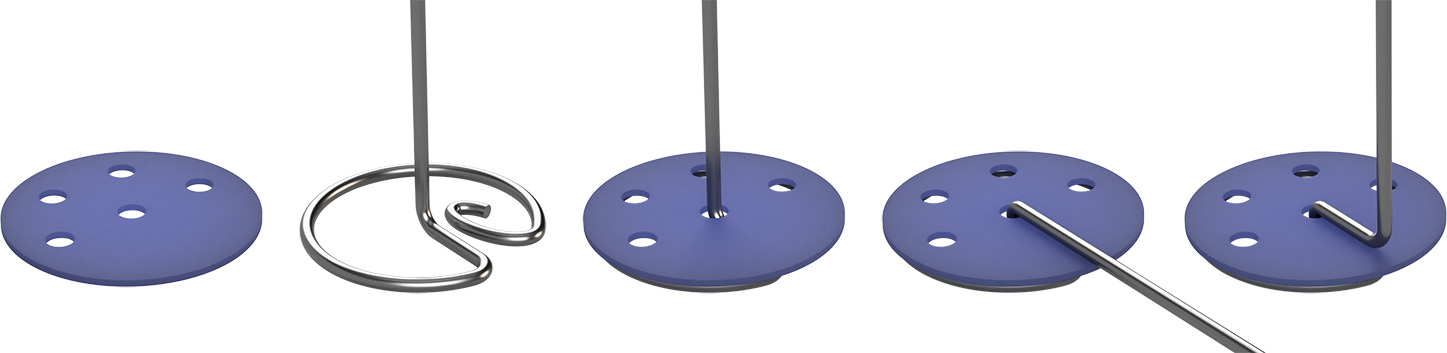
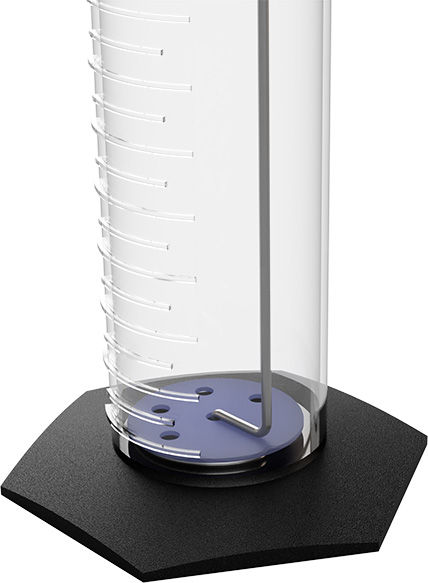
Cut a length of stiff wire about 4 inches (10 cm) longer than the cylinder is tall. Using the needle-nose pliers bend the wire as shown, adding the plastic disk as indicated. The wire lifter must be rigid enough to hold your heaviest item without bending, but the wire must also be thin enough to allow the test tube to float freely inside the cylinder. The wire should lie very close to the inside wall of the cylinder when inserted so it won’t interfere with test tube’s ability to float freely.
If you have plastic graduated cylinders with same-colored raised markings darken them using the side (not the point) of a Sharpie brand or similar permanent black marker. This makes the markings much easier to read.
Add one or two drops of food coloring to about two liters of water. It is easier to read the water level with slightly tinted water.

Put 50 mL of water in a cylinder. If you have an electronic or other balance you can estimate which samples will work. The weight of the sample, tube, cork, and fabric wad should be less than 50 grams. Place the heaviest sample that meets that criteria into a corked tube and gently lower it into the cylinder. If it floats, and the water level stays below 100 mL, all of your samples will be usable. If the tube rests on the bottom, set it aside (not usable!) and test your next heaviest sample. Continue until you determine which of your samples are usable. A sample should displace at least 1 mL in volume in order to get a good reading.

Label your samples with a number that won’t wash off. You can also take a picture of each sample to display with the actual samples to provide the identification number. You will want at least seven different items and as many individual samples, including duplicates, as you have teams. If possible, have one additional item to use for the demonstration.
Many metal items in our lives are actually alloys (mixtures of metals) rather than a single metal element. It is okay — and even a useful lesson — to use some alloy items, but you will want to have pure metals, too. Some common, inexpensive items that will fit in the tubes and are effectively pure metals are listed in the table below.

On every cafeteria tray or at every work station place a graduated cylinder with 50 mL of tinted water, tube with fabric wad and cork, wire lifter, pencil, record sheet, piece of colored paper, a paper towel, one metal sample, table of densities of common metals, and a calculator (optional).
Set up a station where teams will exchange samples. Print the force and meniscus diagrams.
Running the Module
Introduction
What weighs more, a pound of fluffy feathers or a pound of rocks? Neither, they both weigh one pound. The rocks, however, are more dense, taking up much less space than the feathers. Density is the mass per unit volume, determined by dividing the mass of an item by its volume. Many materials, like metals, polymers, and woods can be identified by their densities.
Archimedes’ principle states that the upward force (buoyancy) exerted on a body partially or fully immersed in a liquid is equal to the weight of the liquid that the body displaces. This law of physics is fundamental to the field of fluid mechanics. It was first described by Archimedes of Syracuse.
Tell the story of Archimedes and King Hiero II’s votive crown.
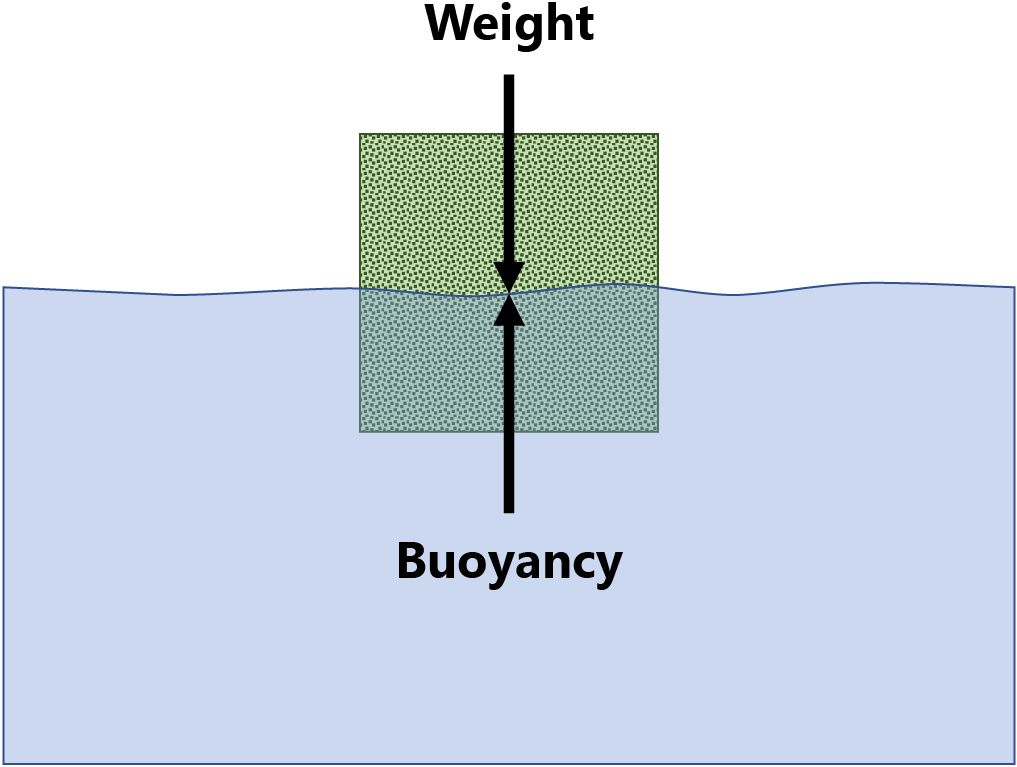
Show the force diagram.
The net force on the object is the difference between the magnitudes of the buoyant force and the object’s weight. The object rises if the net balance is positive, sinks if it is negative, or remains in place, floats, when it is zero.
Explain that we can use the same concept to determine the density of items with no balances, rulers, or other such measuring tools. This is particularly useful for items which have shapes difficult to measure.
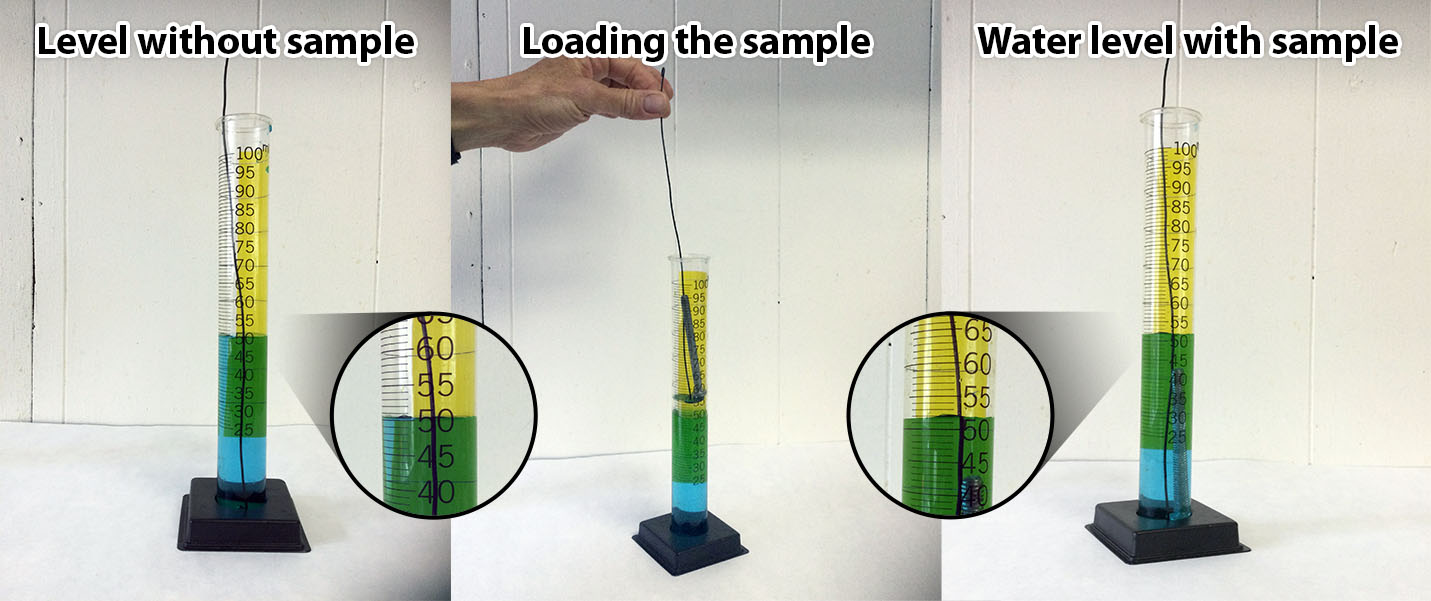
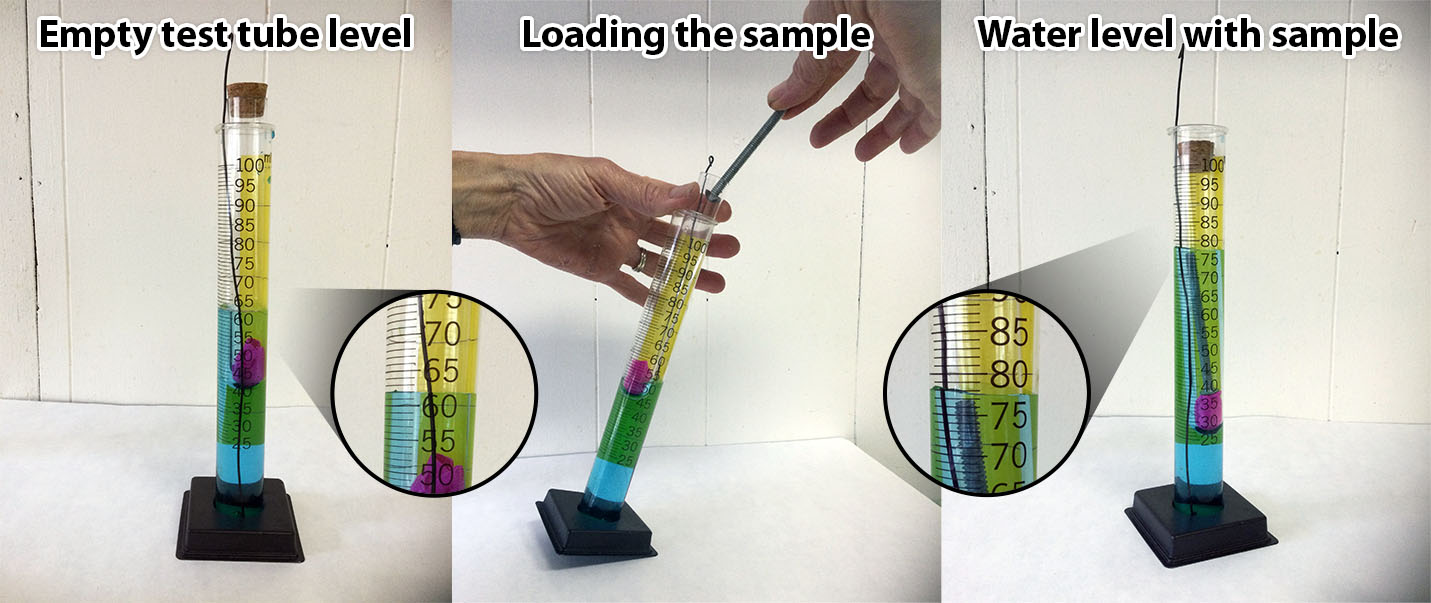
Demonstrate the procedure outlined on the students’ answer sheets. Explain the markings on the cylinder. Be sure to explain that students must keep eyes even with the top of the water. When the tube is in the graduated cylinder read the water level where it touches the glass sides. When the naked sample is in the cylinder read the value at the bottom of the meniscus. (Show the meniscus diagram.) Holding the piece of dark paper behind the cylinder makes the water level easier to see. Estimate volumes to the nearest 0.5 mL. (If you are working with middle school students, estimate to the nearest 0.25 mL.) If there are no questions send teams to the work stations.
The procedures for measuring the water levels with or without using an inner test tube is shown in the photos below:
The Activity
When a team finishes with the sample at their station, they exchange it at the sample table for another. Teams continue to measure and exchange samples until time is called. They should calculate the densities and identify the metal as they work, not wait to do all the calculations at the end.
While the students work recalculate the density you determined in the demonstration by adding 0.5 cm3 (0.25 cm3, if working with middle schoolers) to the volume you measured. Recalculate the density subtracting 0.5 cm3 (or 0.25 cm3) from the volume measured. Jot down your results to use later in the discussion.

Fifteen minutes before the end of the activity stop issuing new samples. As teams finish calculating their last trial visit each to collect their density values for one of your samples. Choose one you are reasonably sure isn’t an alloy, like an aluminum nail or a lead fishing weight. Calculate the average of their result and save it for the discussion. Then gather the students with their answer sheets. Read the answers. How did the students do?
Discussion & Conclusion
Did the teams’ answers differ from one another? Why?
Air bubbles clinging to the object might affect the volume measured.
It can be hard to read the level of water accurately, especially if your eyes aren’t level with the water level.
Accuracy in reading the volume of water, especially when determining the volume of the sample, is crucial. A difference of 0.5 mL makes a big difference when the volume of an item is only two cm3. Show the students your recalculated demonstration results. Then show the range of answers your students obtained for one particular sample, and the average. Was the average any closer to the actual density for that particular metal? Does this suggest that making more trials leads to more accurate outcomes?
Why do some samples have densities that don’t match a particular metal exactly?
Many items are made out of metal alloys rather than pure metals. You can’t tell by looking if a metal is an alloy. For example, pennies are copper colored but are almost entirely zinc. Many items are brass colored, but there are many different alloys that are all types of brass.
How did your young Archimedeses do? Did they discovery the truth about the jewelry, find the pure metals, and more? Did you make any tweaks to the activity that worked well for you? Have any good sources of suitable metals? We’d love to hear from you! Drop us a note or leave a comment!


0 Comments