This module is an alternative version of — or follow-up to — The Great Boat Float Challenge, which may be more satisfying for older students — third grade and up — than simply building a boat to hold as much weight as possible. Students consider the real-world problem that marine engineers and naval architects face when designing ships to pass through the Panama Canal. “Panamax” refers to the maximum allowable dimensions for those ships. This is a good activity for teams of two students.
Supplies Needed
Reusable
- Scissors (1/team plus 1-2 at the store)
- Pencils
- “Cargo” (see below)
- “Locks” (see below)
- “Bridges” (see below)
- “Passenger” (optional)
- Empty milk jugs or two-liter soda bottles (at least 1/”lock”)
- 1x Five gallon or similar-sized pail (unless there is a sink in the room)
- Cafeteria trays (1/team, optional but very useful)
- Pictures or slideshow of the canal, locks, map of Panama, etc. (optional)
Consumable
- Boat building supplies (see below)
- Paper towels
- Scratch paper
- Tape (masking or painter’s preferred, for marking the “locks”)
Printable
- “Store” order forms
- Boat bucks


“Cargo” – These are what the boats must carry. Mass of ~200 g and ~3 inches (7.6 cm) tall. Each “lock” should have identical “cargo”. One good option is two empty 6 ounce yogurt cups with 90-100 g of weight in each per “lock”. Anything waterproof can be used for the weights.
If you like, you can also add a “passenger” (such as the rubber ducky in the photos) to what the boats must carry. In addition to amusement, it also tends to add extra height to the boats.
“Locks” – These are what the boats will be floated in. Transparent plastic shoe storage boxes make ideal “locks”. They are roughly 13″x7.5″x4.5-5″ (33x19x11.5-12.5 cm) depending on the manufacturer. One “lock” per three teams is a good ratio to facilitate testing
“Bridges” – The boats must pass under these to succeed. One “bridge” per “lock”. Anything will do here, from a ruler resting on two stacks of books to an arch constructed from any building set components.
Basic Boat Building Supplies – Aluminum foil, pieces of chipboard (such as cereal boxes), corrugated cardboard, waxed paper, masking tape. We recommend the chipboard and cardboard pieces be roughly 8.5″x11″ (the size of a standard sheet of paper).
Additional Boat Building Items – These can include water balloon sized balloons, plastic Easter eggs, 2-3 ounce (no larger) cups, plastic golf balls, small plastic food container lids, wooden craft sticks, plastic thread spools, ping pong balls, string
Printables

The link below contains printable files for the various handouts and customizable shopping list template used in this activity:
Preparation
Assemble the boat building supplies. In addition to corrugated cardboard, chip board (such as from cereal boxes), masking tape, waxed paper, and aluminum foil, choose five other items. More than ten choices can be overwhelming to some students. Cut the cardboard to size and a few pieces of foil and waxed paper. Set up your store. If this isn’t possible ahead of time have your volunteers do this during the gathering time.
Complete, print, and cut out shopping lists. Print and cut Boat Bucks, ten per team.
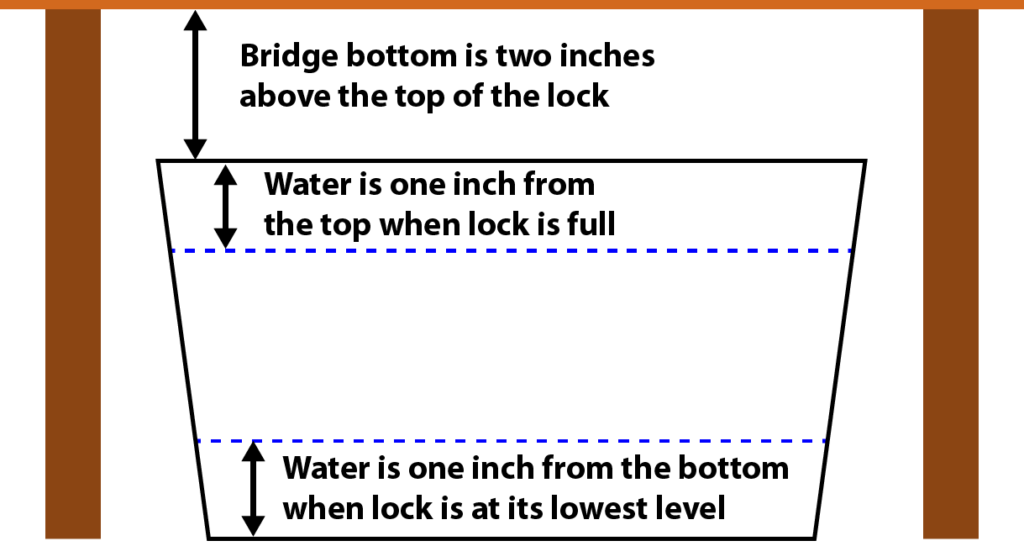
Using tape, mark the beginning (lowest) and final (highest) water levels on each “lock” container. The lowest level should be one inch from the bottom of the tub. The highest level should one inch below the top of the tub. Assemble the “bridges.” Center one over each lock. The assembled testing setup is shown in the diagram below:
Fill the empty milk or soda bottles with water, at least one or more per lock depending on how many teams will be testing at each lock.
Assemble the “cargo” for each lock. The cargo should be exactly the same at each lock.
If you are using trays, prepare one per team with ten Boat Bucks, a shopping list, pencil, ruler, scissors, and scratch paper. If not, place these items at designated work stations.
Running the Module
Introduction (≤ 10 minutes)
A lock is a method used for raising and lowering boats or ships between stretches of water of different levels on river and canals. Each lock is a chamber that can be opened and closed on both ends. A ship enters the chamber from one end, the gates close, then the water is raised or lowered to the level of water at the opposite end. Those gates open, and ship continues on its way. Locks allow ships to travel over hills or even mountains! (There are many videos available online showing a lock in action.)
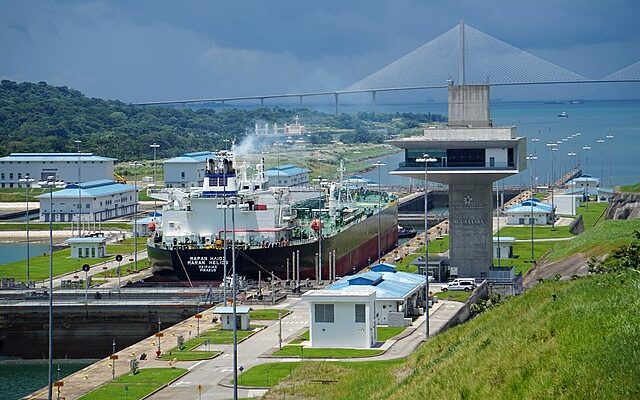
Not all ships can travel through every canal. The allowable width (called the “beam”) and length are determined by the size of the lock chambers, and the “draft” (depth below the waterline) by the depth of water in the canal. The original dimensions for the Panama Canal, Panamax, have been in force since 1914 when that canal was first completed. The height above the waterline has been limited since 1962 by the Bridge of the Americas. A third set of locks was completed in 2016. Since then, New Panamax dimensions are in force. The Panama Canal provides a shortcut between the Atlantic and Pacific Oceans, saving ships thousands of miles and weeks of travel. Ships that are bigger than the Panamax sizes are called post-Panamax or super-Panamax. Those ships have to sail all the way around the South American continent to travel between the Atlantic and Pacific oceans!
| Boat Dimension | Original Panamax | New Panamax |
|---|---|---|
| Length | 289.56 m (950 ft) | 366 m (1,201 ft) |
| Beam (width) | 32.31 m (106 ft) | 51.25 m (168 ft) |
| Height (above the waterline) | 57.91 m (190 ft) | 57.91 m (190 ft) |
| Draft (below the waterline) | 12.04 m (39.5 ft) | 15.2 m (50 ft) |
Activity Outline
- Each team of two students will design and build a Panamax compliant boat to carry the cargo in both empty and full locks and pass under the bridge.
- Teams will buy materials to construct their design. They’ll get Boat Bucks and a shopping list.
- All students can look at the materials in the store before it opens.
- When the store opens, only one person at a time per team can go there to buy.
- The boat has to fit inside the empty “lock” with at least ½ inch clearance at each side, front, and back. They must check the size of their boats in the empty lock boxes.
If students are working in pairs let them choose partners now. If numbers are uneven, allow a team of three, but only one. Alternatively, if you have volunteer students to spare one could be paired with the odd student.
Design and Build (35 min)
Give each team of students a tray, or direct them to work stations.
Volunteers not manning the store supervise and assist, especially to ensure teams routinely check their boats to make sure they are the correct size. You don’t want any team to be unable to test because their boat was too large.
Allow about five minutes for designing, at which time you open the store, thirty minutes for building (close the store after twenty-five minutes), and fifteen minutes for testing. This assumes one “lock” per three teams. Fewer “locks” will require more time for testing. Teams that aren’t quite ready for testing can keeping working for a few minutes more while others test.
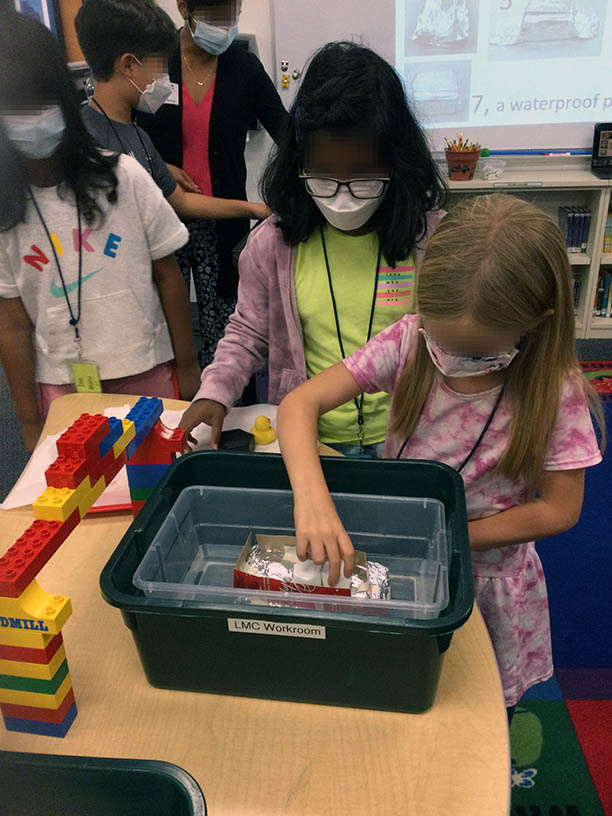
Boat Testing (15 min)
Every trial starts with one inch of water in the lock. Allow the builders to launch their boats and place the cargo. The cargo can be placed anywhere on the boat. No part of the boat can touch the bottom of the lock. The volunteer in charge slowly adds water until it reaches one inch from the top of the lock. The boat must carry all the cargo without sinking or capsizing. No part of the boat or cargo can touch the bridge. Any boat that passes these tests is declared “Panamax compliant”.
Empty the lock between tests. Use a large pail if there is no sink in the room.
If the Panamax Challenge follows The Great Boat Float Challenge on consecutive weeks, the cargo can be changed, especially if the materials remain the same. Since the children will have boat-building experience, consider making each team’s cargo the next full 100 gram weight above their best results in The Great Boat Float. If a team fails, give them two more boat bucks to redesign the boat and try again. If a team is successful, give them two more boat bucks and challenge them to redesign their boat to hold 100 grams more.
Closing
If you have time, ask the students what they would do differently if they could build another boat.
Clean Up
Retrieve reusable boat building components, balls, cups, sticks etc., and discard the rest. Dry any metal items promptly to avoid rust.
How did your marine engineers do? Have any fun designs or stories to share? Discover some building supplies we didn’t mention but that led to interesting and creative boats? We’d love to hear it! Drop us a note or leave a comment!
Updated 22 October 2021


0 Comments