This activity introduces the concept of displacement and buoyancy as it relates to boats and ships, and then lets students put this knowledge into practice by designing and building model boats to hold as much weight as possible without sinking or capsizing.
Supplies Needed
Reusable
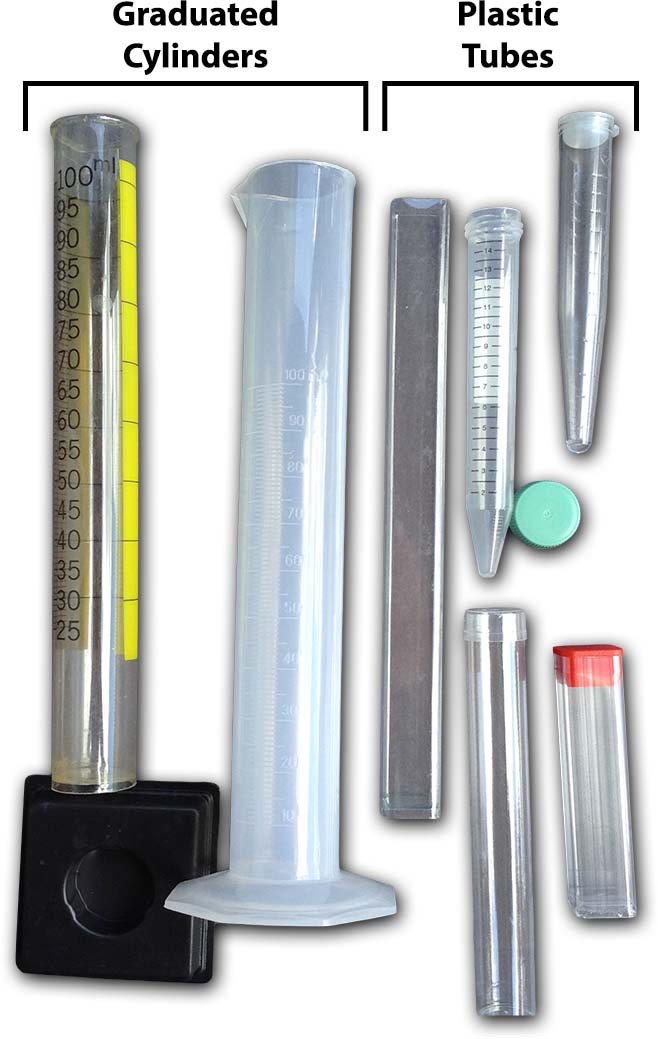
- Graduated cylinders
- Plastic tubes
- Assorted dense objects
- Electronic balances
- Cafeteria trays (optional)
- Scissors
- Rulers
- Pencils
- Waterproof weights
- Container(s) for testing
- Boat size guide
- Pictures of boats and ships, ancient and modern, some with cross-section views
Consumable
- Boat building supplies (see below)
- Paper towels
- Scratch paper
Printable
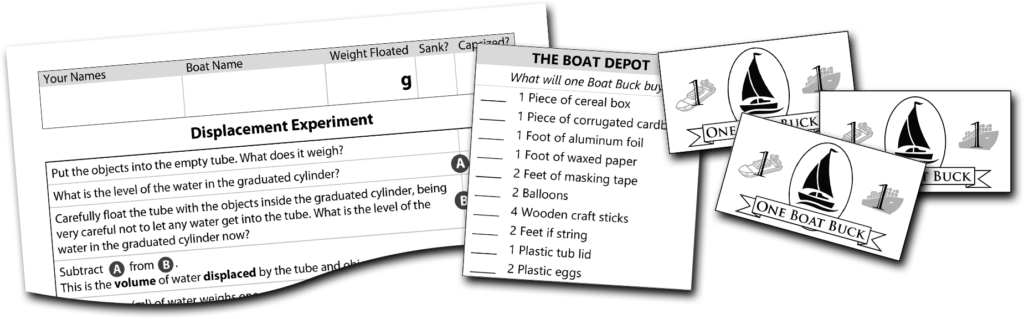
- Record sheets
- “Store” order forms
- Boat bucks
…for Displacement Experiment
Graduated Cylinders – If each pair/team of students is performing the density experiments, give each pair/team a 100 ml cylinder. If you’re running the density experiment as a single demonstration, use a single larger cylinder instead.
Plastic Tubes – These should be closed at one end and fit inside the graduated cylinders. The tubes do not all have to be the same. One tube per pair/team of students.
Assorted Dense Objects – These should fit inside the plastic tube. Examples are marbles, nuts, bolts, screws, etc. The quantity needed is determined by the plastic tubes used; i.e., test ahead of time to make sure the tube plus the objects won’t sink.
Electronic Balances – At least one, if running it as a demonstration (or for pre-weighing objects). One balance per pair/team of students, otherwise.
Cafeteria Trays – One per pair/team of students. These are optional, but very useful.
…for Boat Building
Waterproof Weights – (See our post on weights!) Learning Resources plastic Hexagram weights are a good choice. They are indented for easier stacking. Metal washers or nuts also work, but marbles or other spheres should be avoided because they roll off of many raft-style creations. Choose washers or nuts that are all the same size, if possible. 1000g of total weight per test station is probably enough.
Container(s) for Testing – This needs to be deep enough to allow sinking without overflow, and wide enough surface area to permit capsizing. A 32 quart (~30 liter) storage bin or similar container works well. If your group is larger, consider having two containers. One team can be testing in one while someone is fishing the previous boat and weights out of the other.
Boat Size Guide – Think of those bins for checking the size of carry-on luggage at the airport. Find or make a container that the boats must fit inside. This ensures that boats will be able to float, and capsize, freely in your chosen test container.
Basic Boat Building Supplies – Aluminum foil, pieces of chipboard (such as cereal boxes), corrugated cardboard, waxed paper, masking tape. We recommend the chipboard and cardboard pieces be roughly 8.5″x11″ (the size of a standard sheet of paper).
Additional Boat Building Items – These can include water balloon sized balloons, plastic Easter eggs, 2-3 ounce (no larger) cups, plastic golf balls, small plastic food container lids, wooden craft sticks, plastic thread spools, ping pong balls, string
Printables
The link below contains printable files for the various handouts and customizable shopping list template used in this activity:
Preparation
Assemble supplies for the displacement demonstration or experiment. If you have the supplies and enough time, let the teams of students complete the displacement demonstration on their own. Once completed, they move on to boat design and construction at their own pace.
Set up trays or stations, one per pair/team, including a cylinder with water, balance, plastic tube, assorted dense objects, pencil, and record sheet. Test ahead of time to determine how much water should be in the cylinder, and how many objects to use.
If you do not have enough balances, weigh each pair’s/team’s objects and tube ahead of time. Record this on the sheets, making sure the sheets stay with the corresponding objects and tubes.
If doing a single demonstration for the group, test ahead of time to determine how much water should be in the cylinder, and how many objects to use. If time will be tight, consider pre-weighing the tube and objects.
Assemble the boat building supplies. In addition to corrugated cardboard, chip board, masking tape, waxed paper, and foil, choose five other items. More than ten choices can be overwhelming to some students. Cut the cardboard to size and a few pieces of foil and waxed paper. Set up your store. If this isn’t possible ahead of time have your volunteers do this during the gathering time.
Complete, print, and cut out shopping lists. Print and cut out Boat Bucks. Print record sheets.
Fill your test container(s) with about six inches (15 cm) of water. This should be enough for most boats, but it would be wise to have some additional water handy in case a boat manages to touch the bottom while still afloat.
This module is a good activity for pairs of students, but can be done with teams of three or four. If you are using teams of students choose them ahead of time. Put team numbers in the name tags. You might assign roles. For example, the oldest student could be the captain, the youngest the quartermaster (i.e., the one who goes to the store) and so forth. Include this information in the tags.

Running the Module
Introduction
Define displacement. Displacement represents the amount of water displaced, or pushed aside, by a ship, boat or barge. The weight of the water displaced is equal to the weight of the ship and its contents. A ship sinks when its weight is greater than the weight of water it can displace. This can happen if too much cargo is loaded onto the ship, or water gets in because the ship tips too far or springs a leak.
Activity Outline
Following the introduction, the activity begins with either a demonstration or experiment about displacement. After this, each pair/team will design and build a boat with the goal of floating as much weight as possible before sinking or capsizing.
- After the demonstration or after a team has completed the displacement experiment, they are given Boat Bucks and a shopping list for purchasing building materials.
- Teams begin designing their boats. All students may look at the materials in the store before it opens. Point out the location of your boat pictures, which may give them some clues for a successful design.
- When the store opens, only one person at a time per pair/team can go there to buy supplies.
- Students begin building their boats. Each boat must fit inside the guide (to ensure it can be tested properly). Students may try fitting their boats in the guide at any point.
- All boats and ships need names!
- After the building period is complete, teams bring their boats over for testing.
Displacement Experiment/Demonstration
If students are working in pairs let them choose partners now. If numbers are uneven allow a team of three, but only one. Alternatively, if you have volunteer students to spare, one could be paired with the odd student.
If the student pairs/teams are doing the displacement experiment, dismiss them to their stations to begin. Volunteers supervise and assist, remove the cylinder, objects, tube and balance when finished, and hand out six Boat Bucks and a shopping list to each pair/team.
Otherwise give each pair/team of students an experiment record sheet so they can follow along as you do the demonstration. Invite selected students to read the balance and the water levels for you. Afterwards give them their Boat Bucks and shopping lists to begin their design process.
Boat Building
Allow about ten minutes for the experiment; ten minutes for designing, after which time you open the store; thirty minutes for building (close the store after 25 minutes); and twenty minutes for testing. Teams that aren’t quite ready for testing can keeping working for a few minutes more while others test.
Boat Testing
Check to make sure that each pair’s/team’s sheet includes the students’ and the boat’s name. Allow the builders to launch their boats and add the weights. Remind them to place, not drop, the weights on their boats. Unless you have a lot of time don’t let students rearrange the weights once placed. Assign a volunteer to tally the weights as they are added rather than waiting to the end. If using identical washers or nuts you can record the number of items rather than the actual weight. Record the weight, or number of items, the ship successfully floated before sinking or capsizing. Post the tally of boat names and weights so all participants can follow the results.

Our other boat-building module, The Panamax Challenge, can be run on consecutive weeks with this one. If you do this, and especially if the materials are kept the same, the kids will have some boat-building experience under their belts and you can set their Panamax target as higher than their best Great Boat Float result. See that module for more details of how to integrate the two.
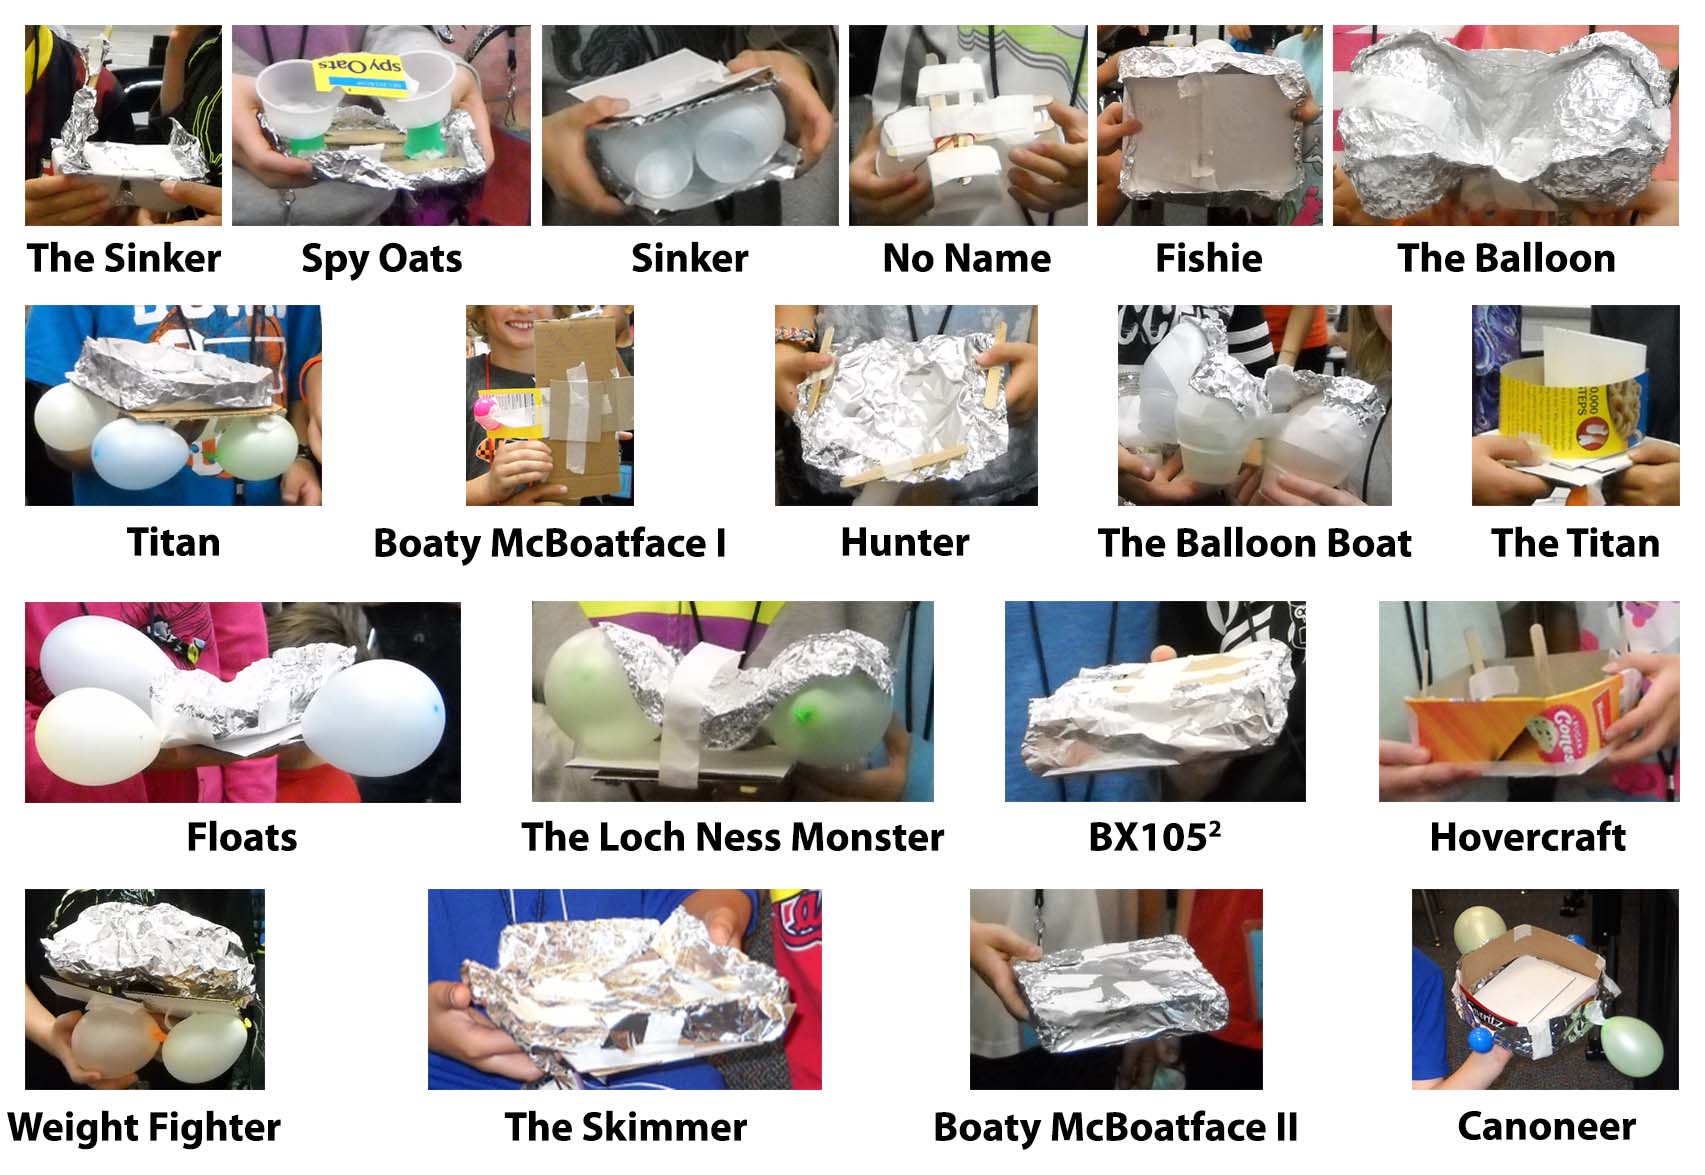
Example Results
For a little fun, we’ve included the nautical contenders (and their performance) from one run of this module at the local elementary school. The kids came up with a fantastic variety of interesting designs, some quite a bit more effective than others. “The Sinker“, it turned out, was aptly named while “Canoneer” led the armada, supporting just shy of a kilogram.

Clean Up
Retrieve reusable boat building components, balls, cups, sticks etc., and discard the rest. Dry metal items used for the experiment or as test weights promptly to avoid rust.
How did your nautical adventures go? Have any fun designs or stories to share? Discover some building supplies we didn’t mention but that led to interesting and creative boats? We’d love to hear it! Drop us a note or leave a comment!
Updated 22 October 2021


0 Comments