Many children today have only experienced digital weighing devices, black boxes that with the touch of a button magically display the weight of an item. This low cost, easy to prepare exercise lets children experience how people measured mass for thousands of years.
Supplies
Reusable
- 1x Lever* (see below)
- 1x Fulcrum* (see below)
- Weights (see below)
- 210x Pennies
- Pencils* + extras
- 1x Cafeteria tray* (optional)
- Electronic balance (optional)
- Modern balance scale (optional)
Consumable
- Masking tape
Printable
- 1x Worksheet*
- 1x Penny stack sheet*
- Pictures of modern triple beam and two-pan balance scales
*Per team of students
Lever
Various homemade lever options are shown below. This is not an exhaustive list: feel free to design your own, too!

Option 1: Paint stirring stick (potentially free from hardware or big-box stores) with centimeter scale printout attached with packing tape. Segments of craft (“Popsicle”) sticks are glued onto one end to accommodate commercial “hexagram” weights. If using nickels, the craft sticks would be adjusted accordingly. You can also use rubber bands as with the commercial rulers. The thick rubber bands from produce (e.g., broccoli) work great. A twist tie is used to hold the washers in place. Three one-inch washers weighs ~10 grams.
Options 2 & 3: Commercial ruler with holes. Use a twist tie to hold the washers in place. Rubber bands are placed on the ruler to accommodate hexagram weights (#2) or nickels (#3).
Option 4: Commercial ruler without holes. Use rubber bands to hold the washers and weights in place.
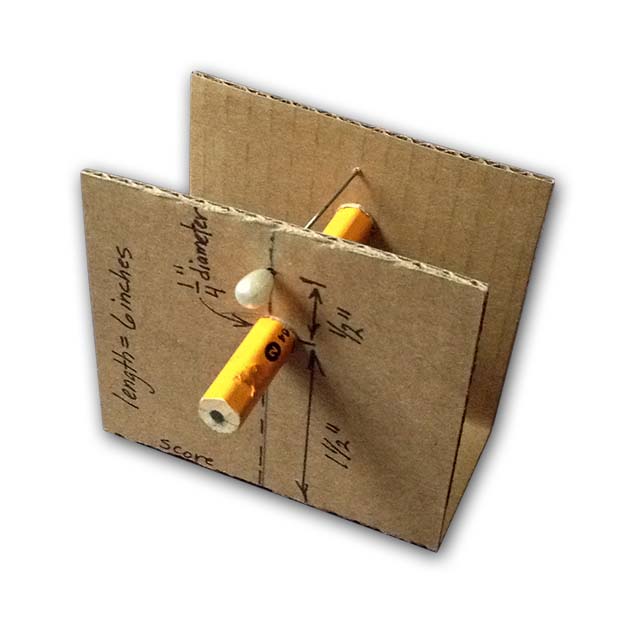
Fulcrum
- Thin corrugated cardboard, ~6 inches by 2.5 inches (~15.4 cm by 6.4 cm)
- Straight corsage, quilting, or other pin about 2 inches long (~5 cm)
- Pencil, pen, or dowel, at least 3 inches long (~7.6 cm)
Weights: Commercial weights or nickels minted in 1965 or later, so that students can calibrate their balances. Weights should range from 5 to 50 grams, in five-gram increments. In a convenient twist of fate, one nickel (minted 1965 or later) weighs 5.0 grams!
Pennies: At least 210. If possible, consider choosing only pennies minted after 1982 if you do not have an electronic balance. (They weigh 2.5 grams apiece.)
Printables
Printable versions of the worksheets, templates, and pictures can be downloaded using the button below. There are four versions of the worksheet, depending on whether the washers at attached at the low end (near 0 cm) or the high end (near 31 cm), and whether you are using nickels as weights or not. We’ve included a document that discusses which to use, as well as the differences in data that can be expected.
Preparation
Cut masking tape into ¼ inch wide strips (~0.65 cm). Tape stacks of pennies together with a single strip of narrow masking tape, from one to 20 pennies. Label the stacks with the number of pennies in each.
Using the electronic balance determine and record the weight of each stack on the answer key sheet. If you do not have an electronic balance, and you only use pennies minted after 1982, you can easily calculate the weight of each stack since each penny weighs 2.5 grams. If you have pennies minted before and after 1982 you will have to note the dates of the pennies in each stack because pennies minted before 1982 weigh 3.11 grams. The weight of the masking tape is negligible if you use a single, narrow strip.
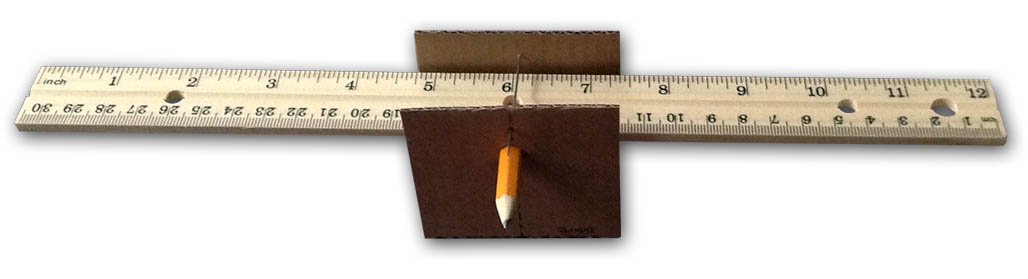
Construct the fulcrums. Mark the cardboard as shown (or use the printable template). Cut the holes for the pencil with a ¼ inch handheld hole punch. Pierce the cardboard with the pin. Score the cardboard. Fold on the score lines, insert and insert the pencil. If the pencil has a hexagonal rather than circular cross section make sure a vertex, rather than a side, becomes the surface on which the lever will rest.

Prepare the levers. If you are using paint stirrers instead of commercial rulers, print centimeter scales, cut, and attach to the center of the stick using glue and packing tape. Glue or tape the scales to the center of the wooden strip.
Attach the rubber bands to the rulers or paint sticks as shown in the diagram. If the ruler already has a hole close to one end you can skip the rubber bands on that end and use a twist tie attach the washers securely to the printed side.
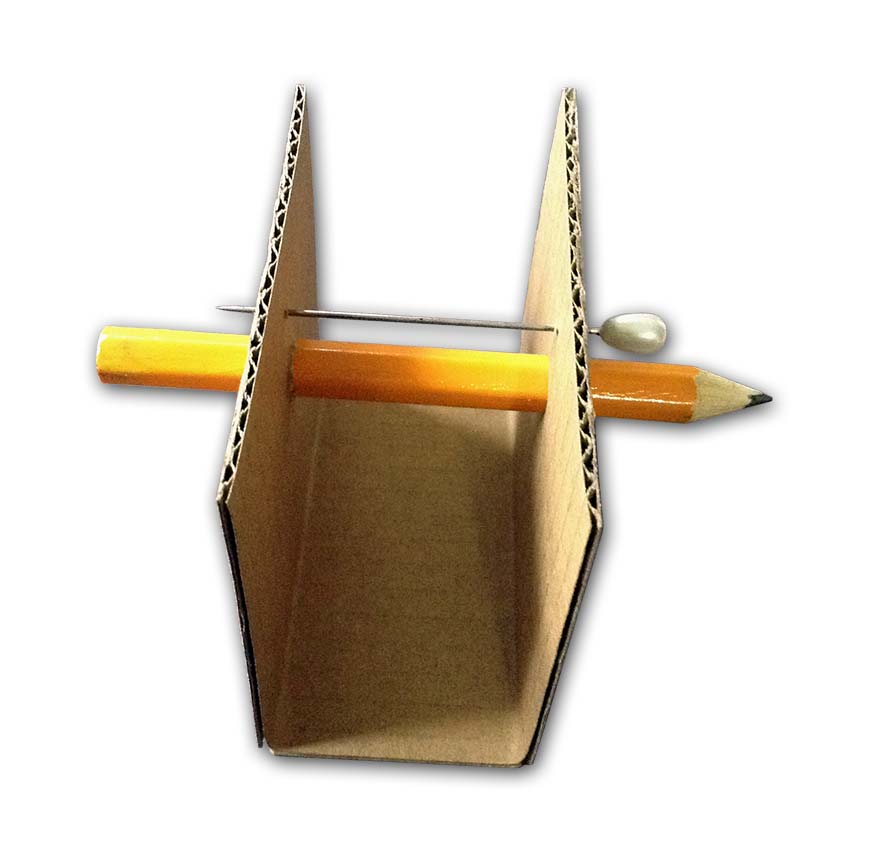
Place a lever onto each fulcrum, and insert the pin.

Print a worksheet for each team of students.
Print completed penny-stack answer sheets, enough for one answer key per team when cut apart.
On each cafeteria tray or at each work station place a prepared ruler on the fulcrum, 10 nickels or one five, two ten, and two twenty gram hexagram (or alternative) weights, a pencil, and a worksheet.
Make sure your volunteers understand how to use the balances, how to plot the calibration data points, and how to determine the weights of the unknowns from the calibration curve.
Print the triple beam and two pan balance pictures. Prepare to discuss what happens if you use only two points to calibrate. (See our post on this issue for suggestions!)
Running the Module
Introduction (≤10 minutes)
Balance scales are based on levers, and are the first way people determined the weight of an object. Archeologists have found evidence of these from 2400 – 1800 BCE (BC) in the Indus Valley, and they were likely in use long before that. For 4000 years, until the 1600s CE (AD), all scales were variations of balance scales. Balance scales are still in use, and can be extremely accurate. Today we are going to experiment with a simple version of a balance scale. First you will calibrate your balance by weighing items of known mass. Then you will use your balance to determine the weight of unknown items.
Demonstrate how to use the balance and plot a data point on the worksheet. A diagram of how the the lever balance is used is shown below:

Notes:
- All balances must be calibrated. That’s the first thing we’re doing today. Show the calibration knobs on the pictures of the triple beam and two pan balances.
- Every balance is just a bit different from any other so data points taken on one team’s balance cannot be used for another. You cannot share your results!
- Students must not make any changes to the balance during the experiment such as moving the rubber bands.
- Penny stacks should be placed equidistant from the two rubber bands.
- It is difficult to get the lever to balance perfectly so, for example, if the levers tips to the right at 16.1 cm, and to the left at 16.2 cm record the balance point as 16.15 cm.
Data Gathering — Steps 1-3 (30 min)
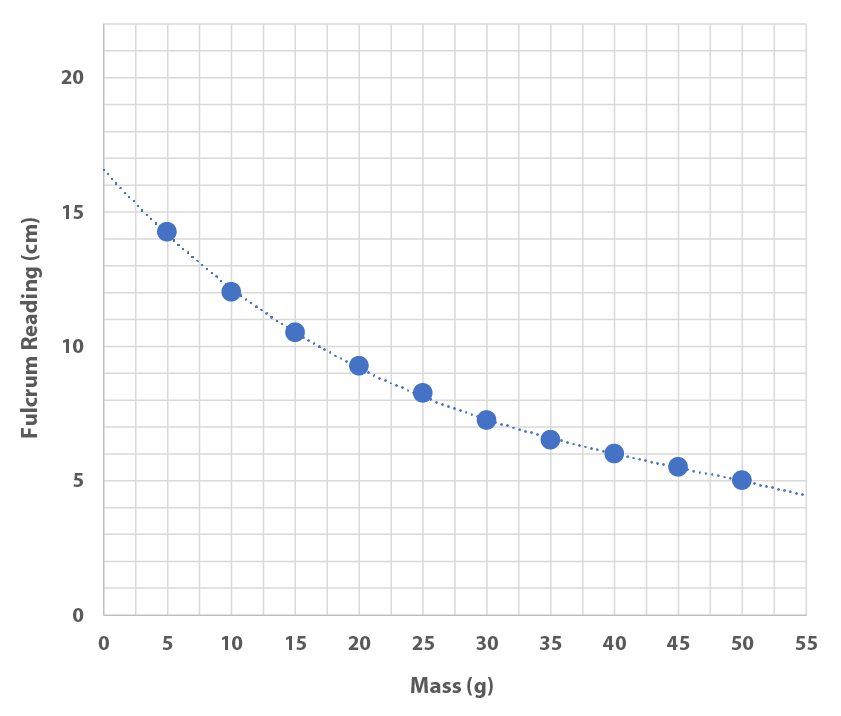
Teams work at their own pace following the instructions on the worksheets. In Step 1, teams will measure ten known weights (see table), which they will plot in Step 2 in order to create a calibration curve (see plot). Younger students may need help plotting their data points to create their calibration curves. Watch for teams that are falling behind that may need a little extra help. If need be, teams can weigh a few penny stacks before they complete plotting their calibration curves.
In Step 3, teams will test as many of the penny stacks as they have time for (at least 2-3). You want to ensure that every team has time to measure at least two or three penny stacks. Ideally, teams should test at least one smaller, one mid-range, and one larger stack.
| Weight (g) | Fulcrum Reading (cm) |
|---|---|
| 5 | 14.25 |
| 10 | 12 |
| 15 | 10.5 |
| 20 | 9.25 |
| 25 | 8.25 |
| 30 | 7.25 |
| 35 | 6.5 |
| 40 | 6 |
| 45 | 5.5 |
| 50 | 5 |
Data Analysis — Steps 4-5 (10 min)
(Step 4) Using their calibration curves, teams determine the weights of the penny stacks they tested in Step 3. (Step 5) When finished, give each team an answer key so that they can compare the penny stack weights they estimated from their curves with with true values measured with an electronic balance. As seen in the example data set below, you can actually get decently accurate measurements, even with these simple setups. Of course, not every team’s estimates may be so accurate, which provides an opportunity for some excellent discussion for the Conclusion.

| Fulcrum Reading (cm) | Estimated Weight (g) | Real Weight (g) |
|---|---|---|
| 15.25 | 2.6 | 2.5 |
| 14 | 5.4 | 5.6 |
| 11.25 | 12.6 | 13.1 |
| 9.75 | 17.6 | 18.1 |
| 8.75 | 22 | 23.2 |
| 7.75 | 27 | 28.1 |
| 6.75 | 33.2 | 33.7 |
Conclusion (10 min)
Gather the students with their worksheets. Ask them to share their conclusions from Step 5.
- Where were the results most accurate, with lighter weights or heavier ones?
- What was the calibration curve like where results were most accurate, steep or shallow?
- What are possible sources of error? (Consider the location of the penny stacks on the lever, parallax error reading the scale, making changes to the lever, air currents, not calibrated accurately, etc.)
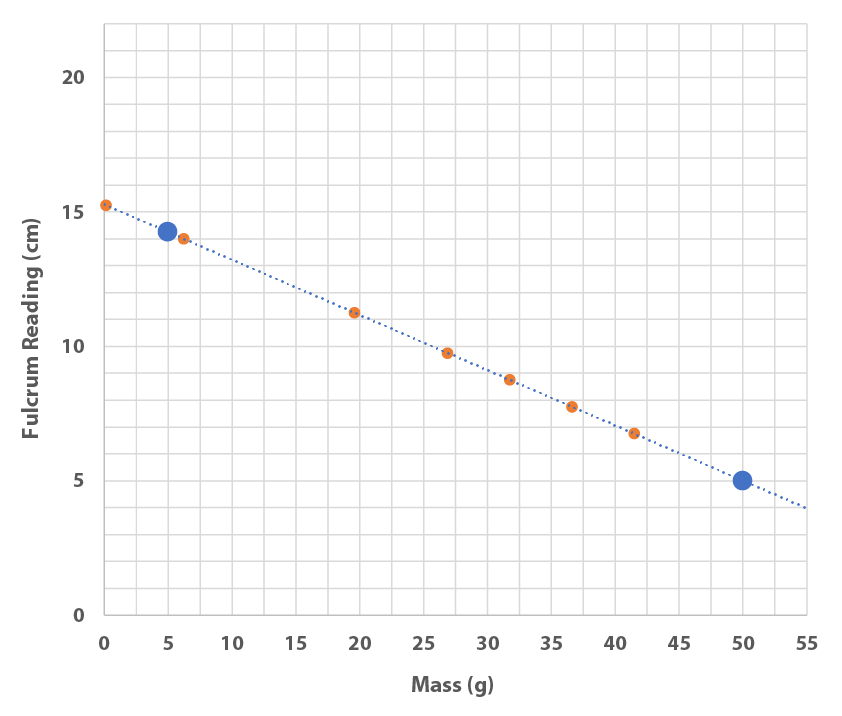
If time permits explore what happens if only two data points, 5 and 50 grams, are used to calibrate the balance. See what it does with our example data, from above:
| Two-point Calibration Estimated Weight (g) | Real Weight (g) |
|---|---|
| 0.1 | 2.5 |
| 6.2 | 5.6 |
| 19.6 | 13.1 |
| 26.9 | 18.1 |
| 31.8 | 23.2 |
| 36.6 | 28.1 |
| 41.5 | 33.7 |
Did you give this module a try? How did it go? Did you come up with new ideas for levers or weights? An improved balance design? Any tips for running the activity you think folks should know? We’d love to hear! Drop us a note or leave a comment!
Updated 23 October 2021


0 Comments