Mankind has been modifying naturally available materials to suit specific purposes for millennia. Pottery, fabrics, plaster, glass, and metal alloys were known thousands of years BCE. The classical Romans were masters of concrete, the Chinese invented modern paper around the 2nd century BCE. Linoleum was invented in 1855. The first plastic material, Bakelite, was patented in 1909. In the 111 years since then thousands of new materials derived from petrochemicals have reshaped how we live.
On the first day of this two-part module, students will determine the physical properties of assorted building materials using a range of hands-on tests. The following day, they will use that information to decide the best materials for constructing a given item or structure, pitching their designs to prospective “customers”.

*Preparation time is high the first time, due to building the test jigs, recording videos, etc. But for subsequent instances, the time cost is much lower, only needing to gather materials and prepare test samples.
**Day 1: For grade school, one helper per station to supervise. (Can reduce this number for older kids.) These are good opportunities for high school students. It is also useful to have one volunteer other than the leader or test supervisors available to check record sheets for completeness before assigning additional samples to teams. For Day 2, 1st and 2nd grade teams benefit from one volunteer per team, 3rd-5th perhaps one per two teams, and for middle school a few floating volunteers will suffice. The volunteers are largely involved with helping the younger students figure out the mathematics.
Suggested group size: Limited by the number of test stations. A good ratio is two pairs of students per testing station. Students test materials in pairs, but in groups of up to four students for the application phase.
Module Overview
Day 1
Pairs of students receive a bag of pieces of a material to test and a record sheet. They visit stations to determine certain physical properties of the material:
- Density
- Bending (Flexural) Strength
- Impact Resistance (Falling Dart)
- Impact Resistance (Falling Ball)
- Impact Resistance (Pendulum)
- Water Resistance to Soaking
- Water Resistance to Water and Oil Drops
- Insulation Capability
- Flammability
As time permits, the students can examine more materials.
Day 2
Teams of two to four students are presented with a task by a “customer”. They choose the materials based on the physical properties, relative costs, and weight. Teams present their proposals to the customer.
Supplies
The supplies required will depend on the stations used, and are described in that section. Potential materials are discussed in the Preparation section below.
Any necessary handouts and sheets can be downloaded using the button below:
Preparation
Materials Collection
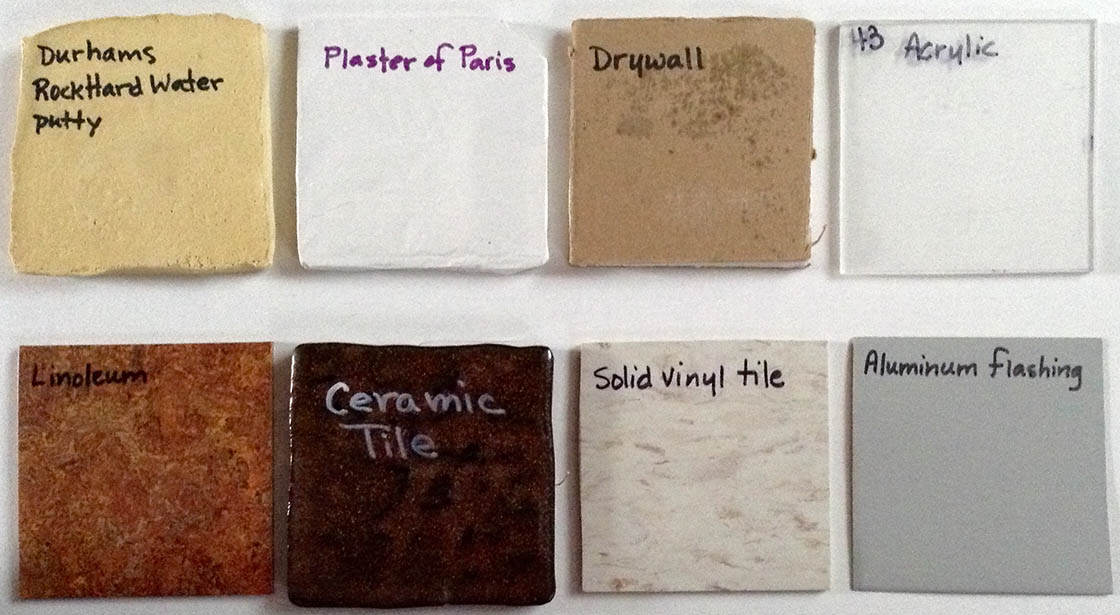
Materials to test are all around us. Foams both soft and rigid are used in packaging; individual floor and wall tiles can be purchased from home centers; aluminum flashing, wood product scraps, and other materials can be retrieved from project remnants. For most materials, choose thicknesses between 1/8 and ¼ inches. You want the samples to break! The exception is aluminum flashing, which will be about 1/16 inch thick, and expanded polystyrene, which can be a bit thicker.
Cast samples of plaster of Paris, Durham’s Rock Hard Water Putty, or Portland cement by pouring a ¼ inch thick layer into a flat, plastic film-lined pan. Tap the pan sharply against the tabletop to remove air bubbles and to level the mixture. Push pieces of chipboard (cereal box) into the wet material to form correctly sized test pieces and leave in them place until the plaster, cement, or putty sets. Break the material into individual samples along the chipboard. You may want to make extra 3″×½” pieces since these break easily if dropped or flexed by curious students.
If you don’t have commercial drywall (a.k.a. plasterboard, wallboard, etc), you can make your own by pouring the wet plaster onto chipboard. Tap the pan to remove bubbles, then press a second piece of chipboard onto the surface. Score the surface of the dried board, then bend and break the drywall into test pieces.
Similarly, foil-covered insulation board can be mimicked by gluing aluminum foil onto clean meat tray foam. You can also use aluminized tape.
Corrugated materials allow children to investigate the differences between samples cut crosswise and lengthwise to the corrugations. Discarded election yard signs provide plastic corrugated material. Shipping and packing boxes come in a wide array of corrugated kraft paper panels, varying in thickness and coarseness of corrugations.
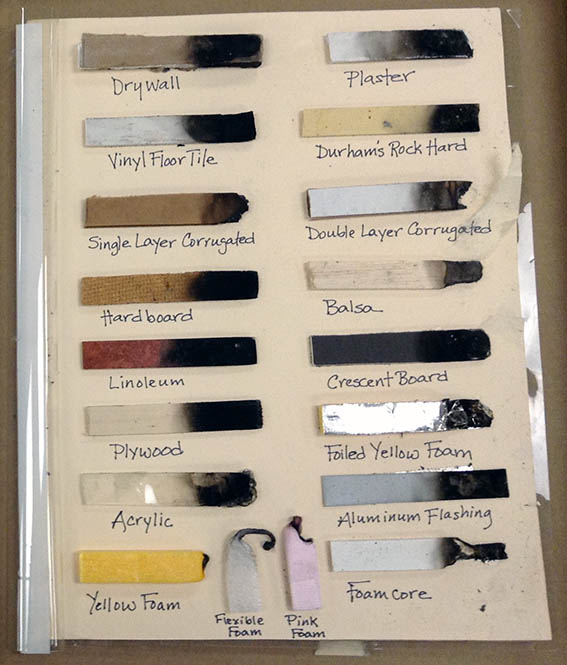
3″×3″ samples of successful materials we have used for this module are shown below (click to enlarge):


Sample Preparation
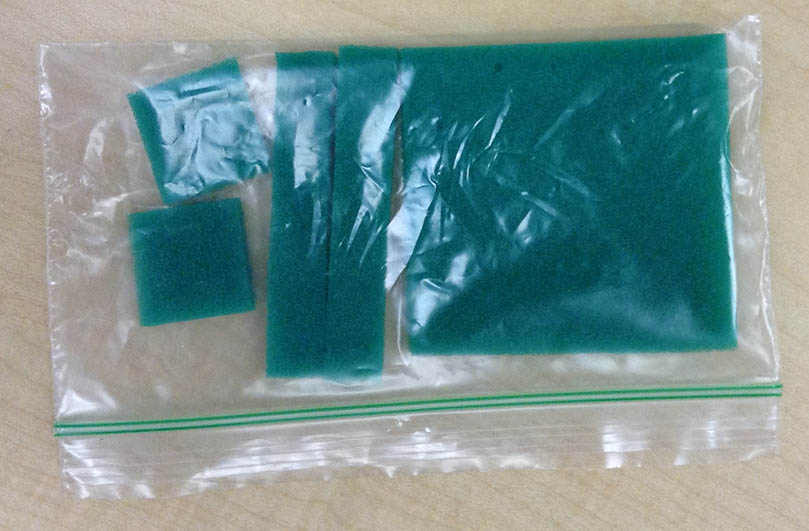
Cut sample materials into 3″×3″, 1″×1″, and 3″×½” pieces. For corrugated materials cut the 3″× ½” samples both crosswise and lengthwise. Place one 3″×3″ piece, two 1″×1″ pieces, and two 3″×½” pieces into baggies. For corrugated materials include two crosswise and two lengthwise 3″×½” pieces, and label which is which on the pieces themselves. Prepare an equal number of baggies of each material, and enough total bags so you’ll have three for each pair of students. Sample baggies for corrugated cardboard and a spongy foam are shown below:

Testing Day
Divide the students into pairs. If you have mixed ages match younger students with older students unless you have enough volunteers to both supervise stations and help younger students calculate. Issue each pair of students a sample bag and a record sheet. Each team should have a different material to start. Allow teams to visit the test stations in any order. After a volunteer confirms that all stations were visited, calculations made, and that the name of the material is recorded on the sheet, teams chose another material to test. Allow students to continue choosing new materials until the end of your meeting, even if there isn’t time for all tests to be completed.
The number and complexity of tests you choose depend on the time, equipment, number of volunteers, and the age of your students. Possible test stations are described in the next section.
Testing Stations
The procedure for each testing station and which samples to use are detailed in the printed worksheet. Students will use a new worksheet for each material they test.
Density
Students use a ruler to measure the length, width, and thickness of their largest sample in centimeters. If you have a caliper, use this for the thickness measurement. They determine the weight in grams using an electronic balance, then calculate the density in grams/cubic centimeter.
Bending (Flexural) Strength
Bending (flexural) strength — also called modulus of rupture — is a measure of how much stress a material can resist when bending before it breaks. The students will be comparing the strengths of the actual samples, so you don’t need to consider the relative thicknesses.
Equipment Needed:
- Bending strength jig (see our Construction and usage guide)
- Weights, some in the 20-50 g range, and enough in the 100-200 g range for a total of ~3000 grams
- Small plastic pail with a handle just large enough to hold those weights
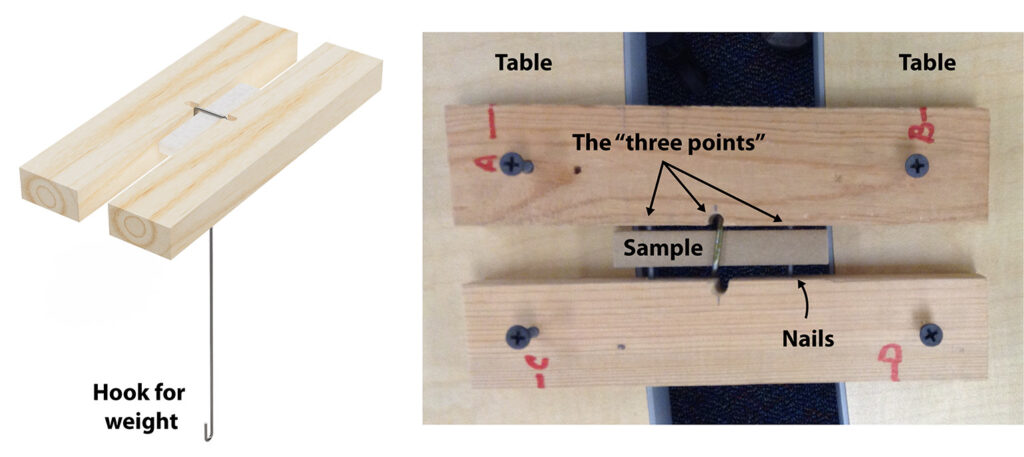
Suspend 3″×½” samples of the material through the hanger and across the two bars of the jig. The hanger should rest at the center of the sample. Attach the bucket. If the sample is relatively fragile add smaller weights to the bucket slowly until it bends enough to fall through the jig or breaks. If the sample is stronger add the larger weights more quickly. Remember to add the weights of the hanger and bucket to the added weights when calculating the breaking point.
Impact Testing
Impact testing allows to students to determine how materials behave when a load is applied at high speed. The three versions below are all used in industry (though with much fancier — and expensive — testing jigs); each provides a different view of a material’s impact resistance. A guide to constructing each of the testing jigs used in these stations can be found in this Toolbox post.
Falling Dart
Construct a falling dart test jig according to the guide here. Remember that the bottom opening must be the length of the dart plus one inch above the scrap wood or stack of cardboard used to protect the surface. Place a 1″×1″ sample on top of the scrap wood or cardboard directly under the tube opening. Students drop (not throw) the dart into the tube and record what happens when it strikes the sample. Did the sample crack, shatter, or dent? Did the point pierce through? Or perhaps the dart bounced off?
Falling Ball
This test is very similar to the falling dart test, using the same style jig, except a steel ball bearing is dropped instead of a dart. The protective stack of cardboard need not be as thick, and the space between the bottom of the tube and the sample should be about twice the diameter of the ball. Use the heaviest ball that will fall freely through your tube. I use a 67g steel ball one inch in diameter.
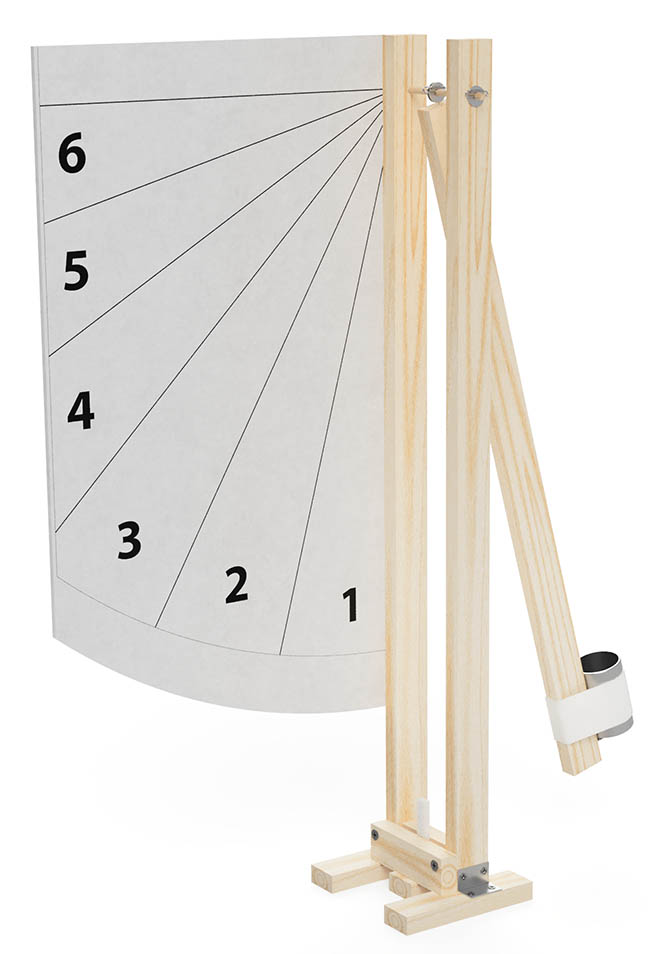
Pendulum Impact
This test is more involved, and the results not as reproducible, but the students love it. Construct the pendulum impact tester (see plans and usage in the toolbox). Clamp a 3″×½” sample into the tester as shown. One student draws the pendulum upwards until it is parallel with the table. The other student gets in position to observe how far the pendulum travels after striking the sample, that is if the sample breaks or bends enough to let the pendulum pass. On the signal, the pendulum is released. Did the sample stop the pendulum? Did it bend or break? If so, what zone did the pendulum reach?
Water Resistance
Water resistance tests let students determine if a material is suitable for outdoor use as-is or in applications where it may get wet, or if it needs to be protected by a waterproof coating.
Test 1: Drops
Place a drop of water on the surface of the bending strength sample after its been tested for strength. Does the water soak in, or does it form a bead and/or roll off? Students can also explore what happens when a drop of oil is placed on a sample.
Test 2: Soaking
The day before your activity record the weight and thickness of one 2″×2″ sample of each material. Submerge them in a tray of water. You will have to put a pebble, stack of pennies or some other mass to keep those that float under water. The first pair of students to test each material will remove the sample, quickly pat the surface dry with a paper towel, then weigh it and measure the thickness being very careful not to squeeze samples that got swollen or mushy. They then calculate the percent change in weight and thickness. If any samples disintegrated students simply record that fact.
Insulation Capability
This is a rather subjective test which depends on the equipment you have on hand. Obtain an electric warming tray, the kind used to keep dishes warm on buffet tables. It must not get so warm that your plastic and foam samples melt.
Version 1 (With thermometer)
Obtain an infrared thermometer that takes the temperature of a surface without touching it. Record the surface temperature of the warming plate. Place the 3″×3″ sample onto the same place on the tray. Wait one minute. Then take the temperature of the center of the sample. Students compare the two temperatures. The larger the difference between the two temperatures, the poorer the thermal conductivity (how easily heat passes through) of the sample. Supervise the students closely to ensure they use the thermometer properly.
Version 2 (No Thermometer)
Place the sample on the hotplate. After one minute have the students touch the sample and record whether or not it feels warm.
Flammability
Understanding how a material behaves when exposed to a flame is very important when designing a safe structure or product. Young students, of course, should not handle flames, to avoid risk of burning themselves.
Equipment Needed (if running these tests in-person):
- Candle and matches
- Long metal tongs
- Timer(s)
- Bowl of water
- Printed “burning effects” key
If you have the option to take your activity outside to a sheltered location consider having an adult demonstrate a flame test on each sample while the students watch and record the time it takes for the material to ignite and quickly it burns. Use a 3″× ½” sample held in metal tongs. Light a candle, and have a bowl of water handy. Ask one or two students to operate timers. Start the timer when the tip of the sample touches the flame. Stop the timer when the sample starts to burn. Extinguish the sample by dipping it in the bowl of water, saving the sample for the students to examine. If a sample doesn’t ignite after a minute remove it from the flame.
After the tests, look at the samples that have been burned; what happened to the material? Did it burn a little? A lot? Merely turn black with soot? Perhaps it melted or turned to ashes. Or maybe it was entirely unaffected. A printable “key” for comparing the samples against has been provided.
If pre-recorded burnings are used, or if time or safety concerns prohibits even those, you can perform the tests ahead of time and attach the samples onto a stiff board for students to examine, as shown in the photo.
Application Day
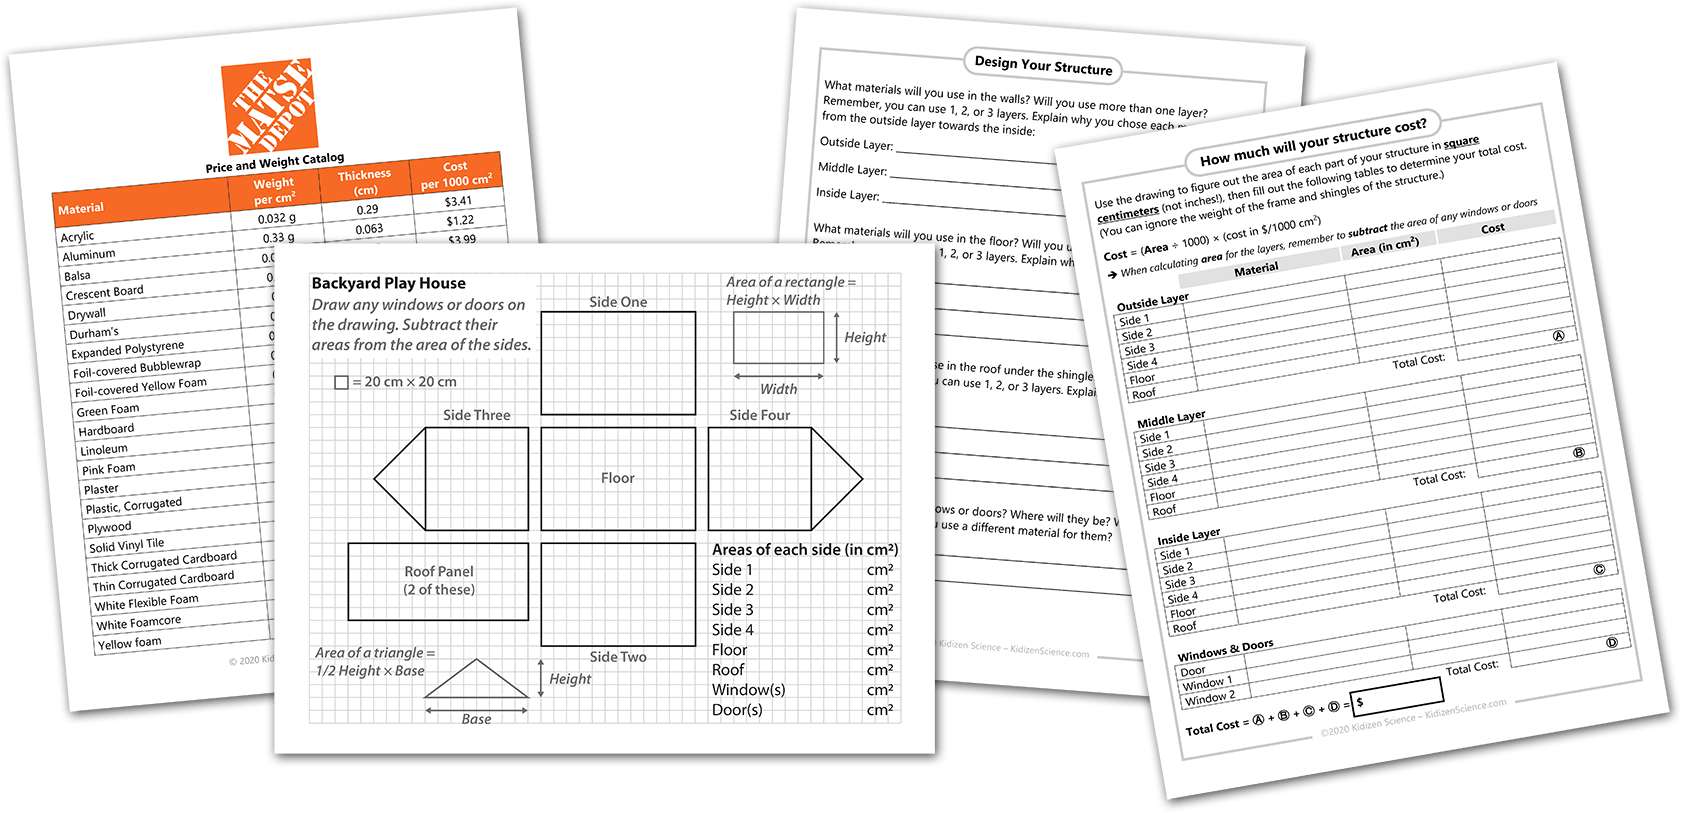
Form teams of three or four students of similar age. A “customer” presents the requirements for his or her project — such as a dog house or a camp kitchen — the teams design/propose solutions and pitch their proposals to the customer at the end. Teams receive the following:
- Table of all the tested materials with their properties as determined by the students on Day 1
- A “catalog” of materials, listing their approximate cost and weight per 1000 cm3
- A project blueprint (or blank graph paper, if designing their own)
- The three-page project design worksheet
Labeled samples of each material should also be available for reference. Two example blueprints (a storage box and a play house) are included in the printable handouts in the Supplies section, along with the worksheets and catalog.
Have available pencils, colored pencils and/or markers, rulers, scratch paper, larger paper for posters, and calculators.
Younger (1st & 2nd grade) students
The project is some sort of box such as a toolbox, camp kitchen, or dog bed. Teams choose materials to use, choose a name for the product, slogan, and logo. The presentation to the customer includes these as well as the explanation of why the materials were chosen. The customer awards the contract to the team which most thoughtfully considers the materials. The poster they make need not be large; the size of two sheets of office paper works well.
Older (3rd-5th grade) Students
The project is either a playhouse or a camp kitchen. Teams choose materials based on properties, then calculate the cost and in the case of the camp kitchen the weight. The customer awards the contract based on performance, cost, and weight.
Middle and High School Students
These students can choose their own projects and will make their own schematics. For the sake of time, the projects should not be too complex; angular designs are much easier to calculate than curvier ones. One team’s choice of designing an outhouse was a good idea. Their decision to add massive windows perhaps less so.
How did your materials scientists do? What tests did folks’ seem to enjoy? Did you come up with any new tests to run? Find some materials with interesting properties? We’d love to hear from you! Drop us a note or leave a comment!


0 Comments