This post of part of the Wind Turbines module (see Overview), and details the supplies and preparation required for the three versions of the module about using wind turbines to generate electricity, linked below:
Supplies
Disclaimer: We have no financial ties and receive no financial support or free/discounted supplies from any company mentioned in this activity. All recommendation comes from our personal experience.
Supplies for All Versions
Wind Turbine(s)
For 24 students, a minimum of two turbines (teams of four students, three teams per turbine). Three turbines is better (teams of four students, two teams per turbine).
The fewer teams using each turbine, the more trials students get to run. If you have the resources, consider building more turbines. A wind turbine to generate electricity consists of a DC motor and a hub to attach blades to the motor.
With fifteen years of experience teaching children about renewable energy, KidWind is an excellent and reliable source for supplies, background information, and plans. KidWind designed an inexpensive wind turbine for student use built from standard pvc plumbing pipe. It has the added advantage of coming apart for easy storage. The plans are available for free from their site. The same plans, without the useful background information, are also available from Popular Mechanics.
Hubs
One hub per team of students.
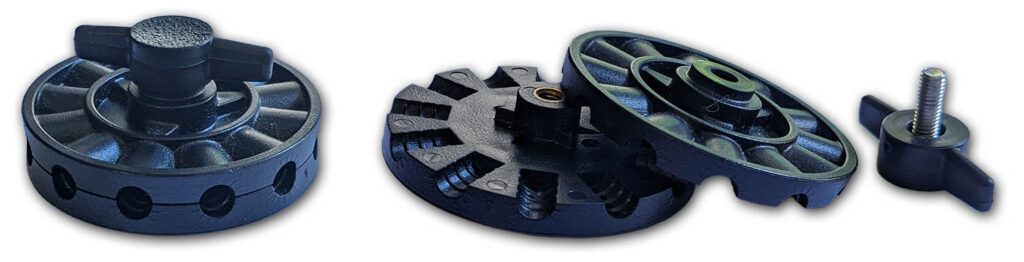
Hubs for electricity generation must attach to the shaft of your DC motor. If a hub is too loose it will simply spin on the shaft without rotating it. If it’s too tight you’ll have trouble exchanging hubs quickly. We’ve found the best option is the durable, twelve-hole crimping hub offered by Kidwind, shown below. They are easy to use and provide guaranteed good connections to your motor shafts. My 13-year-old hubs are as good as new, and well worth the investment.
We are finishing up a 3D-printable version of a 12-hole crimping hub, as a less-expensive alternative. The files will be made available here for free once complete.
MakeIt Toy hubs can be used, but must be modified to grip the motor shaft. One option is to get a piece of dowel as thick as the hub and slightly larger in diameter than the hole. Sand or file the dowel until it fits snugly in the hole, but not so tight that it will split the hub if pushed all the way into the hole. Do not glue it in place so it can be removed when not needed. Drill a hole in the center of the dowel perpendicular to the flat surface of the hub. Start with a 1/16″ drill. If too small to fit the motor shaft re-drill using a 5/32″ bit.

The hub inserts may get loose with repeated use. We suggest having extra modified hubs on hand, or spare sanded and drilled dowel segments for quick replacement of worn inserts. Keep a small hammer and nail set (punch) handy to remove worn inserts and tap in replacements.
Tinker Toy may also make hubs that would work, but we’ve not personally tested them.
Fans
One per turbine.
Electric fans provide the “wind” to power the turbines. The fans should be identical if you plan to compare results of blades tested on different turbines. If they aren’t, and your students are competing to make the best performing blades, you’ll need to retest your top candidates on the same turbine. Both floor fans and box fans work, but you’ll need to put the box fans on a table or counter to raise them level with the turbine hub.
Blades for Electrical Turbines
- Assorted blade material — Examples are 1/8-inch-thick foam core board, thin corrugated cardboard, 1/8-inch-thick balsa wood, chipboard, poster board, etc.
- Tools to cut the blade material safely — Sharp scissors, hobby/precision knives (e.g., X-Acto brand), etc.
- Wooden dowels for blades — Dowel diameter depends on the size of hole in the hubs use:
- 1/4-inch diameter for KidWind 12-hole hubs
- 5/16-inch diameter for MakeIt Toy. You will have to put a little masking or painter’s (preferred) tape over the dowel end for them to fit snugly into the hubs.
- ??? for Tinkertoy
- Glue — Use yellow carpenter’s glue for the two-day format and making the initial sets of blades. Use hot glue for student-designed blade assembly in the workshop setting.
Other Supplies
- Tape measure, yard stick, or meter stick — One per turbine
- Pencils — One per team plus extras
- Safety glasses or goggles — One per student and volunteer or several pairs peer turbine. If you don’t have enough for each person, only those wearing eye protection can be anywhere near the spinning turbine. All others must be out of the “line of fire” should a blade come out of the hub or come apart during testing.
- Duct or gaffer tape — For quick repairs on testing days
- Paper or whiteboard and marker(s)
- Multimeter with two alligator clip cables — One per turbine
- Twelve-inch/thirty-centimeter rulers — One per team
- 0° to 180° protractors — One per team, commercial or homemade (template included)
- Compasses to draw circles and curves (Optional)
- Record sheets
- Printed pictures or slide show of wind turbines and windmills, historical and modern (Optional)
Additional Supplies for Two-day and Workshop Formats
- Battery box and batteries — 2 to 4 AA batteries should work with your turbine
- Alligator clip cable — One per turbine
- Resistor or resistor board — One per turbine, preferably 5-10 ohms. If you don’t use a resistor (load) between the turbine and your meter, the amperage output will fluctuate, making it very hard to get an accurate reading.
- Printed picture or slide of a DC motor
- Picture or model of gear ratios
- Blade design sheet — One per team
Printables
Printable versions of all necessary record sheets, blade design sheets, protractor templates and such can be downloaded via the button below. For the two-day/workshop record sheets, two versions are included: a simpler one for younger students and one for older students.
Preparation
At Home
Assemble the components of the wind turbines (e.g., using the KidWind plans). This includes cutting the pipes, soldering the motors, etc.
Prepare the blades. This is time-consuming the first time you run this module. Thereafter, you need only to simply inspect the blades for damage and make repairs. The number of blades needed depends on whether you are using 12-hole (KidWind) or 8-hole (MakeIt Toy) hubs. The estimates below are for six teams of four students.
| Item | 12-Hole Hub | 8-Hole Hub |
|---|---|---|
| 1/4″ diameter dowels, cut 5 inches long. | 36 | — |
| 1/4″ diameter dowels, cut 7 inches long | 3 | — |
| 5/16″ diameter dowels, cut 5 inches long. | — | 40 |
| 5/16″ diameter dowels, cut 7 inches long | — | 4 |
| Triangles, 1.5 inch base, 5 inches high | 6 | 8 |
| Circles, 3-inch diameter | 3 | 4 |
| Circles, 2-inch diameter | 3 | 4 |
| Rectangles, 2″ x 4″ | 15 | 12 |
| Rectangles, 2″ x 8″ * | 3 | 4 |
| Rectangles, 1″ x 4″ | 3 | 4 |
| Squares, 4″ x 4″ | 3 | 4 |
*If your blade material isn’t stiff enough for a 2″ x 8″ blade, use 2″ x 6″ instead.
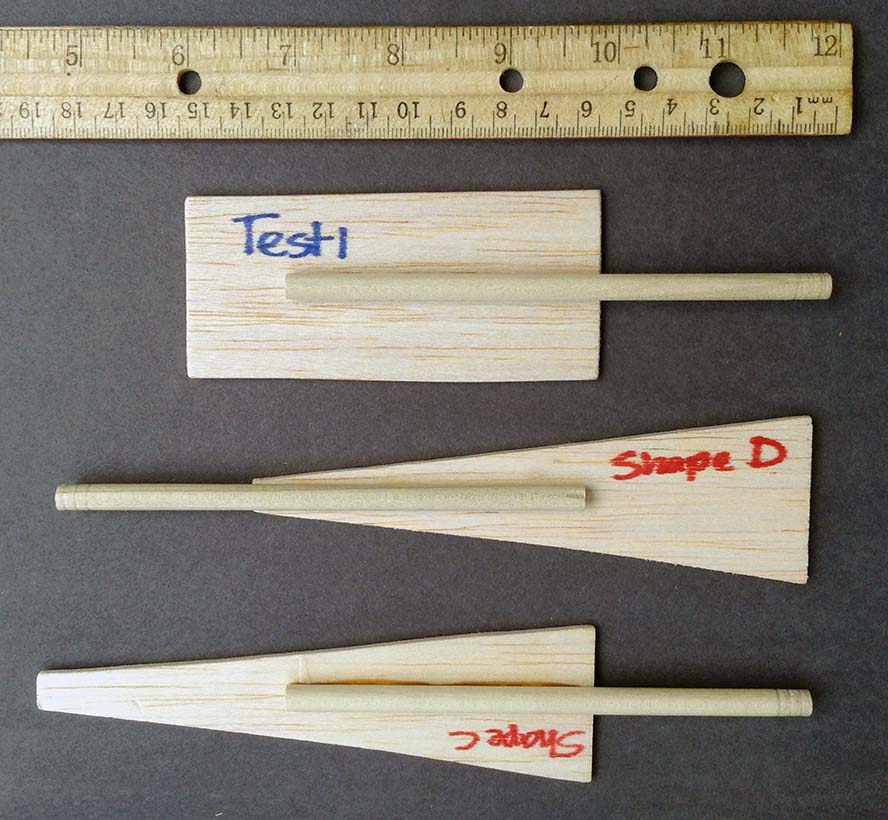

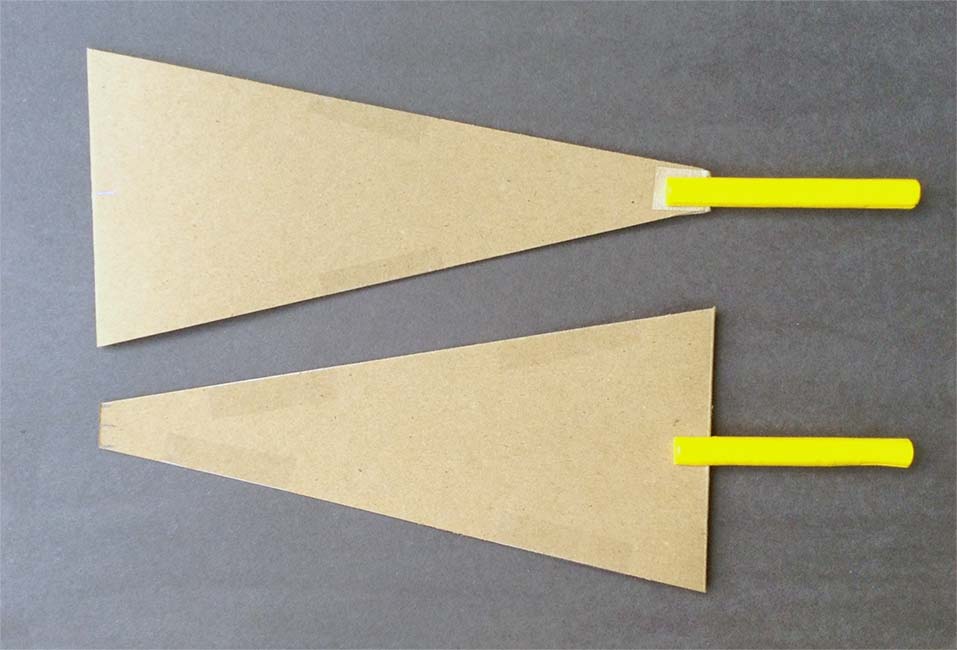
Glue the 7-inch long dowels onto three (four for 8-hole) 2″ x 4″ blades, leaving four inches exposed for the shaft that will go into the hub. Glue the 5-inch long dowels onto the remaining blades leaving two inches exposed for the shaft. For the triangle blades, glue three (four for 8-hole) with the exposed shaft on the base end, glue the other three (four for 8-hole) with the exposed shaft on the vertex. Clamp the dowels in place while the glue dries, or carefully lay books on top of groups of blades. (Laying a book on just one blade will often dislodge the dowel.)
Apply masking or painter’s tape to the free end of the 5/16″ dowels. One way is to cut 1/4 inch wide strips of tape about 1.5 inches long. Apply them one at a time over, not around, the end of the dowel. Test between each piece of tape until your dowels fit snugly enough not to fall out when the blades spin, but not so tight that the tape is torn when inserted. Then wrap one piece of tape around the dowel to cover and secure the exposed ends of the tape.
If using 8-hole hubs modify them as described earlier to attach onto your motor shaft.
If using the printable protractor templates, glue the protractor sheet(s) onto heavy cardstock or thin cardboard. Cut out when dry.
Print the appropriate record sheets. Identify on the record sheets which test(s) each team will do first. These will be Test 1 (blade number), Test 2 and Test 3 (drag), or Test 4 (pitch). This ensures that each test will have been done by at least one team before blade design begins.
Print blade design sheets for the two-day and workshop formats.
On Site
Final assembly of turbines from the components.
Determine the placement of fans and turbines. This importance of this step cannot be over emphasized. The centers of the hubs and the fans must be aligned, and one foot apart. This distance and alignment must be maintained for every test so students can compare results. Attaining this may require liberal use of stacks of books, fans on tables, turbines on the floor, turbines on chairs etc.
Make sure that fans can be plugged in safely. If you must use an extension cord take steps to prevent people tripping over it. If you are pre-selecting team members (advisable, especially for one day format and mixed ages) put team identification slips in the name tag lanyards.
Before the activity begins, show your volunteers how to always hold the motor in place with one hand while removing hubs. Remind them to make sure the hub and fan center are aligned and one foot apart before each trial, and to wait until the blades get up to speed before taking readings.
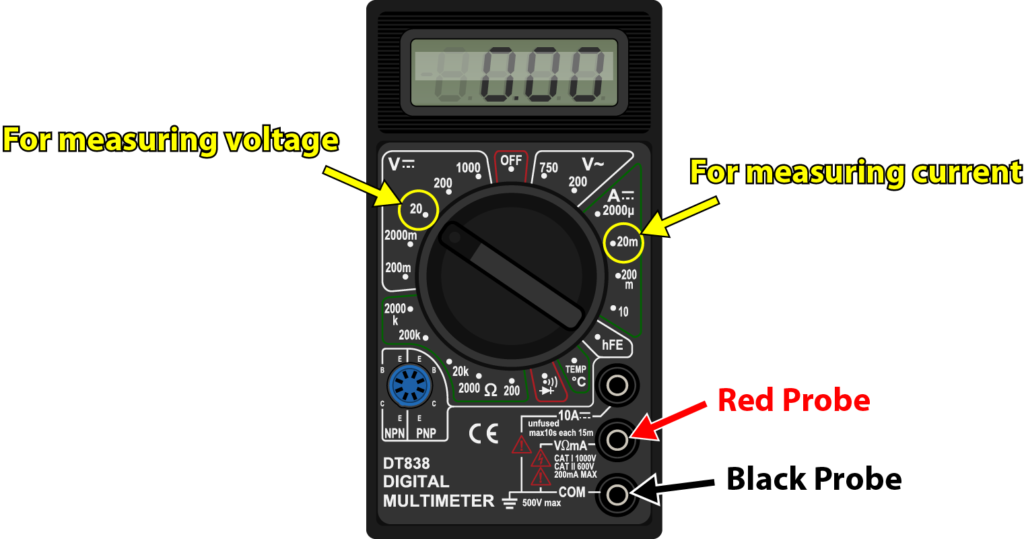
Make sure they know how to read the multimeter. Use these settings: black probe in com(mon), red probe in V ΩmA, DCV 20, and DCA 20m. Negative signs can be ignored; record the absolute value of any reading. Insert a resistor in the circuit if measuring current. If only measuring volts, you can omit the resistor.
Finally, remind your volunteers to always wear eye protection, and to make sure children do as well, or are kept out of harm’s way.
Now you’re ready to run the activity, as detailed in the links below!


0 Comments